Historic NSW Railway Photos
This page contains photos of a historic nature, defined as those which were taken at least 20 years ago.
[Display as: Thumbnails
Order by: Year]
| Abattoirs | 1982 | Abattoirs platform was situated on the north east side of the Metropolitan Meatworks. This afternoon worker service sporting one railmotor had only 6 passengers. |
| Aberdare Central Junction | 2004 | The remains of the base of the signal box controlling the junction. |
| Aberdare Central Junction | 2004 | The view facing towards the one-time junction. |
| Aberdare Central Junction | 2004 | The remains of the lifted Down Main, near the junction. |
| Aberdeen | 1996 | The original station nameboard. |
| Aberdeen | 1996 | The newer Countrylink-style nameboard. |
| Abermain | 2001 | The curved up platform, with recently re-painted name board. |
| Abermain | 2001 | The view of the down main and platform facing. The sign on the left once read "WHISTLE". |
| Abermain | 2004 | The view looking up the Down Main side of the platform. The one-time Abermain Colliery sidings were located among the trees on the right. |
| Abermain | 2004 | The remains of an old gangers shed on the colliery side of the station. |
| Abermain | 2004 | The base of the jib crane which served the goods siding at the down end of the station. |
| Abermain | 2004 | The location of the one-time goods shed at Abermain. |
| Abermain | 2004 | All that remains of the junction and start of the Abermain Railway Branch can be seen as a faint track through the undergrowth directly adjacent to the jib crane. |
| Abermain | 2004 | The general vicinity of the junction for the Abermain Railway. |
| Abermain No 2 Colliery | 2001 | The formation is barely visible among the trees as it nears the site of the one-time colliery. |
| Adamstown | 2003 | The view looking north towards Broadmeadow. Boradmeadow Yard is visible in the left distance. The partly lifted track in the left foreground is the former Down Relief line. |
| Adamstown | 2003 | The remains of the Down Relief line. The former branch to Belmont branched off beyond the station and climbed the hill in the middle distance. |
| Adamstown | 2003 | The view looking north. The remains of the Down Relief line are in the centre, with Broadmeadow Yard in the distance. |
| Adamstown | 2003 | The remains of the Belmont line not far from the one-time junction with the Main North. The tracks are visible as they cross Park Ave. |
| Adamstown | 2003 | The view looking south. |
| Adamstown | 2003 | Adamstown signalbox, at the down end of the station. Now used by a model railway club. |
| Adamstown | 1984 | Adamstown Box served the junction to the Belmont line, seen here in pre-electrification days. |
| Adamstown | 1984 | Adamstown diagram, the Belmont line can be seen to the lower left. |
| Adamstown | 1984 | The Adamstown to Dudley Junction Staff instrument. |
| Adamstown | 1984 | Tyers Block safeworking used for the "Mineral Line" (upper) and Broadmeadow Relief Line (lower). |
| Adamstown | 1984 | The small gate controls for the level crossing for St. James Rd. |
| Albert | 2001 | The view looking south towards the southern end of the yard. |
| Albion Park | 2004 | The view looking north along platform 1. |
| Albion Park | 2004 | The road-side approach to the station. |
| Albury | 1980 | Albury Station Signal Box. |
| Albury | 1981 | 42219 with a single passenger car works through the yard, in this view looking north from the Dean Street overbridge. |
| Albury | 1997 | The view of the impressive station building, looking in the direction of Melbourne. The tracks in the foreground are standard gauge. The broad gauge platform is behind the shelter at the left of the photo. |
| Albury | 1997 | The view of the yard to the north of the station. |
| Albury | 2002 | Albury station, as viewed from the street side. |
| Albury | 2002 | The still operational electric turntable behind the signal box at Albury. This was used to turn 3801 and 3830 on the Southern Steam Spectacular Tour. |
| Albury | 2002 | A view looking south from the overhead foot bridge. The old transhipping yards on the left. Note the "kinky" standard gauge 3rd track in the middle distance. The Southern Aurora carriages used for the Southern Steam Spectacular Tour are shown on the left. |
| Albury | 2002 | A view from the end of the long platform at Albury looking towards Sydney. N458 is in charge of a Melbourne express on the broad Gauge side and 3830/3801 is on the standard gauge side. |
| Albury | 1970 | Steam loco 5241 is working on the Up Yard shunting neck adjacent to Dalgety & Co's shed. |
| Albury | 1972 | A pair of 44 class locos wait to be detached from a southbound goods train outside South Box. The VR X class loco on the adjacent track will take the train the rest of the way to Melbourne. |
| Albury | 1972 | An unidentified 421 class loco at the head of the Sydney-bound Riverina Express service. |
| Albury | 1972 | The view looking north towards the Up Yard. Albury Station Box is just out of sight on the left, whilst the turntable is behind the ganger's shed on the right. |
| Albury | 1972 | A shot looking north of Albury Station Box. |
| Albury | 1970 | A pair of VR T class locos are waiting to depart for Melbourne in the Up Yard. |
| Albury | 2004 | The view looking north towards Albury Station Signal Box. |
| Albury | 2004 | The view looking towards the northern end of the yard. |
| Albury | 1971 | GM and 42 class sitting in the old carriage shed at Albury looking north. |
| Albury | 1972 | A pair of GMs head a northbound passenger service. |
| Albury | 1972 | S313 and 422 at Albury South changing trains. |
| Albury | 1972 | T411 waiting to depart Albury Yard for Dynon. |
| Alleena | 2004 | The silo and good loading bank, looking towards Rankin Springs. |
| Alleena | 2004 | The silo loop has been lifted in this part of the yard. Grain is now transported away by truck. |
| Alleena | 2004 | The silo loop, looking back towards Barmedman. |
| Alleena | 2004 | The silo loop, looking back towards Rankin Springs. |
| Alleena | 2004 | Only the disused loading bank remains at the location of the station. |
| Amaroo | 2004 | The view looking west down the line shows only the residence of the gatekeeper for the one-time gated level-crossing. |
| Amaroo | 2004 | The view looking back towards Sydney. The 347km post is visible in the middle distance. |
| ANL Terminal | 2004 | The view looking into the ANL terminal sidings. |
| ANL Terminal | 2004 | Another view of the sidings and containers. |
| ANL Terminal | 2004 | The ANL terminal sidings, dwarfed by container stacks. |
| Anzac Rifle Range | 2001 | A short piece of track embedded in Anzac Road denotes the location of the one time branch to the Ordnance and Depot sidings |
| Appleby | 2002 | The concrete platform is still visible under the grass. The 471 km post is actually mounted on the platform. |
| Arajoel | 1980 | The name board is leaning, and the station is deserted but still intact. |
| Arajoel | 1999 | The goods (left) and passenger (right) platforms, with the silo in the background. |
| Ardglen | 2004 | A number of wagon sit in the Ardglen Quarry sidings. The Ardglen loop siding is in the left foreground. |
| Ardglen Tunnel | 1990 | A track-side view of the down portal. |
| Ardglen Tunnel | 1993 | General view of the Up end of the Ardglen tunnel. The people are inspecting the tunnel in the tendering process to supply radiating cable through the tunnel for the Countrynet radio. |
| Ardglen Tunnel | 1993 | The Up portal of the Ardglen tunnel. |
| Ardlethan | 2000 | Only a few facilities remain at Ardlethan by this time. |
| Ariah Park | 2004 | The road approach to the GrainCorp silo. |
| Ariah Park | 2004 | A view of the platform and station building, looking towards Sydney. |
| Ariah Park | 2004 | A view of the rear of the station building. |
| Ariah Park | 2004 | The view looking along the platform in the direction of Sydney. |
| Ariah Park | 2004 | A wooden bench remains in the waiting room. |
| Ariah Park | 2004 | The 3-lever ground frame and diagram. |
| Ariah Park | 2004 | The track diagram mounted above the lever frame. |
| Ariah Park | 2004 | The 522km post, looking in the direction of Griffith. |
| Ariah Park | 2004 | The view from the station looking west past the Gents Toilet towards the goods shed and Roto. |
| Ariah Park | 2004 | The view looking west along the platform towards Roto. |
| Ariah Park | 2004 | The view of the goods shed, looking west. |
| Ariah Park | 2001 | The view looking west at the down end of the grain silo. |
| Armatree | 2004 | The base of a jib crane and silos mark the location. The one-time platform was on the right hand side of the main line. |
| Armidale | 2001 | An unusual location for an older-style station sign. |
| Armidale | 2001 | The car park on the road-side of the station building. |
| Armidale | 2001 | A closer view of the road-side architecture. |
| Armidale | 2001 | South-bound Xplorer set headed by car 2526 is stopped briefly at the station. |
| Armidale | 2001 | The rear of a south-bound Xplorer set, stopped at the station. |
| Armidale | 1999 | A closer view of the yard diagram at the station. |
| Arncliffe | 1998 | Arncliffe station, looking north from the footbridge. |
| Arthurville | 2004 | One of the short platforms remaining in the yard. station. |
| Arthurville | 2004 | The ruins of the signal box at the up end of the station. The ramp on the left once led from the platform. The inside is gutted. |
| Arthurville | 2004 | The view of the up end of the yard, showing a goods bank and the ubiquitous silos. |
| Arthurville | 2004 | Looking up the platform road, the station was in the left foreground in front of the signal box. |
| Asquith | 2001 | The view looking north along the up platform. |
| Attunga | 2002 | The view of the crane base and platform. |
| Attunga | 2002 | The view along the down-side platform, looking in the direction of Tamworth. |
| Auscott | 2002 | The Auscott siding, about 5km from Nevertire, serves a large cotton processing facility. The siding opened in 1995. |
| Auscott | 2004 | 4892 heading towards Nevertire on the Warren branch line near the Auscott siding. |
| Awaba | 2003 | The view looking north along the platforms. |
| Awaba | 2003 | Looking north from the Awaba foot-bridge. |
| Awaba | 2003 | Behind the up platform is the former branch to the Awaba State Mine and the Wangi Power Station. |
| Awaba | 2003 | Looking down the path as you leave the station you cross the former Wangi Power Station branch. |
| Awaba | 2003 | The view looking north at Awaba. The line on the right is the former branch to Wangi Power Station. |
| Awaba | 2002 | A southbound National Rail freight train headed by NR4 passes through the station. |
| Baal Bone Junction | 2004 | The concrete signal box controlling the junction. |
| Baal Bone Junction | 2004 | The concrete signal box controlling the junction. |
| Baal Bone Junction | 2004 | The view looking north. The colliery line leads off to the right. |
| Baal Bone Junction | 2004 | The view looking north. The colliery line leads off to the right. |
| Baan Baa | 2003 | The view looking north from the station to the silo siding. The former goods and loop sidings were located on the left side of the main line. |
| Balladoran | 2004 | All that remains is a large grain facility. The station was located at the position of the tree in the distance. |
| Balladoran | 2004 | The location of the one-time station. |
| Ballbank | 2004 | A low bridge near the location of Ballbank. |
| Balldale | 1980 | The station name is barely visible, and the building is in poor condition. However the grain siding appears to be still in use. Note the relatively unusual crossing path built of old sleepers. |
| Balldale | 2003 | The current state sees the station platform minus the station buildings. |
| Balldale | 2003 | The view of the track looking in the up direction towards Culcairn. |
| Ballimore | 2004 | The dead end siding at Ballimore looking towards Dubbo, with the main line on the right. |
| Ballimore | 2004 | The view looking looking east, away from Dubbo. |
| Ballimore | 2004 | The view of the goods ramp, looking east. |
| Ballina | 1933 | An historic view of Ballina station. |
| Ballina | 2001 | The pylons which are all that remain of the one-time bridge over North Creek Canal, just to the west of the town of Ballina. |
| Ballina | 2001 | A close-up of one of the pylons, with a commemorative plaque on it. |
| Balranald | 1927 | An old photo of the road-side view of the station building. |
| Balranald | 2000 | The fenced off and somewhat vandalised station building. |
| Balranald | 2000 | The unusually-coloured elevated water tank. |
| Balranald | 2002 | A close-up of the unusual brick and tile station building. |
| Balranald | 2002 | The view looking east along the remains of the station. |
| Bangalow | 2001 | Trains still pass along the branch although they no longer stop at the station. |
| Bangalow | 2001 | The view looking along platform towards Byron Bay. |
| Bangalow | 2001 | The view of station building, looking towards Casino. |
| Bangalow | 2001 | The view looking towards Casino. |
| Bangalow | 2001 | The view looking towards Casino. |
| Bangalow | 2001 | The view along the platform looking towards Casino. |
| Bangaroo | 2004 | The view looking down the line through the location. The remains of the goods shed in in the middle distance on the left. |
| Bangaroo | 2004 | The concrete base is all that remains of the goods shed. |
| Bangaroo | 2004 | The remains of a short platform of uncertain purpose. |
| Baradine | 1981 | 4853 has paused at the platform on its way north. |
| Baradine | 1981 | 4853 and van are stopped at the down-side station before continuing south. |
| Baradine | 1986 | By 1986, the station and platform had been demolished. Only the name board remained. |
| Baradine | 1997 | 48113 heads a wheat train picking up a load of grain at the silo at Baradine. |
| Barellan | 2000 | A view of the short platform and safeworking building which still remain at Barellan. |
| Bargo | 2001 | A 2-car Endeavour set leaves the station on its way north to Sydney. |
| Bargo | 2001 | The ticket machine at the up platform entrance. |
| Bargo | 2001 | The down platform, looking in the direction of Moss Vale. |
| Bargo | 2001 | The up platform, looking in the direction of Moss Vale. |
| Bargo | 2001 | The remains of the yard at the north end of the station. |
| Bargo | 2001 | The rather utilitarian demountable used by the station mistress. |
| Bargo | 2001 | The modern fencing, bin and signage which is typical of a refurbished CityRail station. |
| Barmedman | 2004 | The remains of the station, looking towards Temora. Only the nameboard and staff hut remain. |
| Barmedman | 2004 | The staff hut and truncated platform remains. |
| Barmedman | 2004 | The view looking down the line. The station remains are on the left, with the jib crane base in the centre. The goods shed was located on the right. In the distance is a level crossing and the junction for the Rankins Springs branch. |
| Barmedman | 2004 | The ground frame controlling the junction for the Rankins Springs branch. |
| Barmedman | 2004 | The Rankins Springs branch has been temporarily closed due to unsafe conditions, however there is no date set for repairs. |
| Barmedman | 1981 | A pair of "Tin Hares" are stopped adjacent to the C Frame at The Temora end of the yard. |
| Barmedman | 1981 | The view looking up the line as a diesel railmotor approaches the yard. |
| Barmedman | 1981 | Diesel Rail Motor 16 is stopped in the yard. |
| Barmedman | 1981 | A Tin Hares has stopped in the mist. The former station is hidden in the mist behind the railcar. |
| Barmedman | 1981 | A pair of Tine Hares have stopped to change points in the yard. |
| Barnes | 1925 | An historic photograph of railmotors passing at Barnes. |
| Barnes | 1927 | A old photograph of Barnes, looking south towards Moama. |
| Barnes | 2002 | The lever frame and pulleys which control the signal and points at the junction of the Balranald line, which branches off to the left. |
| Barraba | 2002 | The view looking over the yard area, in the direction back up the line. |
| Barraba | 2002 | The station nameboard now announces the town. |
| Bathurst | 1981 | A view of 4916 in the yard, which is still wet after a passing storm. |
| Bathurst | 2001 | The impressive station building from the street side. Bathurst has always been an important rail location. |
| Bathurst | 2001 | The rather overgrown view of the down platform, looking towards Blayney. |
| Bathurst | 2001 | The signal box on the Sydney end of the up platform. |
| Bathurst | 2001 | A sign describing the restored locomotive 5112. The loco was actually removed from the location quite a while ago. |
| Bathurst | 2001 | Bathurst station still possesses an older-style station signpost. |
| Bathurst | 2001 | A heritage sign at the station commemorating its opening when the Main West line reached here in 1876. |
| Bathurst | 2001 | The dock siding and platform, behind the up platform. |
| Bathurst | 2004 | The subway leading to the now-disused platform 2. |
| Bathurst | 2004 | The entrance to the disused subway. |
| Bathurst | 2004 | The standard Countrylink signboard on the platform. |
| Bathurst | 2004 | The emergency services diagram, located on the front of the station building. |
| Bathurst | 2004 | The nameboard from Kelso now resides at the Bathurst Miniature railway. |
| Bathurst | 2004 | An older edition of the station signboard, on the disused platform. |
| Bathurst | 2004 | The shelter on platform 2, no longer in use. |
| Bathurst | 2000 | 4852 arranging louvred vans for the daily shunt to Uncle Bens at Raglan. It has detahced from the train, visible in the distance on the old Down Road, and is running down the main line. The Bathurst Railway Workshops can also be seen in the background, built on the site of the former loco depot (opened in 1981 or 1982). |
| Bathurst | 2000 | 4852 has had to run past Bathurst East Box and switch onto the road passing the former down platform. The old gasworks building is seen in the right background. |
| Bathurst | 2000 | 4852 arranging louvred vans for the daily shunt to Uncle Bens at Raglan. The assembled train has a guards van immediately behind the loco. This is possibly one of the last workings that still used a guards van as part of the consist. |
| Batlow | 1987 | This photo of the platform at Batlow was taken only 3 years after the last train ran. |
| Batlow | 1999 | The rather vandalised station building was still standing in January 1999. It has since been demolished. |
| Batlow | 1999 | The rear of the station building. |
| Baulkham Hills | 2004 | The remains of the cutting are all that is still visible. |
| Bee Siding | 2001 | The remains of the down main sit alongside the up main. The now-demolished platforms were located near the curve in the distance. |
| Beecroft | 2004 | The up platform looking towards Cheltenham. |
| Beecroft | 2004 | The down platform looking towards Cheltenham showing the old goods platform on the right. |
| Beecroft | 2004 | The view looking towards Pennant Hills. |
| Belford | 2003 | The pair of short platforms which make up Belford station. |
| Belford | 2003 | A close-up of one of the platforms. |
| Belfrayden | 1980 | This 1980 scene still shows some activity with freight wagons in the siding and a gangers trike at the platform. This shot is looking up the line towards Uranquinty. |
| Belfrayden | 2001 | The yard is almost completely covered in grass. This is the view looking towards Uranquinty. |
| Belfrayden | 2001 | The passenger platform is still present, with a goods platform directly opposite. |
| Bell | 2004 | The view approaching the western end of the platforms at Bell from the front of a Sydney-bound service. |
| Bell | 2004 | The view looking west across at the station. The near end of the building was housed the signal box, as evidenced by the opening in the platform. |
| Bellata | 1997 | 8144 and 8227 are dwarfed by the silos at Bellata. |
| Bellata | 2001 | The station at Bellata boasts only a simple shelter and adjacent staff hut. |
| Bellata | 2001 | The staff and ticket box for the Bellata - Edgeroi section. The staff is present! |
| Bellata | 2001 | The staff and ticket box for the Bellata - Gurley section. |
| Bellata | 2001 | The Sydney-bound Xplorer (from Moree) has paused for a moment at Bellata to exchange staffs. |
| Bellbird Colliery | 2004 | The memorial to the Bellbird Mine disaster of 1923. |
| Bellbird Colliery | 2004 | The main line in the vicinity of the Bellbird Colliery, looking north. |
| Bellbird Colliery | 2004 | Preserved supports for the pit-top decking. |
| Bellbird Colliery | 2004 | The view looking up the line. In the distance can be seen the bridge which once carried the Kalingo railway over the branch at this point. It now serves a fire trail. |
| Bellbird Junction | 1995 | The distinctive 3 arm signal that once stood on the mainline to Cessnock at Bellbird Junction & showed the settings of the various junctions at this location. The gap between the signal post & the surviving line is the site of the down main which was taken out of use between Caledonia & Bellbird Junction in 1973 with the closure of the section to Cessnock and the Bellbird Junction Signal box. With the closure of the signal box the staff machine was transferred to Caledonia. The Signal post along with all other redundant signal posts on the SMR has since been removed. |
| Bellbird Junction | 1995 | The remains of a non-air coal wagon at the site of the runaway siding at Bellbird Junction. Most of these remains have since been removed. |
| Belmont | 2002 | The heavily overgrown wooden platform is all still evident. |
| Belmont | 2002 | The view looking away from the terminus. On the right hand side was the one-time goods siding and shed. |
| Ben Bullen | 1986 | A shot of Ben Bullen with the signal box and semaphore signals still present. |
| Ben Bullen | 1996 | 5910 climbs up the hill and through Ben Bullen station on a RTM charter to Clandulla. |
| Ben Bullen | 2001 | Another view of the unrestored and forlorn station, looking south in the direction of Wallerawang. |
| Ben Bullen | 2002 | The up-side platform at the north end of the one-time loop siding. The station is visible in the right distance. |
| Ben Bullen | 2002 | The platform looking south towards Wallerawang. |
| Ben Bullen | 2002 | The station building is quietly decaying. |
| Ben Bullen | 2003 | A front-on view of the station building. |
| Ben Bullen | 1993 | Ben Bullen loop from the Down end Looking toward the Up in November 1993. The loop was booked out at that time. |
| Ben Lomond | 1977 | Ben Lomond station, at 4473 feet above sea level, was the highest station in NSW before the Ski Tube opened. |
| Ben Lomond | 2003 | Ben Lomond station building, looking from the non-rail side. |
| Ben Lomond | 1988 | The view from a passing ballast train, when the track was still open and being maintained. |
| Bendick Murrell | 2004 | The view looking southwards. The line closest is a siding which served the silos and the grain shed. The line in the distance is the main line. |
| Bendick Murrell | 2004 | The goods bank, looking southwards. |
| Bendick Murrell | 2004 | The view looking southwards showing the silos and concrete base of the one-time grain shed. |
| Bendick Murrell | 2004 | The concrete base of the grain shed. |
| Berendebba | 2004 | The view looking north. The silo siding has been lifted. |
| Berendebba | 2004 | The view looking south. The junction of the silo siding and its lever frame are now gone. |
| Beresfield | 2003 | The view looking across to the down platform. |
| Beresfield | 2003 | The view looking east through the station. |
| Berowra | 2002 | Urban passenger set K60 has terminated at Berowra, and is now heading back south crossing over to the Up Main line. |
| Berowra | 2001 | The local panel at Berowra station. |
| Berrigan | 1998 | The platform and several tracks still remain at Berrigan station. |
| Berrigan | 1998 | Lever Frame "A" is still present next to Berrigan platform. |
| Berrima Cement Works | 2001 | The track leading up to the yard at the cement works. |
| Berrima Cement Works | 2001 | A closer view of the tail end of a train in the cement works, and one of the unusual concrete structures at the entrance to the yard. |
| Berrima Colliery | 2001 | The track beyond the cement works has been lifted, but the ballast still remains. |
| Berrima Colliery | 2001 | A section of track still remains where it is embedded in the road. |
| Berrima Colliery | 2001 | Some track and sleepers still remain adjacent to a road crossing. |
| Berrima Colliery | 2001 | Elsewhere the vegetation is starting to encroach over the track remains. |
| Berrima Junction | 1980 | Berrima Junction diagram and block instruments. |
| Berrima Junction | 1980 | Berrima Junction diagram in 1980. |
| Berrima Junction | 1980 | The view looking south from Berrima Junction showing the semaphore signals. |
| Berrima Junction | 2004 | The train indicator diagram at the junction between the main line and the branch to the Berrima Cement Works. |
| Berry | 2002 | The view of the station looking in the direction of Wollongong. |
| Berry | 2002 | The goods shed is still present in the yard. |
| Berry | 2003 | The view from the end of the platform looking towards Nowra showing the up siding and up siding frame. The main line is immediately to the left of the siding and the loop line (still in use) to the left of the picture. |
| Berry | 1985 | Berry frame and diagram in 1985. |
| Berry | 1985 | Berry frame and diagram in 1985. |
| Berry | 1985 | Berry station in 1985 gives a distinct country appearance. |
| Bethungra | 1980 | Bethungra Station sits quiet and peaceful in 1980. |
| Bethungra | 1980 | Bethungra Signal Box track diagram in 1980. Now all that remains is an emergency crossover and a few rusted tracks. |
| BHP Steelworks | 2004 | A preserved coal wagon from the John Darling Colliery. |
| BHP Steelworks | 2004 | A preserved BHP shunter near the entrance to the steelworks. |
| Billimari | 2004 | The view of the loading bank, looking back towards Cowra. |
| Billimari | 2004 | A low bank marks the location of the one-time station. |
| Billimari | 2004 | The silos at Billimari are still in use, albeit serving only road traffic. |
| Billinudgel | 2001 | The station building at Billinudgel has been turned around and used as a tennis court shelter. |
| Billinudgel | 2003 | The station building has been turned around and a verandah added. |
| Binalong | 1992 | A glass name plate on a window of Binalong Station. |
| Binalong | 1979 | The view looking in the up direction from the Sydney end of the station. |
| Binalong | 2001 | The view of the current station at Binalong. |
| Binalong | 2001 | Looking along Binalong station, from the Harden end of the platform. |
| Binalong | 2002 | An overall view of the station looking towards Yass. |
| Binalong | 2002 | A ground-level view of the island platform and building looking towards Yass. |
| Binalong | 2002 | Another view of the building, this time looking towards Harden. |
| Binalong | 2002 | A view of the building taken from the one-time horse dock platform, which was aligned at an angle to the main platform. |
| Binalong | 2002 | A view of the platform with Countrylink signage and the station building looking towards Harden. |
| Binalong | 2002 | A repeater signal, facing down trains. |
| Binalong | 2002 | The lever frame inside the signal box. |
| Binalong | 2002 | Another view of the disused lever frame. |
| Binalong | 2002 | The view of the signal box at the end of the station building. |
| Binalong | 1980 | Binalong diagram. |
| Binalong | 1980 | This shows the position on the platform of the repeater for signals 4 & 8 which are the home and starter for the down main. |
| Binalong | 1980 | Binalong station in busier times and with a more manicured garden. |
| Binalong (1st) | 2001 | The entrance of the original Binalong station, now a private residence. |
| Binalong (1st) | 2001 | The original station nameboard. |
| Biniguy | 2004 | The remains of the Down Home signal at the approach to the station. |
| Biniguy | 2004 | The view looking down on the concrete platform from the elevated grain siding. Visible in the yard are a 3-lever frame and the jib crane and goods bank in the distance. |
| Biniguy | 2004 | The basic concrete platform still has its nameboard. |
| Binna Burra | 2003 | The view along the overgrown platform, looking back towards Casino. |
| Binnaway | 1979 | The view looking up the platform in the direction of Sydney showing the typical signage, seats and baggage trolley of the period. |
| Binnaway | 2001 | A view of the interior of the staff hut on the station. |
| Binnaway | 1996 | A close-up of the signal diagram. |
| Binnaway | 2001 | The staff holder and ticket box for the Binnaway - Coonabarabran section (the staff is in use). |
| Binnaway | 2001 | The staff holder and ticket box for the Binnaway - Premer section (the staff is present). |
| Binnaway | 2001 | The staff holder and ticket box for the Binnaway - Merrygoen section (the staff is in use). |
| Binnaway | 2001 | The fairly utilitarian station building is only used for safeworking purposes. |
| Binnaway | 2001 | A view across the yard, showing the gantry crane is still present. |
| Binnaway | 1981 | A view looking across to the station when it was still in use. |
| Binnaway | 1917 | A photograph from the opening of the station in 1917. |
| Birdlip | 2000 | The main platform (left) and remains of the goods platform (right) lie in a paddock. |
| Birriwa | 2004 | The remains of the goods loading bank. |
| Birriwa | 2004 | The silos, looking back up in the direction of Sydney. |
| Birriwa | 2004 | The safeworking hut at the nearby level crossing. |
| Black Mountain | 1977 | The view along the station shows it was well tended at the time this photograph was taken. |
| Black Mountain | 2001 | A view of the well-preserved up-side station building. |
| Black Mountain | 2001 | The view looking north along the platform. Note the "A" lever frame is still present, although the one-time yard on the right is now lifted. |
| Blackalls Park | 2001 | The curved concrete platform, now covered in trees. |
| Blackalls Park | 2001 | The level crossing at the down end of the platform. |
| Blackalls Park | 2001 | The view looking back towards Fassifern. |
| Blackalls Park | 2003 | The view looking along the platform towards Toronto. |
| Blackalls Park | 2003 | A sign on the platform, advertising its use as a station from 1912 to 1991. |
| Blackheath | 2004 | The view looking along the platform towards Sydney. The object on the tracks in the distance is a Hi-Rail vehicle. |
| Blackheath | 2004 | The view from the footbridge looking towards Lithgow. |
| Blackheath | 2004 | The crossing arms are lowered as an up train approaches the crossing near Blackheath station. |
| Blackheath | 2004 | A mural on the eastern end of the station building advertising the annual Rhododenron festival. |
| Blackheath | 2004 | A photo of the original painting on the Sydney end of the station building at Blackheath. This was taken almost a year before Vern Treweeke repainted it. |
| Blacktown | 1991 | The interior of Blacktown Signal Box. |
| Blacktown | 2002 | The view looking along the platform serving the branch line to Richmond. |
| Blaxland | 2004 | The view looking down on Platform 2 and the Down Main from overhead bridge. |
| Blaxland | 2004 | The view looking down the Up Main along platform 1 (roughly east). |
| Blayney | 1979 | The nameboard for Blayney, junction for the branch line to Cowra and beyond. |
| Blayney | 2001 | The intricate wrought iron work on the disused back platform. This platform was used for passenger trains which headed down the branch line to Cowra. |
| Blayney | 2001 | Blayney still retains its old-style name board. |
| Blayney | 2001 | The view along the down side platform. |
| Blayney | 2001 | More of the stacks of container in the trans-shipment yard. |
| Blayney | 2001 | The well-maintained ticket office. |
| Blayney | 2001 | A plaque commemorating the re-opening of the branch line from Blayney to Cowra, in 2000. |
| Blayney | 2001 | Blayney is host to a busy container trans-shipment yard, opposite the platform. |
| Blayney | 2001 | The signal cabin is signposted by a Rail Access sign identifying the location as being 290.280 km from Sydney. |
| Blayney | 2001 | Another view along the back platform. |
| Blayney | 2001 | The modern nameboard indicates that this is a station served by Countrylink services. |
| Blayney | 2001 | The disused back platform. The track here is no longer in use. |
| Blayney | 2002 | The view looking along the platform. |
| Blayney | 2002 | Two 81s and a Victorian T class loco at the head of a container freight about to depart Blayney container yard. |
| Blayney | 2003 | A close-up of the remains of the turntable. |
| Bogan Gate | 1996 | The station at Bogan Gate is now used as a craft shop. |
| Bogan Gate | 2001 | The view from the eastern end of the yard looking west towards the silo complex. |
| Bogan Gate | 2001 | The view looking west. The station is visible in the distance under the inclined conveyor belt. |
| Bogan River Tank | 2003 | The location of Bogan River Tank, the foundations of which are to the left of the tree. |
| Bogan River Tank | 2003 | A close-up view of the tank's foundations. |
| Bogan River Tank | 2003 | About 100m south of the tank is the low bridge over the Bogan River. It is still in relatively good condition. |
| Bogan River Tank | 2003 | View over the Bogan River looking back towards Byrock, about 100m back from the Bogan River Tank. |
| Boggabilla | 1996 | The station building at Boggabilla has been abandoned to the elements. |
| Boggabri | 2001 | The station building. |
| Boggabri | 2001 | Another view of the station. Note the change in platform level. |
| Boggabri | 2001 | The view along the platform on a pretty unpleasant looking day. The view is looking in the direction of Moree. |
| Boggabri | 2001 | Trackwork is being performed in the area, as indicated by the hi-railer heading down the platform road. |
| Boggabri | 1999 | A view of the yard diagram. |
| Bolivia | 1977 | The weeds and well-worn nameboard are testament to the decline on this station. |
| Bolivia | 2001 | The view of the down side platform, looking back in the direction of Glen Innes. |
| Bolivia | 2001 | The view looking towards Wallangarra. |
| Bolivia | 2001 | The view looking towards Glen Innes. |
| Bomaderry | 2001 | The view looking up the line from the platform, on a quite overcast day. |
| Bomaderry | 2001 | The jib crane at the up end of the goods platform. In the background is a weighbridge; this was the one-time location of the Timber Siding. |
| Bomaderry | 2001 | The Nowra Dairy Company butter factory, which boasted rail access, lies at the down end of the yard. The razor wire in the foreground protects a siding used to stable rolling stock from vandalism. |
| Bomaderry | 2001 | Looking back from the Dairy Siding to the station. |
| Bomaderry | 2001 | The turntable is still in place. The buffers in the foreground mark the end of the dairy siding. The area beyond the turntable is used to stable rolling stock, and was the one-time location of the engine shed, water tank and ash pit. |
| Bomaderry | 2001 | The well-preserved jib crane at the up end of the goods platform, almost directory opposite the station. |
| Bombala | 1982 | The view looking towards the end of the line, showing goods shed, loading bank and main station. In the distance, wool is being loaded from a truck onto some wagons. |
| Bombala | 1982 | The goods crane is in action, with some farming equipment being offloaded onto a truck. |
| Bombala | 1982 | The view looking across the goods platform to the main station. |
| Bombala | 1982 | The view looking down the platform towards the terminus. |
| Bombala | 1982 | The view looking across to the station from the goods platform. |
| Bombala | 2000 | The platform and station buildings at Bombala are relatively well preserved. |
| Bombala | 2000 | Opposite the station is a large goods shed. |
| Bombala | 2000 | The goods crane is still present. Behind is the footbridge which served the station; it is still used to cross the yard. |
| Bombala | 2000 | The goods platform at the southern end of the yard. To the right is a gangers shed, and what appears to be a forge. |
| Bombala | 2003 | The view from the footbridge looking towards Sydney. The tracks are the main, loop and goods lines. In the distance, the stock siding can be seen branching off the to left of the main line. The small building is a weighbridge. The one-time loco facilities of an engine shed, coal stage and turntable were located in the middle distance. |
| Bombala | 2003 | The view from the footbridge looking towards the end of the line. The goods shaed and station are in very good condition. |
| Bombala | 2003 | The ash-pit still remains on the loco siding. |
| Bombala | 2003 | The view from the end of the line look back towards the station. |
| Bombala | 2003 | The turntable at the northern end of the yard. The one-time engine shed was just beyond the turntable. |
| Bombo | 1986 | An integral part of single line rail operation was the exchanging of the staff at a safeworking point. A classic pose is shown here at Bombo in 1986 as the up South Coast Daylight slowly trundles through. |
| Bombo | 2004 | An early-evening shot looking along the platform. |
| Bombo | 2004 | An evening shot looking along the platform. |
| Bombo | 2004 | The modern platform sign. |
| Bomen | 1980 | Bomen in 1980, before preservation when Bomen station was just a station. |
| Bomen | 2001 | A view of the heritage listed station building. |
| Bomen | 2001 | The station building from the rear. |
| Bomen | 2001 | The cattle yards adjacent to the line at Bomen. |
| Bomen | 2002 | A view towards Wagga Wagga of the platform and restored station building. |
| Bomen | 2002 | A view of the restored station building. |
| Bomen | 2002 | An overall view of the station looking towards Junee |
| Bomen | 2002 | A close-up of the station building. |
| Bomen | 2003 | The view looking north from the platform. |
| Bomen | 2003 | The view looking south along the platform. |
| Bomen | 1980 | Bomen Signal Box diagram in 1980 shows the Meat Works Siding which was well used at that time. |
| Bon Accord | 2001 | Nothing remains at the site. The station and loop were located on the right hand side in this view looking north. |
| Bondi Junction | 2001 | The local panel at Bondi Junction station. |
| Bongalong | 2004 | The station nameboard stands in front of the remains of the wooden platform. |
| Bongalong | 2004 | The view along the line in the vicinity of the platform. |
| Bongalong | 2004 | The primitive wooden platform is still in relatively good condition. |
| Bongalong | 1980 | The short wooden Bongalong platform in 1980 with its leaning sign. |
| Boorindal | 2003 | The remains of the point lever at the up end of the siding. |
| Boorindal | 2003 | The remains of the main line and siding. |
| Boorowa | 1980 | The view looking towards the terminus, showing the station, platform, water columns and lever frame are still present. |
| Boorowa | 1980 | The diagram on the A lever frame, at the down end of the platform. |
| Boorowa | 2001 | The location of the one-time station at Boorowa. Little trace remains. |
| Boorowa | 2001 | Looking south towards the location of the turntable. |
| Boorowa | 2001 | One of the few extant pieces of track, this section is part of a bridge over a creek. |
| Boorowa | 2001 | The view from the entrance to Boorowa yard. Beyond the turntable was an engine shed, and to the left of it was a coal stage. The station and the rest of the the yard was located just out of picture in the left distance. |
| Boorowa | 2001 | Just to the north of the bridge is the Down Home signal. The station was down the left hand side in the distance, while the goods sidings were on the right. |
| Boorowa | 2001 | A closer view of the turntable. |
| Boorowa | 1980 | The Boorowa to Galong Staff and Ticket box. |
| Boorowa | 1980 | The landmark on the approach to Boorowa. |
| Boorowa | 1980 | Boorowa yard looking toward Galong. The loco siding and 50' turntable were to the left in the grassy area. |
| Booyong | 2001 | The platform station at Booyong, where the running line has been slewed away from the platform. |
| Booyong | 2003 | The station sign has been turned away from the tracks. |
| Booyong | 2001 | The bridge at the down end of Booyong Station. |
| Boppy Mountain | 2003 | The vandalised Countrylink bus stop at Boppy Mountain. |
| Boppy Mountain | 2003 | No trace remains of the one-time station at Boppy Mountain. |
| Borambola | 1999 | The goods shed at Borambola shines in the sunshine, in the middle of a field. |
| Border Loop | 2003 | The view standing on the former crossing loop bed looking north. The signalbox would have been mostly hidden by the bamboo. It had a raised platform adjacent to the line for manual staff exchange. The tunnel to Queensland is a couple of hundred metres to the left from where the line disappears from view. |
| Border Loop | 2003 | The view standing on the access track looking south. The former signal box was this side of the bamboo between the telephone pole and the line. Beyond and to the left of the telephone pole there was a cottage used for signaller's accommodation. The cottage was burnt down in 1995. |
| Boree Creek | 1980 | Boree Creek shown here in 1980 sits rather dejected as it waits for passenger never to come again. |
| Boree Creek | 1996 | Boree Creek Silo marks the current end of the truncated Oaklands Branch. |
| Boree Creek | 2004 | The view beyond Boree Creek looking towards Oaklands. The current end of the line is just a few hundred metres down the track. |
| Boree Creek | 2004 | The view looking towards The Rock. Boree Creek is now a significant grain collection and storage centre with a number of concrete, steel and temporary "horizontal" silos. The original main line is on the right. |
| Boree Creek | 2001 | A closer view of the large silos at the up end of the yard. |
| Boree Creek | 2001 | The view looking down the line showing some of the different silos that are present. |
| Boree Creek | 2001 | Grain bunkers at Kooregah, a private loading site at Boree Creek. |
| Borenore | 2004 | The road side of Borenore, now used by the local tennis club. |
| Borenore | 2004 | The view long the platform, looking towards Molong. |
| Borenore | 2004 | The goods loading bank on the now-lifted loop, looking towards Sydney. |
| Borenore | 2004 | The original station nameboard letters, now on a metal frame. The buildings are being restored by the tennis club and Rail Estate. |
| Borenore | 1990 | The view looking west along the platform. |
| Boronia No 5 Tunnel | 1980 | An unidentified 442-class loco hauls a passenger train up Cowan Bank past the portal of the abandoned Boronia No 5 Tunnel. |
| Botany Yard | 2003 | The Boral cement siding on the Botany line. |
| Botany Yard | 2003 | The Botany Freight Yard operations building (on the left). The driver of 4918 talks to the yard shunter. |
| Bourke | 2003 | The old cattle yards about 4 kms south of Bourke. The shot is taken facing in the direction of Nyngan. |
| Bourke | 2003 | The cattle yards looking in the direction of Bourke. |
| Bourke | 2003 | The view from near the sale yards looking back in the direction on Nyngan. |
| Bourke | 2003 | The view looking along the platform in the direction of the end of the line. |
| Bourke | 2003 | The station is now a tourist station, although the original sign is still mounted outside. |
| Bourke | 2003 | The line into Bourke just after you cross the levee bank into town. The outer home is about 100 back out of sight. The beginning of the old yard started about 100m ahead. |
| Bourke | 2003 | A crossing near the southern entrance to the Bourke Yard. |
| Bourke | 2003 | The goods platform on the northern side of Bourke Yard. The area is now used by a trucking company and most of the yard has been cleared. View looking south towards Nyngan. |
| Bourke | 2003 | The signal at the start of the Bourke Yard. View looking towards the end of the line, about 400m metres west. |
| Bourke | 2003 | Piles of cleared railway debris at the southern end of Bourke Yard. |
| Bourke | 2003 | The view looking towards the end of the line. The station is on the right in the background. |
| Bourke | 2003 | The junction for the abbatoir siding is at the 819km post. |
| Bourke | 2003 | The abbatoir branch siding off the Main Western line just south of Bourke. The view is looking towards Nyngan. |
| Bourke | 2003 | The view of the abbatoir siding looking towards Bourke. |
| Bourke | 2003 | A view looking towards Bourke into the partially lifted abbatoir siding. |
| Bourke | 2003 | Looking towards Nyngan at the abbatoir siding. |
| Bourke | 2003 | Where the abbatoir branch line ran alongside the small cool room platform, the track is now lifted. This view is looking towards Nyngan. |
| Bourke | 2003 | The weeds now grow in irregular formation from where the line has been lifted. A small platform on this office building also serviced the train as it passed through the abbatoir. |
| Bourke | 2003 | Evidence of the old abbatoir line in the concrete slab. |
| Bourke | 1982 | The view looking along the station when it was still in use. |
| Bourke | 1982 | 4862 sits at the head of a short freight train in the Run Around siding. |
| Bourke | 1982 | The view looking down along the platform with 4862 in the adjacent siding. |
| Bourke | 1982 | The roadside view of the station building. |
| Bourke | 1982 | B4862 sits at the refuelling point opposite the station. |
| Bourke | 1982 | The State Rail bus to Dubbo is parked on the platform at the station. |
| Bowenfels | 2004 | The road-side approach to Bowenfels station. |
| Bowenfels | 2004 | The view looking along the platform in the direction of Sydney. |
| Bowenfels | 2004 | The station nameboard has been moved to an area adjacent to the station building. |
| Bowenfels | 2004 | The view of the station looking towards Sydney. The one-time up platform has been removed. |
| Bowenfels | 2004 | The road-side approach to the station building. |
| Bowenfels | 2004 | The twin viaducts over Farmers Creek to the west of Bowenfels. The original is at the front, with the now-deviated track being carried by the newer one at the rear. |
| Bowning | 1980 | A freight train is heading south through the station, in this view looking back towards Sydney. |
| Bowning | 2003 | A view of the well-preserved platform and station building looking towards Yass. |
| Bowning | 2002 | A ground-level view of the station looking towards Yass. |
| Bowning | 2002 | A view of the station building and Countrylink signage through trees. |
| Bowning | 2002 | A view of the main platform and building and shorter up platform and less impressive building looking towards Harden. |
| Bowning | 2002 | A close up view of the station buildings looking towards Harden. The main building has been turned into a local craft shop. |
| Bowning | 2003 | A view showing the up platform, looking towards Sydney. The loop sidings on the outside of the platforms are now lifted. The structure on the right was the dock platform. |
| Bowning | 1980 | The block instruments at Bowning flank the track indictor board; the closest one is for Yass Jct. |
| Bowning | 1980 | A 1980 picture of Bowning diagram was of the old style. The drawing date was July 26th, 1943. |
| Bowning | 1980 | Bowning boasted some interesting signals, the underslung lower quadrants were pulled by levers 7 (left) and 4 (right). The tall signal post behind shows the home for the up main (lever 31) and the signal to control the entrance to the up refuge line behind the platform. |
| Bowning | 1980 | Bowning Station just before sunset. |
| Bowral | 2001 | The view along the Bowral down platform, looking north. |
| Bowral | 2001 | The road-side view of the down-side station building. |
| Bowral | 2001 | The up platform, with its older-style architecture. |
| Bowral | 2001 | The down-side platform, looking from the nearby road over-bridge. |
| Bowral | 2001 | The ticket office at the southern end of the up platform. |
| Bowral | 1980 | Bowral station looks sleepy on this Sunday in 1980. |
| Bowral | 1980 | Interior of Bowral Signal Box showing the block instruments. 1980. |
| Bowral | 1980 | Bowral diagram in 1980. |
| Bowral | 1980 | Bowral had some pretty windows as this picture shows in 1980. |
| Box Vale Colliery | 2001 | One of the impressive cuttings along the line to the colliery. |
| Box Vale Tunnel | 2002 | The northern portal of the tunnel. |
| Box Vale Tunnel | 2001 | A closer view of the tunnel portal. |
| Box Vale Tunnel | 2001 | The view looking along the comparatively short tunnel. |
| Box Vale Tunnel | 2002 | The line formation near the end of the line, not far from the northern end of the tunnel. |
| Box Vale Tunnel | 2001 | The indentations left by the sleepers (long gone) are still clearly visible. |
| Box Vale Tunnel | 2001 | The view approaching the tunnel. |
| Branxton | 2003 | The point where the one-time branch to Ayrfield No 3 Colliery left the main line. |
| Branxton | 2003 | A sign on the platform informing that the station is now maintained by the nearby Rothbury Riot Railway and Steam Museum, and that it has been classified by the National Trust. |
| Branxton | 2003 | The view from Branxton looking north. The branch in the left distance is the one-time branch to the Ayrfield Colliery. The former goods siding branches off on the right. |
| Branxton | 2003 | An up Endeavour set set has stopped at Branxton, while 8210 on a coal train passes on the opposite track. |
| Branxton | 2003 | The view from the up platform looking north. An empty down coal train is disappearing in the distance. |
| Branxton | 2003 | The view from the footbridge looking towards Newcastle. |
| Branxton | 2003 | A closer view of the down refuge loop (foreground) which becomes the Ayrfield Colliery branch in the distance. |
| Brawlin | 1999 | Little remains of the siding which once graced Brawlin. |
| Breadalbane | 1980 | The view looking in the down direction from the location of the platforms. The goods siding remains in the background, with the B lever frame just behind the water tanks. |
| Bredbo | 1989 | One of the final runs of the Canberra Monaro Express has paused at Bredbo. |
| Bredbo | 2000 | The view at the southern end of Bredbo station. |
| Bredbo | 2000 | The platform at Bredbo. Note the engine dock at behind the platform at the near end. |
| Brewarrina | 2003 | The view of the remains of the yard. The old goods platform is on the left with the jib crane on the right. A lot of the tracks have been lifted and it looks like the site is undergoing development of sorts. |
| Brewarrina | 1982 | A view of the yard, looking north. The foundations are from either the carriage or the engine shed. |
| Brewarrina | 1982 | The yard view, looking south. |
| Brewarrina | 1982 | The remains of the passenger platform, looking north. |
| Brewarrina | 1980 | A shot of the station building 6 years after the branch closed, and not long before it was burnt to the ground. |
| Brewarrina | 1991 | Looking north toward Brewarrina, from southern end of washed out section. |
| Brewarrina | 1991 | Looking north toward Brewarrina, approximately midway along washed out section. |
| Brewarrina | 1991 | Looking southeast at southern end of washed out section. |
| Brewarrina | 1991 | Looking northeast at northern end of washed out section. |
| Brewarrina | 1991 | Looking south toward southern end of washed out section. |
| Brewarrina | 1991 | Looking south toward Byrock, from northern end of washed out section. |
| Brewongle | 1981 | An up passenger service from Bathurst approaching Brewongle station in December 1981. |
| Brewongle | 1988 | The derelict station building on the down platform in July 1988, shortly before its demolition. The foundations of the former signal box are visible at right. The up platform had already been removed. |
| Brewongle | 2004 | The one-time station-master's house, overlooking the main line. |
| Brewongle | 2004 | The modern Traffic/Relay hut adjacent to the level crossing near the location of Brewongle. |
| Bribbaree | 2004 | The Down Home signal at the southern end of the yard. |
| Bribbaree | 2004 | The view looking north past the staff hut. The one-time station was located on the near siding of the building. |
| Bribbaree | 2004 | The view looking north from the Down Home signal post. |
| Bribbaree | 2004 | The view looking south towards Stockinbingal at the level crossing south of Bribbaree. |
| Bribbaree | 2004 | The view looking south from between the staff hut and Down Home. The tracks from left to right are the Wheat, Silo, and Loop Sidings, and the Main Line. |
| Bribbaree | 2004 | A closer view of the silo, looking north towards Parkes. |
| Bribbaree | 1983 | The view looking north as the Silver City Comet pauses the the station. |
| Brickworks | 1981 | The Brickworks Signal Box 3 years before this section was closed. |
| Brickworks | 1981 | An unusual signal near near the brickworks. The small arm with the ``S'' on it is a Shunt-ahead Signal, allowing the signal to be passed at stop while shunting. |
| Brickworks | 1982 | A panoramic shot of the Brickworks, now a part of the Olympic complex, back in 1982. Brickworks Signal Box can be seen in the centre and this was frequent home for storing "red rattlers". Also a trio of Rail Motors can be seen approaching on their way to pick up the afternoon shift at Abattoirs. |
| Briggsvale | 2003 | Briggsvale station still features its nameboard, alongside the small shelter and overgrown platform. |
| Bringagee | 2000 | The eastern end of the yard at Bringagee. |
| Bringagee | 2000 | The cattle loader and associated track are still present. |
| Bringagee | 2000 | Bringagee once boasted a turntable. Only the pit remains. In the background is the goods platform. |
| Broadmeadow | 2003 | The view looking north along platforms 1 and 2. |
| Broadmeadow | 2003 | The view looking south along platforms 1 and 2. |
| Broadmeadow | 1979 | The left hand side of the signal diagram in the Broadmeadow Signal Box. |
| Broadmeadow | 1979 | The right hand side of the signal diagram in the Broadmeadow Signal Box. |
| Broadmeadow | 2003 | The view from platform 3, looking north towards Woodville Junction. |
| Broadmeadow | 2003 | Wagons and 48 clss locos sit idle in the yard. |
| Broadmeadow | 2003 | The view looking south into Broadmeadow Yard. |
| Broadmeadow | 1986 | Broadmeadow North Box situated on the north end of the main platform. |
| Broadmeadow | 1986 | Broadmeadow North Diagram. |
| Broadmeadow | 1986 | A close up of Broadmeadow North Diagram . |
| Broadmeadow | 1986 | Broadmeadow North Frame taken from the top of the spiral stairway. |
| Broadmeadow | 1986 | If you look closely you can see 3 signal boxes, Broadmeadow South in the foreground, Broadmeadow North mid shot and Woodville Junction in the distance. |
| Broadmeadow | 1986 | Broadmeadow South Box |
| Broadmeadow | 1986 | Broadmeadow South Box had a Tyers Block Instrument, which was for the Adamstown Relief Line. Note the standard bell instruments. |
| Broadmeadow | 1986 | Broadmeadow South frame from the stairs. |
| Broadmeadow | 1986 | Various signals at Broadmeadow yard, no electric lines to be seen. |
| Broadmeadow | 1986 | Broadmeadow yard signals. |
| Broadmeadow | 1986 | Long-gone mechanical signals which protected Broadmeadow yard for decades. |
| Broadmeadow | 1986 | This is the platform repeater which told of many an up train, used because of the curved platform which blocked the view of the Broadmeadow South Home signal. |
| Brocklesby | 1980 | Brocklesby boasted a grain siding and a goods siding through it's working life. Note the water column still survives at the down end of the platform. The concrete pad in the foreground is the floor of the one-time grain shed. |
| Brocklesby | 1980 | Behind the station stood a very unusual and ornate water tank. |
| Brocklesby | 2003 | The view from the level crossing of the Balldale road, showing the rear of the stop block. The silo complex is clearly visible on the up side of the main line. |
| Brocklesby | 2003 | A close up of the stop block looking again in the up direction, with the 637km post adjacent. |
| Broken Hill | 2001 | The view looking west along the current station. |
| Broken Hill | 2001 | The original Broken Hill station, in use until 1956. This is the view looking east, in the direction of Sydney. |
| Broken Hill | 2002 | The view of Broken Hill station from the top of the slag heap, looking north. |
| Broken Hill | 2002 | View of railway activities in the yard. This shot is looking NW from the top of the slag heap. |
| Broken Hill | 2002 | A view of an old station and platform at Broken Hill, located about 600m east of the current station. |
| Broken Hill | 2002 | A view of the street side of the main station. |
| Broken Hill | 2004 | The giant slag and overburden heap from the mines dwarfs 8640 and 8605 at the head of a conga line of withdrawn 86 class locos stored on a siding next to the main line. |
| Broken Hill | 2004 | The Silverton loco depot with 44s1 and Silverton 23. |
| Broken Hill | 2004 | The abandoned freight marshalling yard, gantry crane and loading shed. |
| Brooklana | 1986 | The old station name-board, lying in the grass next to the track. |
| Brushwood | 2002 | A station sign board on the up side of the line marks the location of Brushwood. |
| Brushwood | 2002 | The location still sports a siding and loading bank. The building is a weighbridge for the nearby grain silo. |
| Brushwood | 2003 | The view looking west towards the grain siding and silos. |
| Bugilbone | 1974 | Bugilbone station looking westward in May 1974. At the time of this photo there was still an active goods siding opposite. |
| Bugilbone | 2003 | The hand-painted sign on the loading bank face. |
| Bugilbone | 2003 | The view looking west towards Walgett. The siding has been lifted. |
| Bukalong | 2000 | The roof has partially collapsed at Bukalong station. |
| Bukalong | 2000 | The goods and passenger platforms. Note the 2 missing sections of rail on the through road. |
| Bukalong | 2000 | The cattle loader and associated yard are well preserved, although the goods siding has been lifted. |
| Bukalong | 2003 | A close up of the station build and tank. Note the the awning is now missing. |
| Bukalong | 2003 | The station building, looking back up the line. |
| Bukalong | 2003 | A rail-level view looking up the line along the platform face. |
| Bulgary | 1980 | The station is still present, although the platform is in poor condition. |
| Bulgary | 1999 | The remains of the goods platform at Bulgary, with the 566 kilometre post directly in front. |
| Bullaburra | 2004 | The view approaching the western end of the station. |
| Bullaburra | 2004 | The view of the Down Main and side of platform 2 from near the Great Western Highway. |
| Bullaburra | 2004 | The view from the overbridge looking down onto platform 1 and the Up Main. Bullaburra is an unmanned station although there is a staff member there between 0550 and 1040 Monday to Friday to perform safeworking (Right of Way) duties for 6 and 8 cars trains during the peak times. |
| Bullaburra | 2004 | The view looking away from Sydney along platform 1. |
| Bullenbung Creek Tank | 1980 | The massive structure of Bullenbung Creek Tank stands in testament to the days of steam travel. In the background is the culvert over the creek which gave the tank its name. |
| Bulli | 2004 | The Signal levers where found in the long grass beside the railway station and have been remounted and restored by the local museum that now occupies the old timber station. |
| Bulli | 2004 | The yard diagram for Bulli station. This is not the original board. Apparently the original board was stolen one night and the thief left a photograph of the original board and the Museum has reproduced this board from the photo. |
| Bulli | 2004 | The yard diagram for the coal sidings. |
| Bulli | 1987 | The signal box controlling access to the Bulli Coal Siding. |
| Bullocks Flat | 1993 | A train in the station at Bullocks Flat. |
| Bullocks Flat | 1993 | A close-up showing the rack, and the cog wheel. |
| Bullocks Flat | 1993 | A wide-angle view of Bullocks Flat terminal station, clearly showing that all track is rack equipped. |
| Bullocks Flat | 1993 | A train crossing the bridge near Bullocks Flat, just before entering the tunnel (the longest in Australia). |
| Bullocks Flat | 2001 | The view looking out the tunnel on the way down to Bullocks Flat. |
| Bundanoon | 2004 | The foot crossing at the Sydney end of the station. |
| Bundanoon | 2004 | The pedestrian crossing barrier and signal at the Sydney end of the station. |
| Bundanoon | 2004 | The safeworking instruments in the signal box. |
| Bundanoon | 2004 | The lever frame inside the signal box. |
| Bundanoon | 2004 | The view looking down along the tracks between the two platforms, in the direction of Goulburn. |
| Bundanoon | 2004 | The view looking south along platform 2. A north-bound Explorer set is sitting at platform 1. |
| Bundanoon | 2004 | The semaphore signal at the up end of platform 1. |
| Bundanoon | 2004 | A bench seat on the station. |
| Bundanoon | 2004 | The older-style station nameboard. |
| Bundanoon | 2004 | The short shelter building on platform 1. |
| Bundanoon | 2004 | The portal under the platform where the rodding and wires emerge from the lever frame in the signal box. |
| Bundanoon | 2004 | A close-up of the semaphore signal at the up end of the station. |
| Bundanoon | 2004 | Another view looking down the main station building platform 2. |
| Bundanoon | 2004 | A closer view of the station diagram. |
| Bundanoon | 2004 | The station diagram and safeworking instrument behind the lever frame. |
| Bundure | 2000 | Bundure station is slightly unusual in that is has a goods platform (centre) lies directly opposite the passenger platform (left). This is the view looking south. |
| Bundure | 2000 | The name of the station can barely be seen on the sign. |
| Bungendore | 1986 | The view looking south from the station towards the goods shed, showing the manual gates. |
| Bungendore | 1986 | The Bungendore - Tarago Staff & Ticket box. Note the signal box plate dated 1917. |
| Bungendore | 1986 | Bungendore track diagram. |
| Bungendore Junction | 1986 | Bungendore Junction showing the track still visible to Captains Flat, but disconnected from the main line. |
| Bungulla | 2001 | Only a signpost marks the location of Bungulla. |
| Bunnerong Power Station | 1960 | A shot of Bunnerong Power Station loco No. 6 (ex NSWGR 2413) shunting the power station sidings. |
| Bunyan | 2000 | The new station at Bunyan. |
| Burcher | 2001 | Burcher platform and name board, with probably the world's smallest station building! |
| Burcher | 2001 | The silo and stop block at the end of this relatively short branch line. |
| Burradoo | 2004 | The view looking north along the [extended] down platform. |
| Burradoo | 2004 | The view looking south along the down platform. |
| Burradoo | 2004 | The southern end of the up platform. |
| Burradoo | 2004 | The view looking north through the station, from the pedestrian crossing. |
| Burradoo | 1980 | The stark Burradoo station in 1980. |
| Burrangong | 2004 | Only the remains of the passenger platform are present at this location. |
| Burrawang | 2001 | The site of the one-time Burrawang station looking towards Moss Vale. |
| Burren | 2003 | The view looking east towards Narrabri. |
| Burren | 1990 | The view looking east from the top of the water tower. The eastern leg of the turning triangle is visible in the foreground. |
| Burren | 1990 | The view looking west towards the water tank and turning triangle. The remains of the track at the left base of the tank served the coal stage and engine shed. |
| Burrumbuttock | 1980 | This quaint country station will see passengers no more but boasted a crossing loop and siding until the end. |
| Burrumbuttock | 2004 | The view of the trestle decking from the western abutment looking east towards Walla Walla. |
| Burrumbuttock | 2004 | The view from the western abutment of the trestle showing the piers. |
| Burrumbuttock | 2004 | The view of the Burrumbuttock yard from the access road on the eastern side. The remains of the platform is on the right; the Graincorp silos and weighbridge are still in use. Although buried under soil and sand in some places, the trackwork for the remaining siding was still largely intact in 2004. |
| Burrumbuttock | 2004 | The view from the Burrumbuttock yard looking west to the junction with the main line at 'B' frame. In 2004 the trackwork and interlocking was still intact. |
| Buxton | 2001 | The rebuilt platform and signboard. |
| Buxton | 2004 | The view looking south from Buxton. |
| Buxton | 2004 | The view looking north towards Buxton station. |
| Bylong Tunnel | 1976 | The eastern portal of Bylong Tunnel in 1976. This end of the tunnel was dry, and access to the abandoned workface several hundred metres inside was possible. |
| Bylong Tunnel | 1976 | Remains of abandoned construction equipment outside the western portal of Bylong Tunnel in 1976. The bore was incomplete and flooded, blocking access. |
| Bylong Tunnel | 2001 | The eastern portal of the now complete Bylong Tunnel at Murrumbo. |
| Byrock | 2003 | This is information board situated at the Byrock railway station, or as the sign says "Bye-Rock". |
| Byrock | 2003 | The remains of the station and yard, looking down the line towards Bourke. |
| Byrock | 2003 | The remains of the turntable pit. |
| Byrock | 2003 | Remains of building foundations in the yard. This is probably the engine shed. |
| Byrock | 2003 | A view of the yard. The branch to Brewarrina is on the left, with the main line on the right. The two object on either side may be kerosene powered track indicators. |
| Byrock | 2003 | The elevated water tank in the remains of the yard, looking towards Nyngan. |
| Byron Bay | 2003 | The road-side view of the station building. |
| Byron Bay | 2003 | Byron Bay platform and station buildings. The building in the foreground is now a pub. Signs on the platform prohibit the consumption of alcohol on the platform itself. |
| Cadia Mine | 2002 | Formation of old Cadia Mine line looking west on the northern side of the Spring Hill to Orange Road just west of Spring Hill. |
| Cadia Mine | 2002 | The remains of a small bridge where the line follows the Spring Hill to Orange road. |
| Caldwell | 1999 | An impressive wooden bridge near the silo at Caldwell. |
| Caledonia | 2001 | The elevated water tank dominates the down end of the platform. The up platform face is just visible in the background. |
| Caledonia | 2001 | Looking along the up platform face. Behind the platform is the disused down main and platform face. |
| Caledonia | 2001 | The signal box at the up end is boarded up, and completely stripped inside. |
| Caledonia | 2004 | The gutted interior of the signal box, which was a replacement of the original structure. |
| Caledonia | 2004 | The remains of a water column. |
| Caledonia | 1995 | A closer view of the water tower. |
| Caledonia | 1986 | The Tyers block instrument in the signal box. |
| Caledonia | 1986 | The rather basic signal diagram. |
| Caledonia | 1986 | 1986 sees the station sign at Caledonia peeking up from the bushes. |
| Califat | 1999 | There is no evidence remaining of the siding at Califat. |
| Calleen | 2001 | The view looking along the wheat siding back towards Temora. The one-time station was opposite the 576km post visible in the middle distance. |
| Calleen | 2001 | The view looking south along the wheat siding, with some recent use apparent. |
| Camden | 2004 | The Dairy Farmers building which was once served by a short siding. |
| Camellia | 1981 | The line diagram in the Camellia Signal Box. The branch at the top is the short Sandown line. |
| Camellia | 2004 | The view looking north along the platform. |
| Camellia | 2004 | The view south from the end of the platform. The Sandown junction is the line on the left in the distance. |
| Camellia | 1981 | The Camellia block instrument. |
| Camellia | 1981 | The interior of Camellia Signal Box. |
| Camellia | 2004 | The tiny station at Camellia looking south towards Rosehill. |
| Camellia | 1982 | This view shows the up end of Camellia. The starter signal has been pulled for the road and the fish tail signal under it is the fixed distant to Rosehill Racecourse Box. |
| Camellia | 1982 | The gates at Camellia were manually worked, no matter what the weather. Here the station staff are closing the gates for an up train approaching. |
| Camellia | 1982 | Looking in the down direction with the manually operated gates open for vehicular traffic. |
| Campbelltown | 2001 | Campbelltown station before the additional covered waiting areas went in. FL200/EL62 are working an empty container train north. |
| Canberra | 2001 | A view of the goods shed, with several oil tanks being stored in the adjacent sidings. |
| Canberra | 2001 | The view looking along the goods platform. |
| Canberra | 2001 | A view looking across the yard. |
| Canberra | 2001 | A view looking across the yard. |
| Canberra | 2001 | A view looking across the yard. |
| Canberra | 1985 | The nation's capital could not even boast a full signal box, just a Frame A. Here 42219 in 1985 stands ready to head a Sydney passenger train. |
| Canberra | 1985 | Canberra Frame A diagram in 1985. |
| Canobolas | 2004 | The location of the station is now private property, but the station building is still present. The main line is behind the building. |
| Canowindra | 2000 | Despite the sign, it would appear that no trains have run this far down the line for several years. |
| Canowindra | 2001 | The road-side view of the somewhat unusual station building. |
| Canowindra | 2001 | The station nameboard is still present. |
| Canowindra | 2001 | The view along the platform, looking in the up direction towards Cowra. |
| Canowindra | 2001 | The rail-side view of the station showing the station building, which resembles a shed more than a station. |
| Canowindra | 2001 | The elevated water tank was part of the loco servicing facilities when this was the terminus of the line. |
| Canowindra | 2001 | A closer view of the water tank and adjacent gangers shed. |
| Canowindra | 2001 | The Canowindra yard diagram. |
| Canowindra | 2001 | The yard diagram and lever frame. |
| Canowindra | 2004 | The turntable is still present and in good condition and in the same position as the 1922 diagram, although the track has been lifted leading up to it. |
| Canowindra | 2004 | A side-on view of the turntable and pit. |
| Canyon Colliery | 2002 | A short distance down the line from the site of Hartley Vale is the junction for the now-closed Canyon Colliery. |
| Canyon Colliery | 2002 | The view looking towards the colliery branch junction. The lines in the foreground lead behind the camera to a balloon loop. |
| Capertee | 2002 | The road side approach to the impressive brick station. |
| Capertee | 2002 | The view looking up the platform towards Wallerawang. |
| Capertee | 2002 | The entrance to the the waiting room from the platform. |
| Capertee | 2002 | Another shot looking up the line, showing the fenced off station area. |
| Capertee | 1984 | Capertee, when still in use and a ganger's vehicle pays a visit. |
| Capertee Tunnel | 2004 | The down portal of Capertee tunnel. |
| Capertee Tunnel | 2004 | The view looking north from the down portal of Capertee Tunnel. |
| Captains Flat | 2001 | The rails are not completely covered over, where they cross the main Captains Flat road. |
| Captains Flat | 2000 | The southern end of the platform, with the name board still present. |
| Captains Flat | 2000 | The gantry crane and goods shed. The latter is being used for storage purposes. |
| Captains Flat | 2000 | The view of the northern end of the yard. The turntable and loco facilities were located behind the bush in the centre of the photo. |
| Captains Flat | 2000 | The view in the yard showing the approach to the loader from the nearby mine. |
| Captains Flat | 2001 | At least one set of points in the yard still operates! |
| Captains Flat | 2001 | The ash pit on the turntable road is still present. |
| Captains Flat | 2001 | The turntable is surrounded by weeds, but still present. |
| Captains Flat | 2001 | A close-up view of the turntable deck. |
| Captains Flat | 2001 | The manufacturer's name-plate on the turntable. |
| Captains Flat | 2000 | A close-up view of the ore loader. |
| Captains Flat | 2001 | The coal loader as viewed from the mine end. |
| Captains Flat | 2001 | Detail of the weighbridge underneath the coal loader. |
| Captains Flat | 2000 | The upper stage of the loader. |
| Captains Flat | 1986 | The landmark distant to the approach to Captains Flat. |
| Captains Flat | 1986 | Captains Flat station showing the sign clearly visible. |
| Captains Flat | 1986 | Captains Flat station from the embankment in 1986 shows rusty tracks and some vegetation beginning to grow on the platform. |
| Caragabal | 1996 | One of the staff instruments in the safeworking hut, at Caragabal. |
| Caragabal | 1997 | A pair of 81 class locos at the head of a wheat train loading at the silos. |
| Caragabal | 2003 | Looking north towards Forbes. No trace remains of the station which was located on the left side of the line near the leaning pole. |
| Caragabal | 2003 | The view looking north from the level crossing where the Mid-Western Highway crosses the line. There are men working on the siding to the silos. |
| Carcoar | 1992 | The road-side view of the station in its 1992 paint scheme. |
| Carcoar | 1992 | The rail-side view of the station in its 1992 paint scheme. |
| Carcoar | 1992 | The fairly simple nameboard at the station. |
| Carcoar | 1998 | The view of the road side of the station. |
| Carcoar | 1998 | A trackside view of the station. This was taken before the line reopened in 2000. |
| Carcoar | 2001 | The station at Carcoar was renovated to coincide with the 2000 re-opening of the line. |
| Carcoar | 2001 | The view looking along the platform of the repainted station. |
| Carcoar | 1998 | An unusual sign on the platform. |
| Carcoar | 2000 | The view looking south towards the station. On the left is the goods siding, with an abandoned water gin. The former goods shed was on the far left. The siding on the right is the overgrown loop siding. |
| Carcoar | 2000 | The view looking north towards the station. On the left is the crossing loop. No longer present in the right middle distance is the former dock siding. |
| Carcoar Tunnel | 2004 | The southern portal of the tunnel. |
| Caringbah | 2003 | A night shot looking along the platform towards Central. The tunnel mouth ahead is the bridge where The Kingsway crosses the line. |
| Carlingford | 2004 | The end of the line. No trace remains of the one-time main line and siding which were beyond this track. |
| Carlingford | 2004 | The view looking along the platform back up the line. |
| Carlingford | 2004 | The view looking along the platform to the end of the line. Carlingford. Oct 2004. |
| Carlingford | 1978 | The Carlingford A lever frame. |
| Carlingford | 1968 | The view looking north towards the station and the end of the line. The former Electricity Commision siding can be seen branching off the the left of the goods siding. |
| Carlos Gap Tunnel | 1993 | The up portal of the tunnel. |
| Carlos Gap Tunnel | 1993 | The down portal of the tunnel. |
| Carlwood | 2002 | Looking along the track towards Oberon. |
| Carlwood | 2001 | The line between Carlwood and Hazelgrove is intact, with only a few sleepers missing. |
| Carlwood | 2002 | The wooden bridge over the Snake River. Carlwood is just out of frame in the left distance. |
| Carlwood | 2002 | The view of Carlwood looking towards Oberon. |
| Carlwood | 2002 | At the up end of Carlwood is the bridge over the Snake River. |
| Carlwood | 2002 | The view of Carlwood looking towards Tarana. |
| Carlwood | 2002 | The track beyond the Snake River bridge. From here the line begins the long 1 in 25 to Oberon. |
| Carrathool | 2000 | Carrathool still boasts its sign on a relatively long platform. |
| Carrathool | 2000 | A view to the west of the platform area. In the background is a steam-era water tank. |
| Carrington Yard | 2003 | The view of Carrington Yard, looking directly towards Newcastle. |
| Carrington Yard | 2003 | Empty wheat wagons sit in Carrington Yard. |
| Cascade | 1986 | In 1986 the station still had its wooden-faced platform, name-board and rudimentary shelter, although all were is a state of disrepair. |
| Casino | 1997 | The Up XPT has stopped at Casino to exchange passengers before continuing the journey to Sydney. |
| Casino | 2001 | A flooded Casino roundhouse turntable, following a severe storm. |
| Castle Hill (1st) | 1979 | The site of the former Castle Hill Railway Station, now Castle Hill Park. Photograph taken from Old Northern Road, Castle Hill. |
| Casula | 1986 | A 4-car set with target B22 heads south on the up toward Liverpool. |
| Casula | 1985 | A twin set of Parcel Vans speedily run through Casula toward Campbelltown, a solitary passenger waits for the next up train. |
| Cawley | 2003 | The remains of the old alignment in the vicinity of Cawley. |
| Cawley | 2003 | The remains of the old alignment in the vicinity of Cawley. |
| Cawley | 2003 | The remains of the old alignment in the vicinity of Cawley. |
| Cawley | 2003 | The remains of the old alignment in the vicinity of Cawley. |
| Cawley | 2003 | The base of a former telegraph pole near the old alignment. |
| Cawley | 2003 | A brick culvert under a section of the old alignment. |
| Cawley | 2003 | A brick culvert under a section of the old alignment. |
| Cawley | 2003 | A drain under a section of the old alignment. |
| Cawley Tunnel | 2003 | Approaching the down portal through the cutting from the Helensburgh side. |
| Cawley Tunnel | 2003 | The tunnel was used in later years as a mushroom farm. |
| Cawley Tunnel | 2003 | The covered entrance to the tunnel. |
| Cawley Tunnel | 2003 | The interior of the tunnel. The small gauge track in the foreground was used by the mushroom farmer to remove the mushrooms to the packing shed. A small converted diesel tractor was used to run along this line. |
| Cawley Tunnel | 2003 | A brick culvert in the vicinity of the old tunnel. |
| Cawley Tunnel | 2003 | A brick culvert in the vicinity of the old tunnel. |
| Central | 2003 | The far left of the Central departure board, now in the Powerhouse Museum. |
| Central | 2003 | The middle left of the Central departure board, now in the Powerhouse Museum. |
| Central | 2003 | The middle right of the Central departure board, now in the Powerhouse Museum. |
| Central | 2003 | The far right of the Central departure board, now in the Powerhouse Museum. |
| Central | 1970 | A panorama view of Central Yard. |
| Central | 1970 | A signalman posing in the Sydney West signal box. |
| Central | 1970 | The signal diagram for the Wells Street signal box. |
| Central | 1970 | A close-up view of the minature points levers in the Wells Street box. |
| Central | 1970 | The Wells Street signal box, looking in the direction towards Redfern. |
| Central | 1970 | The Wells Street signal box, looking towards Central. |
| Central | 1970 | Sydney West Box, looking towards Darling Harbour. |
| Central | 2003 | Looking down the tunnel on platform 25. |
| Central | 2002 | Tangara set T51 is pulling into platform 23, which services the new Airport Line. |
| Central | 1978 | The monolithic pistol grip Sydney West Box interior taken a week before its closure in 1978. |
| Central | 1978 | One of the diagrams in Sydney West signal box. This one shows platforms 1 - 4, the main long distance and inter-state platforms. |
| Central | 2002 | The main concourse of the "country" platforms. |
| Central | 2003 | The view looking towards the buffers along platforms 1 and 2. |
| Central | 2003 | NR15 sits near the Indian Pacific MOTORAIL rolling stock. |
| Central | 1967 | The view looking south towards Central station from an approaching train. The tracks, from left to right, are the Up City Circle Outer, Down City Circle Inner, Up City Circle Inner, Up North Shore, Down City Circle Outer and Down North Shore. |
| Central | 1931 | The view looking down from an aeroplane over the Central Station area. In the left foreground are the suburban platforms, with the country platforms on their right. Beyond the second overbridge is Redfern station. A larger version of this photo is available here. |
| Central | 2000 | A view of the yard control panel showing the country platforms. |
| Central Goods Junction | 2004 | The new combined public walkway and operating railway siding running from Central Station yard to the Powerhouse Museum. The line passes through a tunnel seen in the background to join the main line at Central. |
| Central Goods Junction | 2004 | A relic of busier days. An isolated signal now disconnected is still in its original position attached to a building near the entrance to the Broadway tunnel on the former Darling Harbour line. The signal is now tightly sandwiched between the wall and a new pedestrian overpass. |
| Central Goods Junction | 2004 | The tunnel under the University of Technology building at Broadway near Central Station. The tunnel was originally double tracked but with both tracks overlapping so trains could not pass in the tunnel. Now only one track is present. The line is a siding of Sydney Yard leading to the Powerhouse Museum that is now part of a combined public walkway and operating railway siding. |
| Cessnock | 1975 | The view looking along the platform to the terminus, during the dismantling of the station. |
| Cessnock | 1975 | The view of number 2 platform during the demolition of the station. |
| Cessnock | 1975 | A view of the partially dismantled station and overgrown yard, looking back in the direction of Maitland. |
| Cessnock | 1975 | The station nameboard, in very poor condition. |
| Cessnock | 1975 | The rear of the station building, complete with demolition worker. |
| Cessnock | 1975 | Another view of the partially dismantled station building. |
| Cessnock | 1975 | The down yard and water tank, looking back in the direction of Maitland. |
| Cessnock | 1975 | The signal box, before demolition has started. |
| Chakola | 2000 | The platform (with lamp!) at Chakola. In the middle is a small platform used to help passengers off the train. |
| Chakola | 2000 | The passenger and goods platforms at Chakola. |
| Chakola | 2003 | Preserved CPH 22 has stopped at Chakola before heading back to Cooma. |
| Chakola | 2003 | Preserved rail motor CPH 22 stopped at Chakola. The station now sports a restored shelter. |
| Charlton | 2003 | Flood damage to line just to the south of Charlton. This damage was caused by the 1990 floods, rather than those of 1974 which resulted in the closure of the branch. |
| Charlton | 2003 | The up end of the siding, looking in the direction of Brewarrina. |
| Charlton | 2003 | The crumbling remains of the platform on the loop siding. |
| Charlton | 2003 | This is a wool loading platform for the shearing sheds that were serviced by the rail line in that time. The view is looking toward Brewarrina. |
| Charlton | 2003 | The view from the down end of the siding, looking back towards Byrock. |
| Chatswood | 2004 | A close-up of the track diagram. |
| Chatswood | 2004 | The view looking towards Hornsby along platform 2. |
| Chatswood | 2004 | A close-up of the level frame in the signal box on the main platform. |
| Chatswood | 2004 | The view looking towards Sydney along platform 2. The signal box which controlled Chatswood is located at the near end of the building. |
| Chatswood | 2004 | The view looking towards the original platform 1. This platform will be brought back into use with the advent of the Epping-Chatswood rail link. |
| Cheltenham | 2004 | The view looking towards the city along platform 2. |
| Chullora North Junction | 1997 | National Rail train hauled by NR62/G519/8045/42211 has just halted on the line, after arriving from Melbourne. It is about to back up along the Chullora - Sefton goods line and into NR's goods yard. |
| Circular Quay | 2002 | The view of the tunnel portal at the eastern end of the station. |
| Circular Quay | 2002 | A Tangara train has emerged from the portal at the western end of the station, having just left Wynyard. |
| Circular Quay | 1967 | A single deck "red rattler" service approaches platform 2, as a Wynyard-bound set leaves the opposite platform. |
| Civic | 2004 | The tiny Civic signalbox which controlled the Merewether Street level crossing next to the station. This is now monitored remotely via closed circuit cameras from the CTC at Broadmeadow. |
| Civic | 2004 | A night shot of Civic looking in the direction of Newcastle. |
| Civic | 2004 | The view along the platforms looking towards Newcastle. |
| Clandulla | 1996 | The view of Clandulla Station from the north. |
| Clandulla | 2004 | The station building is looking a bit the worse for wear, in this view looking down the line. |
| Clandulla | 2002 | The view looking south along the platform. |
| Clandulla | 2002 | The view looking across towards the gradually deteriorating building. |
| Clandulla | 1981 | Clandulla diagram in 1981; it may look old but was revised in 1973. |
| Clandulla | 1993 | HPC402 at Clandulla. Looking south in the Up direction. The goods siding with platform can be seen left of the loop. |
| Clarendon | 1985 | The view looking in the direction of Sydney across towards the station. |
| Clarendon | 2004 | The view of the modern station building. |
| Clarendon | 2004 | The view looking along the platforms. |
| Clarendon | 1981 | The passing of two DMU sets required the up to pull into the station then reverse into the siding to let the down proceed. |
| Clarendon | 1981 | A standard weekday afternoon in 1981. Clarendon station was rather sleepy but still boasted a signal box and ground frame. |
| Clarendon | 1981 | The Clarendon sign had a unique light blue background. |
| Clarendon | 1981 | Clarendon station diagram. |
| Clarendon | 1981 | Adjacent tothe main platform was the brick faced (and wide) Hawkesbury Racecourse platform. The grassy platform was located on the opposite side of the line from Clarendon Station and had the tall down home signal situated in the middle. |
| Clyde | 2004 | The view looking back up the reception sidings. |
| Clyde | 2004 | The view from Clyde Up Yard, looking east towards the yard entrance. |
| Clyde | 2004 | A night shot of Clyde, looking in the direction of Sydney. |
| Clyde | 2004 | The view looking further down the reception sidings. |
| Clyde | 2004 | The view looking into the Up Yard, from near the entrance. A number of private sidings lead off the to right, with the main Pacific National yard obscured in the right distance. |
| Clyde | 2004 | The view looking into th Up Yard. The lines ahead are the reception sidings, with the entrance to the Pacific National yard on the right. In the left middle distance is Clyburn station, a one-time employees-only platform, now disused. |
| Clyde | 2004 | The Australian Cement sidings, located just off the Carlingford branch at Clyde. |
| Coal Cliff | 1987 | With a dramatic backdrop, no passenger station and signals galore Coal Cliff was a picturesque but busy place to be a signalman, even though this 1987 picture shows a quiet time. |
| Coal Cliff | 1987 | The signal box on the up side of the line. |
| Cobar | 2000 | An early morning view of Cobar Station from the non-rail side. |
| Cobar | 2000 | The station is still a safeworking location where staffs must be exchanged to proceed further. |
| Cobar | 2000 | The view along the platform. The line in the distance heads to the Elura and CSA mines. |
| Cobar | 2000 | The station nameboard has been removed from the platform and placed out the front of the building. |
| Cobar | 2003 | The old turntable, looking towards the station in the down direction. |
| Cobar | 2003 | The view looking east towards the remains of the yard. |
| Cobar | 2003 | The view looking east from the dock siding. The turntable is visible on the left, with the goods siding branching off in the middle. |
| Cochrane | 1998 | An overgrown colour light signal south of Cochrane. |
| Cochrane | 1998 | Looking south from the footbridge at Cochrane station, towards Dunheved. |
| Cochrane | 1998 | Cochrane station from the northern end. |
| Cochrane | 1998 | The remains of a semaphore signal post near Cochrane. Note also the train trip at the base. |
| Cockburn | 2002 | This is the water tank and a shed at the location of the old border station at Cockburn. The standard gauge line runs about 300 meters to the south. |
| Cockburn | 2002 | The level crossing over the old narrow gauge line at Cockburn station. Despite the sign, trains last ran here in 1969. |
| Cockle Creek | 1982 | The view looking south along the platforms. |
| Colinton | 1989 | A three-car diesel railcar set crosses the Monaro Highway at a now-lifted crossing near Colinton. |
| Colinton | 2000 | The location of Colinton. In the middle distance is a 2-lever frame marking the beginning of the siding. |
| Collingullie | 1980 | Eight years before the line was closed, the station still sports a waiting room. Surrounding the station are the wheat fields which were responsible for most of the line's traffic. |
| Collingullie | 2001 | The relatively short platform at Collingullie. |
| Collingullie | 2001 | Opposite the platform are some discarded rails, presumably left over from when the loop siding was lifted. |
| Colo Vale | 2001 | The view of the station and shelter looking north. |
| Colo Vale | 2001 | The view of the station looking south. |
| Commonwealth Platform | 2004 | The Commonwealth Platform is still in existence. Thsi view is taken through the security fence at the back of the Army property. |
| Commonwealth Platform | 2004 | The formation is still in evidence in this view looking east towards the Army Base. |
| Commonwealth Platform | 2004 | The formation is still in evidence in this view looking east towards the Army Base. |
| Commonwealth Platform | 2004 | Railway tracks are still embedded in a road behind the Army Property, looking towards Marrangaroo. |
| Como | 1986 | The platforms still remain in this 1986 photo of the old Como station. Como was opened on 26-12-1885 but because of the gauntlet track on the bridge over the Georges River which caused rail congestion, a new multi-track bridge was built to the west and a new station opened on 27-11-1972 |
| Como | 2003 | Another view of the original Como station, looking towards Sutherland. |
| Compton Downs | 1991 | A view looking across at the burnt-out station building, still featuring its name board. |
| Compton Downs | 1991 | A closer view of the station remains, looking back up the line towards Byrock. |
| Compton Downs | 1991 | The view looking up the collapsing platform. |
| Compton Downs | 1991 | The view looking along the platform in the direction of Brewarrina. |
| Compton Downs | 1991 | The view looking north-east, with the loading bank on the left and passenger platform on the right. |
| Compton Downs | 2004 | The remains of an old bridge just to the north of the location, looking north towards Tarcoon. |
| Compton Downs | 2004 | The view looking south, just to the north of Compton Downs. |
| Compton Downs | 2004 | The view looking back up the line of the end of the loop siding. |
| Compton Downs | 2004 | The name of the nearby property which gave its name to the station. |
| Compton Downs | 2004 | The view looking north towards the down end of the loop siding. |
| Compton Downs | 2004 | The view looking towards Brewarrina at the down end of the loop siding. |
| Compton Downs | 2004 | Only the base of this building at the northern end of the yard remains of and structures. |
| Compton Downs | 2004 | The remains of the wooden-faced goods loading platform. |
| Compton Downs | 2004 | The remains of the passenger platform and station building, some 30 years after closure. |
| Compton Downs | 2004 | The remains of the one-time station building at Compton Downs. |
| Compton Downs | 2004 | The view looking south of the main and loop lines. |
| Compton Downs | 2004 | Apart from shrubs and tree, the yard area has remains relatively clear. |
| Compton Downs | 2004 | Time has seen this points lever become part of the vegetation after 30 years of neglect. |
| Compton Downs | 2004 | The view looking north at the up end of the loop siding. |
| Concord West | 2004 | The view looking south along platform 1 towards Strathfield. |
| Concord West | 2004 | The view looking south across towards platforms 2 and 3. |
| Concord West | 2000 | A view of the interior of the old signal box. |
| Condobolin | 2001 | A water gin and a couple of carriages sit in a siding opposite the jib crane. |
| Condobolin | 2001 | The station building is opposite a small local museum. |
| Condobolin | 2001 | The view looking west along the down side station. |
| Condobolin | 2001 | The name board pokes out from behind some of the local vegetation. |
| Condobolin | 2001 | Another view of some of the museum exhibits behind the station. |
| Condobolin | 2004 | The road side view of the station. |
| Condong | 2003 | A section of the remaining track in the vicinity of Condong. |
| Coobool | 2004 | A low bridge on the eastern side of Coobool. |
| Coobool | 2004 | The view looking east along a low bridge towards Murrabit. |
| Coobool | 2004 | The eastern end of the bridge, which still has a refuge for line workers. |
| Coobool | 2004 | The view looking west from Coobool where the formation is crossed by a dirt road. |
| Cookamidgera | 2004 | The view looking down the line towards Parkes. |
| Cookamidgera | 2004 | The view looking back up the line, showing the remnants of the old loop siding. The platforms were located on either side of the lines just beyond the level crossing. |
| Cooks River | 2004 | The view looking north of some empty sidings in the yard. |
| Cooks River | 2003 | Cooks River Junction. The line curving away from the Botany line leads to the Cooks River Container Terminal. |
| Cooks River | 2004 | The Botany Goods line just past the entrance to the Cooks River Goods Yard. |
| Cooks River | 2004 | The view looking along the sidings in the yard. |
| Cooks River | 2004 | After passing under the Princes Highway, a freight train heads towards the yard. |
| Cooks River | 2004 | The bridge over Shea's Creek, looking down the line just past the entrance to the Cooks River yard. |
| Cooks River | 2004 | The entrance to the yard, looking north. |
| Coolabah | 2003 | The remains at Coolabah. |
| Coolabah | 2003 | The view of Coolabah siding, looking west towards Bourke. |
| Coolabah | 2004 | A collapsed culvert at the 660.891 km mark, in the vicinity |
| Coolac | 1999 | The goods shed (pre-restoration) on the siding at Coolac. |
| Coolac | 1999 | The remains of the goods bank. |
| Coolac | 2001 | The road-side view of the now restored goods shed. |
| Coolac | 2001 | The track-side view of the restored goods shed. |
| Coolac | 2001 | The view in the direction of the overgrown goods bank. |
| Coolac | 2001 | A front-on shot of the goods shed. |
| Coolac | 2003 | The signal diagram for Coolac has been preserved and is now in the Gundagai Railway Station. |
| Coolac | 2004 | The remains of the buildings on the platform, including the toilet. |
| Coolac | 2004 | The view looking up the line from the goods bank to the station remains and former station-master's residence. |
| Coolac | 2004 | The view looking down the line from the goods bank to the restored goods shed. |
| Coolah | 2002 | Grazing has kept the yard clear of long grass, but hasn't prevented the deterioration of the long wooden-face platform. The nameboard is still present. |
| Coolah | 2002 | As a terminal station, Coolah possessed a turntable. This is located up the line from the station. |
| Coolah | 2002 | The view looking towards the end of the line. On the down side of the yard are the goods platform and silos, with the passenger platform opposite. |
| Coolah | 1982 | Possibly the last passenger service to leave Coolah station. |
| Coolalie | 1980 | All that remains of Coolalie in this 1980 photo was the abandoned signal box, which once stood on the down platform. The former Up Starting signal is on the left. |
| Coolamon | 2001 | The view looking along the platform in the direction of Junee. |
| Coolamon | 2001 | The view looking along the platform in the direction of Narrandera, showing the signal box and well-presented station building. |
| Coolamon | 2001 | The jib crane which sits opposite the station. |
| Coolamon | 2004 | The jib crane and silos, looking along the platform towards Junee. |
| Coolamon | 2004 | The jib crane, looking towards Narrandera. |
| Coolamon | 2004 | The view looking west along the platform towards Narrandera. |
| Coolamon | 2004 | The view looking west along the platform towards Narrandera, showing the signs for the Parcels, Station Master's and Booking Offices. |
| Coolamon | 2004 | The view looking towards Junee, showing the silos and signal box. |
| Coolamon | 2004 | The view looking east along the platform showing the various office signs. |
| Coolamon | 2004 | The view looking east from the down end of the platform. |
| Coolamon | 2004 | The recently repainted nameboard at the down end of the platform. |
| Coolamon | 2004 | The road-side view of the station building. |
| Coolamon | 2004 | Another view along the platform, looking towards Junee. |
| Cooma | 1982 | Looking south along the platform with a 48-class loco on the left, and the Dental Clinic car on the right. |
| Cooma | 1982 | A tuscan-liveried 48-class loco sits alongside the station. |
| Cooma | 1982 | A close-up of an unidentified 48-class loco and a rail trolley in the yard. |
| Cooma | 1982 | The view looking north from the platform. |
| Cooma | 1982 | The travelling Dental Clinic car sits in the dock behind the main platform. |
| Cooma | 2000 | The view south from the engine dock at Cooma station. Note the 2 shunting signals below the main semaphore signals. |
| Cooma | 1982 | The staff instrument in the signal box. |
| Cooma | 1982 | The level frame in the signal box. |
| Cooma | 1989 | The signal diagrams inside the box at Cooma. |
| Cooma | 2000 | The view north from the platform. |
| Cooma | 2000 | The main station. The building beyond the sign is the signal box. |
| Cooma | 2000 | The Cooma-Monaro Railway's CPH 6 railcar sitting at the station. |
| Cooma | 2003 | The road over-bridge to the north of the station. |
| Cooma | 2003 | The view looking south past the signal post towards the station. |
| Cooma | 2003 | The view looking south across to the station with preserved railcar CPH 22 at the platform. |
| Cooma | 2003 | The rear of the up end of the station showing the two sidings behind the platform. |
| Cooma | 2003 | The road-side view of the station building. |
| Cooma | 2003 | A view of the goods shed from the window of a CPH car. |
| Cooma | 2003 | The view looking towards the northern end of the yard from a CPH railcar. |
| Coombing Siding | 2004 | The grassy section in the middle is where the siding left the main line. |
| Coombing Siding | 2004 | The formation veers to the left after it leaves the main line. |
| Coombing Siding | 2004 | Another view of the formation as it veers to the left and goes through a small cutting. |
| Coonabarabran | 1979 | This view looking down along the platform is evidence that this was once a busy location for passengers. |
| Coonabarabran | 1986 | The view looking across towards the station building. |
| Coonabarabran | 1986 | The road-side view of the station building. |
| Coonabarabran | 1997 | Coonabarabran station is now only used as a safeworking location. |
| Coonabarabran | 2000 | Three years later not much has changed, although weeds are starting to grow in the tracks. |
| Coonabarabran | 2000 | The view from behind the station building. |
| Coonabarabran | 1997 | The gantry crane and goods shed in the yard. |
| Coonabarabran | 2000 | Another view of the gantry crane and goods shed. |
| Coonabarabran | 2000 | A view of the rationalised yard, looking in the down direction. |
| Coonabarabran | 2000 | A set of points levers and associated diagram. Much of the diagram has been blacked out, as the yard was rationalised. |
| Coonabarabran | 1997 | Relics of the steam era. |
| Coonabarabran | 2004 | The signal hut on the eastern side of the Newell Highway level crossing. |
| Coonabarabran | 2004 | The view looking south towards the Newell Highway level crossing. |
| Coonabarabran | 2004 | The view looking west at the Newell Highway level crossing. |
| Coonamble | 1986 | The view looking south towards the station building. |
| Coonamble | 1986 | The road-side view of the station building. |
| Coonamble | 1996 | The station building and remains of the platform at Coonamble. The silos at the back see seasonal traffic. |
| Coonamble | 2004 | The view along the cut-back platform towards the end of the line. |
| Coonamble | 2004 | The road-side approach to the boarded up station building. |
| Coonamble | 2004 | Looking from the station towards the end of the line. |
| Coonamble | 2004 | The unusual enclosed goods platform. |
| Coonamble | 2004 | The base for a water column. The one-time loco facilities were in the background. All the remains is this and the turntable (in the right distance). |
| Coonamble | 2004 | A closer view of the turntable. The track serving it has been lifted. |
| Coonamble | 2004 | The overgrown turntable, looking towards the main station area. |
| Coonamble | 2004 | The identification plate of the Sellers-built turntable. |
| Coopernook | 1981 | Coopernook was still in operation in 1981. |
| Coopernook | 1981 | Coopernook signal box diagram in 1981. |
| Coopernook | 1981 | A familiar site on the north main line was the use of automatic staff exchangers which were used so as to not slow down the trains. This is ready for a northbound train in 1981. |
| Coopernook | 1981 | Coopernook station saw some activity in this 1981 shot of 4463 leading a 48 on a northbound freight as onlookers watched. |
| Coorabin | 1980 | In 1980, the wooden platform face was still in good condition, and the station still boasted a name board. Services ceased 2 years later. |
| Coorabin | 1998 | This view is taken from the top of the goods loading ramp of the remains of the platform. |
| Coorabin | 1998 | The loading ramp opposite the platform. |
| Coorabin | 1998 | The loading ramp is in the distance to the left of the track. |
| Coorabin | 1998 | The remains of the platform viewed from the top of the goods bank. This view is looking to the south. |
| Cootamundra | 1976 | The nameboard at Cootamundra, showing some of the destinations which can be reached from here. |
| Cootamundra | 1976 | A view of the main platform from the footbridge. |
| Cootamundra | 1976 | A 44 class, with No 2 end leading, pulls a container train through the down platform. |
| Cootamundra | 1976 | A ballast train leaves the station under the footbridge. |
| Cootamundra | 1976 | The dock platform at the Sydney end of the station. |
| Cootamundra | 1976 | The dock platform at the Albury end, with CPH 16 ready to form the Tumut connection No 15a with the Riverina Express. |
| Cootamundra | 1997 | The impressive station at Cootamundra. |
| Cootamundra | 2001 | The view along the platform, looking in a southerly direction. |
| Cootamundra | 2001 | The disused turntable at the southern end of the yard. |
| Cootamundra | 2001 | Cootamundra station and yard, looking in the direction of Sydney. |
| Cootamundra | 2002 | The goods loading platform at Cootamundra with 3801 and 3830 being re-coaled. |
| Cootamundra | 1985 | The rear of an XPT service, sitting on platform 2. |
| Cootamundra | 1985 | An XPT approaching the station from the south. |
| Cootamundra | 1980 | Cootamundra North Box frame. |
| Cootamundra | 1980 | This is the entire Cootamundra North diagram in 1980. |
| Cootamundra | 1980 | The right half of the Cootamundra North diagram. |
| Cootamundra | 1980 | The left half of the Cootamundra North diagram. |
| Cootamundra | 1980 | The gate controls for the level crossing. The manual cranks can be seen below. |
| Cootamundra | 1980 | The utilitarian Cootamundra North Box with the level crossing gates. |
| Cootamundra | 1980 | Cootamundra South Box with Rail Motor 27 headed north to Cootamundra Station from the Tumut line. |
| Cootamundra | 1980 | The left half of the Cootamundra South Box diagram. |
| Cootamundra | 1980 | The right half of the Cootamundra South Box diagram. |
| Cootamundra | 1980 | Cootamundra South Box and crossing gates. |
| Cootamundra West | 1976 | A rail train and diesel railcar sit at the expansive station. |
| Cootamundra West | 1976 | The view looking east along the platform. |
| Cootamundra West | 1986 | The unusual station sign. |
| Cootamundra West | 1986 | The signal box on the platform. |
| Cootamundra West | 1986 | The view looing east from upstairs. At this time, the station was the local headquarters of the Cootamundra State Emergency Services (SES). |
| Cootamundra West | 1986 | The view looking west along the platform. |
| Cootamundra West | 2001 | The view of the station building looking from the northern side of the station. |
| Cootamundra West | 2001 | The view looking west along the South Fork platform. |
| Cootamundra West | 2001 | The view looking west along the Main Line platform. |
| Cootamundra West | 2001 | The view looking east at the signal box, which is still in use. |
| Cootamundra West | 2001 | The view from the south, showing the unusual iron signboard.. |
| Cootamundra West | 1980 | The small diagram for Frame D situated to the west of the platform, to control the main line to the siding. |
| Cootamundra West | 1980 | The scene in 1980 which shows the original Station Masters house and the manually operated gates. To the right the single line south and the left the up & down lines north. |
| Cootamundra West | 1980 | The diagram of Cootamundra West in 1980. |
| Cootamundra West | 1980 | The iron station sign and signal box still used 1980. |
| Cootamundra West | 1980 | The view looking east towards the station showing the short signals designed that way because of the local airfield close by. Frame B can be seen in the middle. |
| Coreinbob | 1999 | The A lever frame at the up end of the siding. |
| Corobimilla | 2000 | The remains of the platform nestles in a heavily-overgrown yard. |
| Corowa | 1980 | Eight years before the last train, Corowa station is in poor condition. |
| Corowa | 1996 | The station buildings at Corowa have been used as a tourist information centre. |
| Corowa | 1996 | The turntable is still present at Corowa yard. The yard has been turned into a public park. |
| Corowa | 1996 | The gantry crane and surviving yard trackwork. The station is in the left distance. |
| Corowa | 2003 | The (slightly damaged) home signal at Redlands Road, looking in a Down direction. The station awning can be seen in the middle background. |
| Corowa | 2003 | The main line viewed in the up direction just short of the terminus. |
| Cougal Spiral No 1 Tunnel | 2003 | A broad view of the Cougal border loop looking down the valley towards Kyogle. Due to the steepness of the countryside, a series of tunnels were built through the mountains giving the old steam trains enough height to cross over the Border Ranges into Queensland. |
| Cougal Spiral No 1 Tunnel | 2003 | A closer view of the Cougal border loop showing the line doubling back on itself on its way to Queensland. |
| Cougal Spiral No 1 Tunnel | 2003 | A sign overlooking the border loop at Cougal just south of the Queensland border. |
| Couridjah | 1983 | A pre-restoration view of the station and nameboard. |
| Couridjah | 2001 | The station has been restored by the RTM staff. |
| Couridjah | 2003 | Aother view of the restored station. |
| Cowan | 2001 | The view looking north, showing the light-weight construction of the platforms. |
| Cowan | 2001 | The view looking south showing the overgrown per-way sidings behind the up platform. |
| Cowan | 2001 | The up perway sidings, looking north. |
| Cowan | 2002 | A city-bound inter-urban "V" set moves though the up platform in the late afternoon shot. |
| Cowra | 1997 | Cowra station is still used occasionally by the Lachlan Valley Railway. |
| Cowra | 1991 | The entrance side of Cowra station. |
| Cowra | 2001 | The view looking south through the LVR carriage shed. |
| Cowra | 2002 | The view looking along the freshly painted platform in the direction of Young. |
| Cowra | 2002 | Looking along the platform in the direction of Blayney. |
| Cowra | 2002 | Looking along the station in the up direction. |
| Cowra | 2002 | The road-side approach and car-park. |
| Cowra | 2002 | The sidings and silo at the Cowra Wheat terminal, about 4km south of Cowra station. |
| Cowra | 2002 | A view of the Lachlan Valley Railway depot at Cowra. A CPH railcar is visible in the shed. |
| Cowra | 2002 | The elevated water tank at the north end is mounted on the top of a bank. |
| Cowra | 2002 | The old jib crane, with the refrigerated goods shed on the left. |
| Cowra | 2002 | The road-side view of the refrigerated goods shed. |
| Cowra | 2002 | An overview from the northern end of the yard, with a goods bank to the right and what's left of the over grown yard, the goods shed in front, and in the far distance the station and signal box. |
| Cowra | 2002 | A view of the long goods bank and what's left of the northern end of the yard. |
| Cowra | 2002 | The newly painted station building. |
| Cowra | 2004 | A view looking south across the yard. |
| Cowra | 2004 | The view looking south of the junction of the branch to Eugowra. The Lachlan Valley Railway facilities are visible on the left. |
| Cowra | 1984 | Candy-liveried louvred wagons sit in a siding. |
| Cowra Stockyards | 2002 | The rusty sidings serving the Cowra Stockyards, about 5km south of the town. |
| Cowra Stockyards | 2002 | The remains of the cattle loading bank, on the stockyards siding. town. |
| Cowra West | 2004 | The view looking back towards Cowra. No trace remains of the station. |
| Coxs Gap No 1 Tunnel | 1978 | The eastern portal when the tunnel was still being used for road traffic. |
| Coxs Gap No 1 Tunnel | 1991 | The approach to the western portal. |
| Coxs Gap No 1 Tunnel | 1991 | A closer view of the western portal. |
| Craboon | 1998 | The view of the overgrown formation looking away from the junction at Craboon. |
| Craven | 2004 | The level crossing and associated hut at Craven. |
| Craven | 2004 | A southbound coal train waits in the loop before continuing to Newcastle. |
| Cringila | 1996 | Various wagons reside in the Cringila exchange sidings. |
| Cringila | 1996 | BHP locomotive D38 hauls a short coal train past the station at Cringila. |
| Cringila | 2004 | The view of the platform looking down the line. |
| Cronulla | 2003 | The station master's desk and signal diagram. |
| Crooble | 1980 | A view of the one time up-side station |
| Crooble | 1980 | Locos 4875 and 4855 pass the station platform with wheat bound for Moree. |
| Crooble | 2001 | A view of the wheat siding at Crooble. The staff hut is just visible behind the nearest wagon in the siding. |
| Crooble | 2001 | The fairly simple yard diagram in the staff hut. |
| Crookwell | 1998 | The station and infrastructure is still in good condition. This view is looking in the up direction. The goods shed is in the background. |
| Crookwell | 1998 | The turntable is still present. In the background are the goods shed and loading bank. |
| Crookwell | 2001 | The view of Crookwell station and yard, shows that it is still in excellent condition. The loop siding includes a rail trike (red) and weed sprayer (yellow). |
| Crookwell | 2001 | The view of the yard, looking back towards Goulburn. |
| Crookwell | 2001 | A closer view of the goods shed reveals that the platform area is being used to store wrapped bales of fodder. |
| Crookwell | 2001 | The overgrown goods loading bank. |
| Crookwell | 2001 | The ash pit on the engine siding. The turntable is visible a short distance further along. This area is starting to disappear under the weeds. |
| Crookwell | 2001 | The rotting timbers on the deck of the 60ft turntable. |
| Crookwell | 2001 | Looking up towards the end of the line. On the loop siding is a small wagon for weed spraying, and beyond that a rail trike. |
| Crookwell | 2001 | The back of the station building, revealing a chimney which would have provided welcome warmth in winter. |
| Crookwell | 2001 | The end of the line. The points are still in operating condition. |
| Crookwell | 2001 | Warning sign near at the outskirts of Crookwell yard. |
| Crookwell | 2001 | A visiting maintenance trike sits in the platform road. |
| Crookwell | 2001 | The gangers shed. |
| Crookwell | 2001 | The C lever frame, with rodding still connected. |
| Crookwell | 1980 | Crookwell's down home signal, which waits a long time for a train in 1980. |
| Crookwell | 1980 | The beautiful station clock inside the Station Master's office at Crookwell. |
| Crookwell | 1980 | The Crookwell-Goulburn staff & ticket box 1980. |
| Crookwell | 1980 | Crookwell down home lever & repeater. |
| Crowther | 2004 | A view looking southwards. Only 2 concrete pillars remain at far southern end. |
| Crowther | 2004 | The view looking southwards at southern end. |
| Cryon | 2004 | The view looking towards Walgett. The goods bank is present, although the loop siding has been lifted. |
| Cryon | 2004 | The pile of rubbish marks the location of the one-time station. |
| Cryon | 2004 | The Down Home semaphore signal on the outskirts of the location. |
| Culcairn | 1997 | The road-side view of the station building. Although in good condition externally, at this time much of the interior had been damaged by vandals. |
| Culcairn | 2000 | The station and crane at Culcairn. |
| Culcairn | 2000 | The remains of the Holbrook branch as it approaches the now-lifted junction at Culcairn. |
| Culcairn | 1980 | Culcairn Signal Box diagram in 1980. |
| Culcairn | 1980 | Culcairn signal levers showing the branches to Holbrook and Corowa. |
| Culcairn | 1980 | The nameboard at Culcairn looking worse for wear as it sets the mood for the defunct Corowa and Hobrook branches. |
| Culcairn | 1980 | Long gone signals at Culcairn. This was situated at the Albury end of the platform road; the left signal was for the loop to Corowa (lever 7) and the right signal (lever 6) was for the Corowa line from the back platform road. |
| Culcairn | 1980 | The staff and ticket boxes for both Holdbrook and Corowa in Culcairn Signal box. |
| Culcairn | 1980 | A view of the station with its well-maintained gardens. |
| Culcairn | 1980 | 42220 waits patiently in the loop waiting to head south while 42103 42214 rumble north on a dark and gloomy day in 1980. |
| Culcairn | 1980 | 42220 sits in the loop on the down as 42217 thunders by and is about to exchange the staff on the automatic staff exchanger through the next section to Gerogery. |
| Culgoora | 1975 | The simple platform and shelter, with signboard still present. |
| Culgoora | 1975 | The view looking across to the shelter and station nameboard. |
| Cullen Bullen | 2002 | The grass mound on the right side of the line is the location of Cullen Bullen station, in this view looking north. No trace remains today. |
| Cullen Bullen | 2002 | Cullen Bullen was the junction for a short branch to the Invincible Colliery. Near the junction is the remains of a coal bunker. The formation is visible behind the wall, and continues along the road in the distance for a couple of kilometres. |
| Cullerin | 1980 | The station was near the top of the Cullerin Range, as this sign attests. |
| Cumboogle | 2004 | The remains of the platform at Cumboogle. |
| Cumnock | 2003 | The dilapidated station building, from Yeoval end. |
| Cumnock | 2003 | Nearby Grain Corp structures: Cumnock Grain Corp bulkhead and concrete silos. |
| Cumnock | 2003 | The Grain Corp concrete silo. |
| Cumnock | 2003 | The town side of the overgrown platform and station building. |
| Cumnock | 2003 | The Grain Corp bulkhead. |
| Cumnock | 2004 | The remains of the signal box which sat at the down end of the platform. |
| Cumnock | 2004 | The view looking up the line, showing the goods platform (left) and main passenger platform (right). |
| Cumnock | 2004 | The remains of the station nameboard lie on the platform. |
| Cumnock | 2002 | The remains of a point indicator in the yard. |
| Cumnock | 2002 | The view looking south along the down platform. |
| Cunningar | 1980 | The original platform of Cunningar now is a little ways off the main line in this 1980 photo. The station had a 98 year life closing on March 9th, 1975 |
| Curban | 2003 | The location of Curban, now dominated by the silo and grain siding. |
| Curban | 2004 | The view looking towards Dubbo. |
| Curban | 2004 | The probable location of the station was between the two trees. |
| Curlewis | 2003 | The interior of the signal box. |
| Curlewis | 2003 | The yard diagram adjacent to the outdoor lever frame. |
| Curlewis | 2003 | The staff instruments for the Breeza-Curlewis and Curlewis-Gunnedah sections. |
| Dapto | 1986 | Dapto Station was a crossing point for the diesel railcars which served this section of the branch. |
| Dapto | 2004 | The view looking north along No 2 platform. |
| Dapto | 2004 | The view looking south along No 2 platform. |
| Dapto | 2004 | The road-side approach to the station building. |
| Darling Harbour | 1984 | A throw-over points lever in the yard. |
| Darling Harbour | 1984 | The southern end of the large Outwards Goods Shed (West). |
| Darling Harbour | 1984 | The view looking south from the western side of the yard. Demolition of some of the sheds appears to be in progress. |
| Darling Harbour | 1984 | The tracks leading into the upper level of the Double Tier Goods Shed. |
| Darling Harbour | 1984 | The tracks leading into the upper level of the Double Tier Goods Shed. |
| Darling Harbour | 1984 | The tracks leading into the upper and lower levels of the Double Tier Goods Shed. |
| Darling Harbour | 1984 | The view looking north-west over the Double Tier Goods Shed. This has now been replaced by the Novotel Hotel. The orange building in the centre is the Murray Street signal box. |
| Darling Harbour | 1984 | The view looking north showing (L to R) the Double Tier Goods Shed, the Outward Goods Shed and Outwards Goods Shed (West). In the right distance, the Pyrmont Bridge is in the open position. |
| Darling Harbour | 1984 | A close-up view of the Outward Goods Shed. |
| Darling Harbour | 1984 | Advertising signs on the southern end of the Outward Goods Shed. |
| Darling Harbour | 1984 | The view looking east across the yard to the city. |
| Darling Harbour | 1984 | The view looking west from the city side, showing a restored sailing ship alongside the wharves. |
| Darling Harbour | 1984 | A closer-view of the Pyrmont Bridge which can open to allow ships through to the wharves served by the yard. |
| Darling Harbour | 1984 | A locomotive (possibly a 73 class) hauls some wagons through the yard. |
| Darling Harbour | 1984 | An unidentifed part of the yard, possibly near the old Ultimo power station. |
| Darling Harbour | 1984 | An aerial view looking down over Darling Harbour goods yard, taken from Sydney Tower. |
| Darling Harbour | 1979 | The lever frame for the Murray Street crossing. The gate wheels can be seen on each end of the frame |
| Darling Harbour | 1982 | Union Street Box controlled the entrance to Darling Island goods yard and the Pyrmont power station. |
| Darling Harbour | 1984 | The main road entrace to the yard, located at the western end of Liverpool Street. |
| Darling Harbour | 1984 | The upper level road entrance to the Double Tier Goods Shed. |
| Darling Harbour | 1979 | Ultimo Signal Box contained 36-lever frame. The building was unfortunately destroyed by a fire on 11/3/1996. |
| Darnick | 1982 | The view of the platform, station and name-board. |
| Darnick | 1982 | The view looking east along the platform, showing the water tank and cattle loader. |
| Daroobalgie | 2004 | The view looking north towards Parkes shows the loading bank, now no longer served by a siding. |
| Daroobalgie | 2004 | The view looking south from the one-time station location shows what appears to be the old meat feezing works, which were served by several sidings. |
| Deepwater | 1996 | The up end of the platform and nameboard. |
| Deepwater | 1996 | The view looking down the line towards Wallangarra. The water tank and pipe are still present at the far end of the platform. |
| Deepwater | 1996 | The road side view of the station building. |
| Deepwater | 2002 | The road-side approach to the preserved station building. |
| Deepwater | 2002 | The station name board. |
| Deepwater | 2002 | The new fittings of the station-masters office entrance betray its re-use. |
| Deepwater | 2002 | The rail-side view and brick platform face. |
| Deepwater | 1996 | A view of Deepwater Station looking south. |
| Deepwater | 1996 | The Water column and tank with extra jib for double headers at Deepwater Station. |
| Delec | 1980 | Many a crew change has occurred on Delec platform and on an April Thursday morning in 1980, 48134 waits placidly for its new handler. |
| Delec | 1996 | Candy-liveried 42208 stands idle next to the turntable during the 1996 Open Day. |
| Delec | 1996 | 8154 sitting in the fuel point as Delec. |
| Delec | 1996 | A somewhat battered-looking class leader 8501 sits on the wheel lathe. The wheel lathe is used by all types of locomotives to remove defects (wheel scale, flat spots etc) from wheels. |
| Delungra | 1980 | Loco 4852 is hauling the Weed Kill Train past the platform towards Inverell. |
| Delungra | 2004 | The long concrete platform is almost buried beneath the long grass. |
| Delungra | 2004 | Behind the platform is the remains of a lever frame. |
| Demondrille | 1980 | Always in the shadow of big brother, Demondrille South now stands decaying beside tracks overtaken with long grass in 1980. |
| Demondrille | 2002 | The view from the road bridge looking towards Cootamundra. The line to Cowra branches of the to right of the Demondrille North Signal Box. The station was a pair of island platforms on the main and branch lines just beyond the signal box. The overgrown line on the far right served a dock platform just beyond the box. |
| Demondrille | 2002 | The view of the North Signal Box, looking back towards Sydney. The lines in the foreground are the branch to Cowra and Blayney, with the Main South at the back. |
| Demondrille | 2002 | The overgrown branch line platform is still present, along with a pair of semaphore signals. |
| Demondrille | 2002 | A ground-level view of the branch line platform. The main south line is visible in the background. |
| Demondrille | 2004 | A close-up view of Demondrille North Box. The branch line to Blayney is on the right. |
| Demondrille | 2004 | The remains of the branch line platform. |
| Demondrille | 2004 | The interior of the North Box, showing the lever frame and safeworking instruments. |
| Demondrille | 2004 | The interior of the North Box, showing the lever frame and signalling telephones. |
| Demondrille | 2004 | A close-up view of the signalling instruments. |
| Demondrille | 2004 | A close-up view of the signalling telephones and log books. |
| Demondrille | 1980 | CHP38 comes off the Blayney Branch and trundles north through the old branch platform at Demondrille. |
| Demondrille | 1980 | Demondrille North Box needs a coat of paint in this 1980 photo. |
| Demondrille | 1980 | The diagram at Demondrille North Box. It almost appears the Blayney line was the main. |
| Demondrille | 1980 | In contrast to later photographs, in this 1980 shot there are a lot of levers that are not spare or unused (painted white). |
| Demondrille | 1980 | The little-used Demondrille South Box in 1980. |
| Demondrille | 1980 | A view looking down to Albury where Demondrille North Box can be seen and also the two separated platforms, the one from the branch on the right. |
| Deniliquin | 1988 | Deniliquin station prior to its demolition. |
| Deniliquin | 1988 | Deniliquin goods shed with RT47 shunter. |
| Denman | 1976 | XXX |
| Denman | 2002 | The truncated sleeper-build platform at Denman still sports a nameboard, although it no longer sees passengers. |
| Denman | 2002 | The view in the yard looking west towards the platform and elevated water tank. |
| Denman | 2001 | The view looking through the yard towards the station remains and the water tank. |
| Denman | 2001 | The view looking back up the yard in the direction of Muswellbrook. |
| Denman | 2003 | The view looking east across the yard form the station. |
| Denman | 2003 | The view looking west across the yard from the remains of the station. |
| Dhuragoon | 2004 | The view looking east towards the one-time station location. |
| Dhuragoon | 2004 | The crossing indicates that trains have not recently travelled here. The station location is believed to be on the left. |
| Dhuragoon | 2004 | The view looking north of the railway crossing. |
| Dhuragoon | 2004 | The view form the down end of the location looking up towards Murrabit. |
| Dhuragoon | 2004 | A mound on the north of the line which may be the platform remains. |
| Dhuragoon | 2004 | The road-side approach to the crossing, from the north. |
| Doonside | 2004 | The view looking west from the footbridge. |
| Doonside | 2004 | The view looking east from the footbridge. |
| Dora Creek | 2003 | Dora Creek Station overlooking the nearby waterway. |
| Dora Creek | 2003 | Dora Creek looking north. |
| Dorrigo | 2002 | Dorrigo station is still in reasonable condition, although the platform facing is collapsing. |
| Dorrigo | 2002 | Some railway carriages being stored in a siding at Dorrigo. |
| Dubbo | 1979 | The wooden nameboard for Dubbo, junction for the line to Coonamble. |
| Dubbo | 1996 | Various locos rest in the yard behind the platform at Dubbo. |
| Dubbo | 1998 | The pedestrian entrance to Dubbo Station. |
| Dubbo | 1998 | The former Narromine end bay platform where the mail used to be loaded onto/from the Sydney Mail; has been replaced by an elevated ramp for the rail replacement coaches to park in the shade. The shorter canopy in front of the longer rear canopy on the platform was built for the coaches in the early 1980's. |
| Dubbo | 1998 | The entrance to the yard, taken looking west from the Fitzroy Street crossing. Dubbo East Signal Box is on the far left, with the sanding tower beyond the loco depot. |
| Dubbo | 1998 | Dubbo station from the Sydney end, looking towards Narromine. The building in the immediate foreground is Dubbo West Signal Box. The area to the left of the points in the middle distance was where the two line carriage shed used to be. |
| Dubbo | 1998 | The lever frame and signal diagram inside Dubbo West box. |
| Dubbo | 1998 | Looking towards Sydney/Werris Creek. Dubbo Loco on left, and container facility on right. Approach to the short bay platform on bottom right, which was just long enough for a CPH and CTH combined set to be stabled. |
| Dubbo | 1998 | Fitzroy Street crossing looking east. The line turning to the left heads off to Gilgandra and Merrygoen/Werris Creek. The line to the right heads off to Sydney and the siding that remains of the truncated Molong branch. The line in the middle, is the approach to the sleeper mill, which appeared to be somewhat lacking in sleepers at the time. |
| Dubbo | 1998 | General view from the end of the platform in the Narromine end of the yard, with part of oil storage facility on right. |
| Dubbo | 1998 | The 57 class boiler still in use as the sanding tower at Dubbo Loco. |
| Dubbo | 1998 | Dubbo's yard shunters wagon, sitting beyond the dirt track that remains to mark the carriage siding. The new coach station is directly above the shunter's wagon. |
| Dubbo | 2004 | 3801 leads a tour train off the Macquarie River bridge, to the west of Dubbo. This is the view looking back towards Dubbo. |
| Dubbo | 2004 | The original iron bridge over the Macquarie River, looking towards Narromine. |
| Dubbo | 1989 | Looking across the Macquarie River towards Dubbo. Photo taken from the rear of Dundullimal Homestead, a National Trust property at Dubbo. |
| Dubbo | 1982 | The view looking west towards the end of the platform. |
| Dubbo | 1982 | The road-side view of the station. |
| Dubbo | 1982 | The interior of the signal box, with the lever frame and yard diagram. |
| Dubbo | 1982 | The view looking across towards the loco servicing facilities. |
| Dubbo | 2004 | The Pacific National goods yard track diagram sign, adjacent to Darling St. |
| Dubbo | 2004 | Looking west towards Macquarie River bridge (in background) from Darling St level crossing. |
| Dubbo | 2004 | Looking east at station, from Darling St level crossing. |
| Dubbo East Junction | 1998 | The highway crossing about 1km from the junction. |
| Dubbo East Junction | 2004 | The now-closed line to Molong has been lifted from Wingewarra Street to Dubbo East Junction. This is the remains of the northern end of the line. |
| Dubbo East Junction | 2004 | The site of the original junction between the Main Western Line and the Dubbo-Molong branch line. No trace remains of the branch line at the junction. |
| Dumaresq | 1977 | The view along the station, looking back towards Sydney. |
| Dumaresq | 2002 | The view of the station looking in the down direction. |
| Dumaresq | 2002 | The view looking north along the platform. |
| Dumaresq | 2002 | The view looking south along the station and platform. |
| Dumaresq | 2002 | The road-side view of the station building. |
| Dumaresq | 2002 | The rail side approach to the station, showing the nameboard still in place. |
| Dumaresq | 2002 | A close-up of the 5 lever frame which controlled the yard. |
| Dundas | 2004 | The road-side view of Dundas station. |
| Dundas | 2004 | The view looking south along the platform towards Clyde. |
| Dundas | 2004 | The view looking north along the single platform towards Carlingford. |
| Dundee | 2001 | The down-side platform remains. |
| Dunedoo | 1979 | The view of the platform and yard, looking down the line towards Gwabegar. |
| Dunedoo | 1991 | The station and platform in 1991. At this time the original low-level platform is still present. |
| Dunedoo | 2002 | The paint is flaking off the closed station building. The platform has been replaced with a full-height version. |
| Dunedoo | 2003 | The view looking down the line towards Merrygoen. |
| Dunedoo | 2003 | Dunnedoo looking back towards the station from the west. |
| Dunedoo | 2004 | An NR locomotove heads an ore train through the station. |
| Dunedoo | 2004 | The lever frame on the platform. |
| Dunedoo | 2004 | 4908 and two carriages stand at the restored station. |
| Dunedoo | 2004 | A look inside the old ticket office. A few broken windows are the only damage that has occurred since the station closed September 1975. |
| Dunedoo | 2004 | The preserved Station Masters house behind the station. |
| Dungog | 1981 | The view looking down over the station and yard. |
| Dungog | 1981 | A view of the station, looking back towards Sydney. |
| Dungog | 1999 | The Grafton XPT sits briefly at Dungog station before heading northwards. |
| Dunheved | 1996 | The view from the footbridge looking up the line. |
| Dunheved | 1996 | These two carriages (N5127 and C3866) have been used by the fire brigade and local vandals. They have since been removed. |
| Dunheved | 1996 | The remains of the station. The lever frame is still present (it has since been removed). |
| Dunheved | 2004 | By 2004 the remains of the sidings and related infrastructure have been removed. |
| Dunheved | 2004 | Another view of the now trackless yard. |
| Dunheved | 2004 | The view looking towards St Marys. |
| Dunheved | 2003 | By 2003, the track had been lifted. |
| Duri | 2002 | Indicating its status as a unused location, the silo at Duri stands well back from the rail line in this view towards Tamworth. |
| Duri | 2002 | A closer view of the short unused platform looking towards Tamworth. |
| Duri | 2002 | Another view of the platform looking towards Werris Creek. You can still see where the main frame would have been located on the platform. |
| Dwyers | 2003 | Only a small concrete structure marks the location of Dwyers. |
| Dwyers | 2003 | A close up of what appears to be a concrete tank at Dwyers. |
| East Greta | 2001 | A maintenance "hi-rail" vehicle passes the remains of the up platform. |
| East Greta | 2001 | A view of the down platform. |
| East Greta | 2001 | Some of the ruins which sit above the location of the station. The platforms are just out of view on the right. |
| East Greta Junction | 2001 | The view down the line from the station. The track on the left went to the one-time locomotive servicing facilities. |
| East Greta Junction | 2001 | Platforms and semaphore signals. The sign on the down platform at the back reads "South Maitland Railways - East Greta Junction". |
| East Greta Junction | 2002 | A view of the platform and semaphore signals and signal box looking towards Cessnock. |
| East Greta Junction | 2001 | The remaining trackwork at East Greta Junction. In the background, the line curves to the right where it meets the Main North line. The signal box is still in use. |
| East Greta Junction | 2002 | An overall view of the unusually positioned platforms looking towards Cessnock. Note that a new sempahore arm has been added to the down signal. |
| East Greta Junction | 2001 | The remains of the East Greta Exchange Sidings. |
| East Greta Junction | 2002 | A view along the down platform looking towards the junction at Maitland. |
| East Hills | 1985 | East Hills was the terminus for many years and this shows the Signal Box diagram depicting the simple layout of the station which was single line to this point. The location became quite busy in rush hours. |
| East Hills | 1985 | East Hills Signal Box frame before the line was duplicated and extended to Glenfield and the box removed. |
| East Hills | 1985 | The bracket signal at the approach to the original East Hills terminus. The upper quadrant signal was for No.2 platform road (lever 3) and the lower quadrant (lever 4) for No.1 platform road. |
| East Maitland | 2003 | A 2 car Endeavour set heads west through the station. |
| East Maitland | 2001 | Looking along the preserved branch line platform, which is situated at a lower level to the main line platforms. Buried under the grass appears to be the remains of the tracks. |
| East Maitland | 1997 | The station sign on the branch line platform. The live platforms are visible in the background. |
| East Maitland | 1997 | A closer view of the disused, but well-preserved, branch line platform. |
| East Richmond | 1985 | The view looking east towards Sydney along the platform. |
| East Richmond | 2004 | The view of the modern station building. |
| Eastwood | 2004 | The view looking south along the platforms. |
| Eastwood | 2004 | The road-side view of the modern entrance to the station. |
| Echuca | 1997 | V/Line loco S307 sits shut down in the yard just to the south of Echuca station. |
| Echuca | 1997 | It's a quiet day at Echuca in this view looking toward Melbourne. |
| Edgeroi | 2001 | The platform sign at Edgeroi. |
| Edgeroi | 2001 | The small platform contains a small passenger shelter and water tank. |
| Edgeroi | 2001 | Edgeroi is a staff exchange station, as evidenced by the staff receptacles for the sections to Bellata and Narrabri. Both staffs are absent. |
| Edgeroi | 2001 | A track maintence worker consults a log book in the safeworking room at the station. |
| Edgeroi | 2001 | Quite unusually, the platform shelter features a Roll of Honour on the wall. |
| Edgeroi | 2001 | A close-up of the World War I Roll of Honour mounted on the wall of the platform shelter. |
| Egelabra | 2002 | A view of the siding at Egelabra. |
| Elong Elong | 2004 | The wheat siding at Elong Elong. |
| Eltham | 2002 | The bridge over Wilsons Creek just after the site of Eltham station. |
| Eltham | 2002 | Another view of the bridge. The station site was to the left of the photo; it is now tennis courts. |
| Emerald Hill | 2004 | Boxing Day 2004 sees 8152 stopped on the Loop Siding opposite the remains of the station. |
| Emerald Hill | 1999 | A view of the yard diagram inside the signal boz. |
| Emu Plains | 2004 | The view from the footbridge looking east towards the city. |
| Emu Plains | 2004 | The view looking west, showing the impressive station building on platform 2. |
| Enfield Yard | 1980 | Front view of the majestic Enfield North Box which was busy no matter what shift the signalman had. |
| Enfield Yard | 1997 | This photos shows 8159/8180 with an empty coal train on the running lines next to an empty Enfield Yard. At this time the yard has not yet been re-commissioned. |
| Enfield Yard | 1984 | Enfield north box, with 4622 and another unidentified 46 loco. |
| Enfield Yard | 1986 | The electric loco servicing facility at Enfield, showing an assortment of locos. |
| Enfield Yard | 2004 | The view looking north from Punchbowl Road towards Enfield South Yard. |
| Enfield Yard | 2004 | The view looking north from Punchbowl Road towards Enfield South Yard. |
| Enfield Yard | 2004 | The view looking north from Punchbowl Road towards Enfield South Yard. |
| Enfield Yard | 2004 | The view looking north along the Delec Siding from the Punchbowl Road overbridge. |
| Epping | 2003 | Epping Signal Box is nestled under the road overbridge at the southern end of the station. |
| Epping | 2003 | The view looking north along platform 1. |
| Epping | 2003 | The view looking south along platform 2. |
| Epping | 2003 | The view looking south along platform 1. |
| Epping | 2003 | The view looking south towards platform 1. |
| Erigolia | 2003 | Looking back towards Weethalle, with not much remaining except the wheat silos. |
| Erskineville | 2002 | The view looking north along the platforms. |
| Erskineville | 2002 | The view looking north from the southern end of the station. |
| Erskineville | 2002 | The view looking south from the footbridge. |
| Erskineville | 2002 | The main entrance to the station, from the road-side. |
| Erskineville | 2002 | Two passenger trains are passing throught the station, with an up freight train approaching from the south in the distance. |
| Erskineville | 1985 | The remains of the Alexandria Goods Yard, just prior to its removal. This is the view from Garden Street looking south-west towards Henderson Rd. |
| Erskineville | 1985 | The rear of the large goods shed at the eastern end of the large goods shed. This area is now taken up by the Australian Technology Park. |
| Erskineville | 1985 | A closer view of the partly-demolished goods shed. |
| Erskineville | 1981 | The view looking along the platform in the direction of St Peters. |
| Ettamogah | 1970 | The view looking across towards the down-side station with its rudimentary shelter. |
| Euabalong West | 2001 | The view looking along the platform. |
| Euabalong West | 2001 | The unusual placement of the station name written along the platform facing. |
| Euabalong West | 2004 | The original out-of room. The two figures at the western end of the platform are train crew brought by taxi from Parkes to relieve on an Up freight train. |
| Euabalong West | 2004 | A close-up of original nameboard. |
| Euabalong West | 2004 | The building erected in the late 1980's to replace the station building, which was destroyed by white ants. |
| Euabalong West | 2004 | The view of the out-of room looking towards Condobolin. |
| Euabalong West | 2004 | The loading bank and silos. |
| Euabalong West | 2004 | The water tank which was part of the Loco facilities here. |
| Euabalong West | 2004 | The road-side view of the station. |
| Euabalong West | 2004 | The road-side view of the out-of room. |
| Euabalong West | 2004 | The final resting place of the small frame for the Loco facilities. |
| Euabalong West | 1987 | A view of the station when it was still attended. |
| Euchareena | 2002 | The supposed location of the one-time station. The silver object mounted on the telegraph post is a signal phone. |
| Euchareena | 2002 | The signal telephone still shows the "bell codes" for the nearby locations of Orange, Wellington and Stuart Town. |
| Euchareena | 2004 | The view looking towards Sydney. The one-time station was located on the right centre. The bank on the left served the stockyards and associated siding. |
| Eugowra | 2001 | The view from the line terminus, looking back up the line in the direction of Cowra. |
| Eugowra | 2001 | A gangers shed is still present. The rails in the foreground was used to move rail equipment on and off the line. |
| Eugowra | 2004 | The view from on top of the loading bank at the eastern end of the yard looking east. The station is just visible on the right side. |
| Eugowra | 2004 | The view from on top of the loading bank looking west towards the terminus. |
| Eugowra | 2004 | The remains of the station building. The platform has been cut-away from the line. |
| Eugowra | 2004 | The view of the loading bank, looking back up the line. |
| Eugowra | 2004 | A shot inside the station building reveals the remains of a 3-lever frame. |
| Eugowra | 2004 | The view looing west from the station towards the terminus, which is just beyond the trees. |
| Eugowra | 2004 | Looking across the yard, the terminus is in the distance. |
| Eumungerie | 1986 | The low wooden-faced platform and small shed that made up the station. |
| Eumungerie | 2004 | The view of the one-time station location. Now only a ground frame and signal box remain. |
| Eumungerie | 2004 | The view looking up the line showing the goods bank, and Train Orders and original sempahore signals. |
| Eumungerie | 2004 | The Down Home semaphore signal on the approach to Eumungerie. |
| Eumungerie | 1996 | 48117 hauls an ARHS charter over a wooden bridge near the township of Eumungerie. |
| Eungai | 2003 | A view of the short "CountryLink Modern" style platform. |
| Excelsior | 1981 | Excelsior had a staff & ticket location as shown in this 1981 picture. |
| Exeter | 1980 | A view of Exeter Signal Box, sitting on the up platform. |
| Exeter | 2004 | A view of a station signboard on the down platform. |
| Exeter | 2004 | The sempahore signal at the up end of the station is standing at danger, as a train has just passed through. |
| Exeter | 2004 | The view looking down the station in the direction of Melbourne. |
| Farley | 1987 | The view looking west along the down platform when the building was still present. |
| Fassifern | 2004 | The view looking across the large "V"-shaped platform towards the main station building. |
| Fassifern | 2003 | The back of Toronto Branch line platform. |
| Fassifern | 2001 | The branch-line platform, with the track area now filled in. |
| Fassifern | 2004 | The view looking along the branch line platform. |
| Fassifern | 2001 | The shelter along the branch-line platform, with the remains of the line. The track on the left was a storage siding, connected to the branch beyond the curve. |
| Fassifern | 2003 | The main complex at Fassifern Station. |
| Fassifern | 1967 | Steam locomotive 3034 is moving from the Toronto branch onto the Down Main, in this view looking south. |
| Fassifern | 2004 | The train indicator diagram at Fassifern. |
| Fassifern | 2004 | The control panel at Fassifern, controlling the branch to the nearby Newstan Colliery. |
| Faulconbridge | 2004 | The view looking across the Great Western Highway of the station and footbridge. |
| Fellow Hills | 1980 | The station sign now adorns the gate of a nearby property. |
| Fellow Hills | 2000 | Horses now wander over the station at Fellow Hills. The line branches off to the left to form the goods siding. The main platform is behind the horses. |
| Fellow Hills | 2000 | The remains of a level-crossing sign and telegraph poles. The station lies behind the first pole. |
| Ferndale | 1980 | Ferndale, in this 1980 photo, sports no waiting room but just a large cement water tank. |
| Finley | 1998 | The station and platform buildings at Finley are still being used as a community centre. Interestingly, the station building was not at track level. Several track are left in the yard, as well as signal posts, lever frame, the remains of the scales and a transfer crane. |
| Finley | 1998 | A lever frame and the remains of the goods shed in Finley yard, so the south of the station. |
| Finley | 1998 | The remains of the goods scales lie in the yard. |
| Finley | 1983 | Finley station is still in use as railset 706 606 have paused before continuing south to Tocumwal. |
| Fish River | 1980 | The view looking down the line to the location of Fish River. Note the water tank on the left and the old water column on the right. The signal box can be seen in the distance at the curve; this is the only remnant of the station. |
| Fish River | 1980 | The remains of Fish River signal box. This used to sit on the platform which was demolished around it. |
| Flemington | 1996 | Green-and-gold 4901 sits shut down in Flemington Goods Yard. |
| Flemington | 1982 | Flemington Car Sidings Box was a huge installation utilising pistol grips for the complex function of the car sidings. |
| Flemington | 1982 | Flemington Car Sidings signal box shows the array of pistol grips to control the complex sidings and main line. |
| Flemington Goods Junction | 1982 | Looking north from Flemington Goods Jct Box toward Pippita. A 48 sits on a short oil tank train waiting for the "road". |
| Flemington Goods Junction | 1982 | 7321 heads toward Pippita with a local freight to do some shunting with Flemington Goods Jct. Signal Box in the background, perched on its high vantage point. |
| Flemington Goods Junction | 1984 | The west end of Flemington Goods Junction diagram showing the connection leading to Lidcombe and the roads to the Goods line. |
| Flemington Goods Junction | 1984 | The east end of the Flemington Goods Junction diagram showing the lines to Pippita and eventually Abattoirs and connection to the back of the Car Sidings. |
| Flemington Goods Junction | 1984 | The striker bells in Flemington Car Sidings Signal Box to notify of train coming. |
| Flemington Goods Junction | 1984 | Flemington Goods Junction diagram. |
| Flemington Goods Junction | 1984 | The extensive Pistol Grip frame of Flemington Goods Junction in 1984. |
| Flemington Goods Junction | 1984 | This is the black Indicator board of Flemington Goods Junction which shows the positions of the train. Not to many of this style existed on the NSWGR. |
| Flemington Goods Junction | 1984 | A close up view of the now gone Pippita station are of the diagram in Flemington Goods Junction, with the various industries at the time it was a hive of activity. |
| Florida | 2003 | No trace remains of the one-time station. |
| Forbes | 2000 | The non-platform side of Forbes station. |
| Forbes | 2000 | The lever frame and track diagram are still present at the station. |
| Forbes | 1996 | The preserved station and platform. |
| Forbes | 1996 | 8121 leads a chartered train over the Lachlan River bridge, just to the south of Forbes. |
| Forest Hill | 2002 | A view of the decaying timber platform remains looking towards Ladysmith. |
| Forest Hill | 2002 | Another view of the derelict platform complete with point lever, this time looking back to Wagga Wagga. |
| Frampton | 1980 | The abandoned Frampton station, 5 years after it was closed. This is the view looking towards Albury. |
| Frampton | 2002 | Today there is little sign of the station's existence. |
| Frampton | 2002 | The station sign, now at a roadside location approx. 1 km east of the station site |
| Frampton | 2002 | The lever frame controlling the emergency crossover. |
| Frampton | 1979 | A north-bound passenger service passes through the station. |
| French Park | 2001 | The remains of the low down-side loading platform is all that remains at this site. |
| Galong | 1980 | A view of the station when it was still in use, and in good condition. |
| Galong | 2000 | Sadly, trains no longer stop at Galong. |
| Galong | 2000 | The abandoned double-platform station at Galong is still in good condition. |
| Galong | 2000 | The gantry crane in the yard. |
| Galong | 2000 | The goods shed in the yard is still intact. |
| Galong | 2000 | Remains of the branch line to Boorowa. |
| Galong | 2000 | Remains of the branch line to Boorowa. |
| Galong | 2000 | Remains of the branch line to Boorowa. |
| Galong | 1980 | Galong diagram. |
| Galong | 1980 | The Galong staff and ticket box for the Boorowa branch. |
| Galong | 1980 | The landmark, a triangle replacing a distant signal, was used to come from the Boorowa branch toward Galong. |
| Galore | 1980 | The station structures at Galore mirror the stations on this short branch line. |
| Galore | 2001 | The passenger platform still sports its nameboard. |
| Galore | 2001 | The goods platform is still present although the associated siding has been lifted. |
| Galore | 2001 | The short stock loading bank is still present. |
| Ganmain | 2001 | The view looking back towards Junee showing the loading bank on the now-lifted goods siding. The station was on the left of the track. |
| Gap | 1996 | 8130 hauls an ARHS charter train through the junction at Gap, heading down the cross-country line to Binnaway and Dubbo. The line on the left heads north to Narrabri. |
| Gap | 2001 | The safeworking instructions at the junction at Gap. |
| Gap | 2001 | The safeworking hut. |
| Gap | 2001 | The approach to the junction, looking towards Werris Creek. The line on the left is from Narrabri and the north-west, and the line on the right is from Binnaway. |
| Garah | 2004 | The small staff hut at Garah. |
| Garah | 2004 | A closer view of the sign on the staff hut's door. |
| Garah | 2004 | The grain silo, platform and water tower, looking south towards Moree. The one-time turntable was located out of the picture to the right. |
| Garah | 2004 | The view from the platform looking north towards Munigindi. |
| Garah | 2004 | The northern end of the platform and the water column attached to the tank. |
| Garland | 2004 | The brick-faced platform, in a view looking north. |
| Garland | 2004 | The view looking north towards Lyndhurst showing goods bank and platform. |
| Gelco | 2004 | The view of the Ampol siding at Baker Street, looking towards the end of the siding. |
| Gelco | 2004 | The view looking down over the up end of the Gelco sidings. |
| Gelco | 2004 | Where ther Ampol siding crossed Baker Street, the tracks are still present in the road. This is looking back up the line. |
| Gelco | 2004 | Branching off the Gelco sidings was the one-time Total Oil Siding, later known as the Ampol Siding. This is the view looking back towards the junction, where the line crosses Ocean Street. |
| Gelco | 2004 | Various safeworking equipment including signal BY3, the driver's emergency pushbutton for the same, and a telephone. The Botany relay and traffic room is in the background. This is at the up end of the Gelco sidings. |
| Gelco | 2004 | A close-up of the well-graffittied Botany relay room. |
| Gelco | 2004 | The location where the Ampol siding crosses Ocean Street, just after branching off the main line. |
| Gelco | 2004 | The down end of the Gelco sidings. The white building is the Kelloggs factory, which is served by a number of short sidings. |
| Gelco | 2004 | The view looking down the line towards the Gelco sidings. |
| Georges Plains | 2002 | The view of the disused station and platform. |
| Georges Plains | 2004 | The view looking east to the station, now a private residence. |
| Georges Plains | 2004 | The view from the western end looking towards the station and loading dock. |
| Geradan | 2004 | The possible location of the one-time station. |
| Geradan | 2004 | The level crossing signpost, with its associated distance on it. |
| Geradan | 2004 | The view looking east. The remains of a cattle loader are just around the corner. |
| Gerogery | 2002 | The late afternoon sun catches the abandoned Gerogery station, with one of its chimneys crumbling. |
| Gerogery | 2002 | The view looking south towards Albury. The lines are the Main and Loop Lines respectively. The area on the right once contained goods and grain sidings. |
| Gerogery | 2002 | A closer view of the north end of the station building, showing its rather sad state of disrepair. |
| Gerogery | 2002 | Inside the station building is the remains of a concrete pillar, purpose unknown. |
| Gerogery | 2002 | The remains of the fireplace on the southern-most room of the station. |
| Gerogery | 2002 | The loading bank opposite the southern end of the platform. |
| Gerogery | 2002 | The view of the station from the southern end. Note the low height of the wooden-faced platform. |
| Gerogery | 2004 | The view of the platform with Countrylink-style nameboard, from the adjacent Olympic Way. |
| Gerogery | 2004 | The signal box at the up and of the platform. |
| Gerogery | 1980 | The track diagram inside Gerogery Signal Box showing a very simple layout. |
| Gerogery | 1980 | Bathed in the early morning light Gerogery prepares for another day of business, the Signal Box can be seen to the left of the name board and the storage shed was designed with vents at the top to help dissipate heat. |
| Gerogery | 1980 | 8009 4201 in "125" colours rumbles north from Albury as it approaches Gerogery. |
| Gerringong | 2002 | The view looking north along the station. |
| Gerringong | 2002 | The creamery building, once served by a siding. |
| Geurie | 2002 | The station at Geurie is modern, with Countrylink signage and shelter, and even a yellow safety line. |
| Gidginbung | 2004 | A view of the silo and wheat siding, looking back towards Temora. The one-time station was about 100m away in the distance. |
| Gidginbung | 2004 | The view of the silo and wheat siding, looking towards Barmedman. |
| Gidley | 2002 | The view looking down the line at remaining facilities. |
| Gilgandra | 1979 | Gilgandra station, in its original location. |
| Gilgandra | 1986 | The view looking across to the station. |
| Gilgandra | 1986 | The road-side approach to the station. |
| Gilgandra | 1989 | Gilgandra station 1 year before closure. |
| Gilgandra | 1989 | The view looking northwards to the goods platform and shed. |
| Gilgandra | 1989 | The view from the station of the silos and goods shed. |
| Gilgandra | 1989 | Locomotive 4839 about to pass south through the station. |
| Gilgandra | 1989 | The lever frame with signal diagram behind. |
| Gilgandra | 2003 | The remains of the fertilizer shed. |
| Gilgandra | 2003 | The elevated platform serving the ground frame in the yard. |
| Gilgandra | 2004 | The modern staff hut. |
| Gilgandra | 2004 | The short platform containing the yard frame, alongside the 525 km post. This is all that remains of the station. |
| Gilgandra | 2004 | The yard diagram. The station and goods shed are no longer present. |
| Gilgandra | 2004 | A close-up of the 8-lever frame controlling the yard. Only 3 levers are in use. |
| Gilgandra | 2004 | The one-time goods shed was located between the silo and the jib crane (also gone). |
| Gilmore | 1976 | CPH 11 and 1 stand at Gilmore station. |
| Gilmore | 1984 | A view of the damaged bridge near Gilmore that caused the closure of the line. Taken shortly after the closure in 1984. |
| Gilmore | 1984 | Another view looking along the top of the damaged bridge in the up direction. |
| Gilmore | 1999 | The island platform and signal box at Gilmore. |
| Gilmore | 1999 | One of 2 sets of lever frames at Gilmore (the other is in the signal box). |
| Gilmore | 2002 | Another view of the station building. Supports for the platform can also be just made out in the overgrown grass. |
| Gilmore | 2002 | A closer look of the remaining building on the one time platform looking towards Tumut. |
| Gilmore | 2002 | An view of the overgrown platform looking towards Tumut. The mens toilets are in the foreground and the loading bank is on the right of frame. |
| Gilmore | 2004 | A close-up of the goods shed. |
| Gilmore | 2004 | The view looking back up the line through the yard, showing the goods shed station building and semaphore signal. |
| Gilmore | 2004 | The C frame is still visible although most of the yard is covered in spring-time flowers. |
| Girilambone | 1996 | A points lever lurking among unusual vegetation indicative of the fact that this location is a long way out west. |
| Girilambone | 1996 | The station building with brick faced platform. The structure in the foreground appears to be a device for checking the loading gauge of trains. |
| Girilambone | 1996 | The view along the platform looking in the direction of Sydney, over 600km away. The loading bank is still present. |
| Girilambone | 1996 | The view along the platform road looking in the direction of Bourke, showing more of the unusual vegetation. |
| Girilambone | 1996 | Another view of the station, looking from the top of the loading bank. The roof appears in danger of collapse. |
| Girilambone | 2003 | Age and vandals have worn the main building despite attempts to keep them out. |
| Girilambone | 2003 | The interior of part of the station building. |
| Girilambone | 2003 | More derelict station buildings. |
| Girilambone | 2003 | The 666.5km post in the yard, looking towards Nyngan. |
| Girilambone | 2003 | More derelict yard structures. |
| Girilambone | 2003 | The view along the platform looking towards Nyngan. |
| Girilambone | 2003 | The view of the yard, looking in the direction of Nyngan. |
| Girilambone | 2003 | By 2003, no attempt appears to have been made to preserve the station. |
| Girilambone | 2004 | The western line between Girilambone and coolabah. Damage done during the floods of 1990 which closed the line. |
| Girilambone | 2004 | Flood damage to the western line near Girilambone. |
| Girilambone | 2004 | The remains of a short culvert near Girilambone. |
| Girragulang | 2002 | This rotting timber platform is still present, although the track which served it has been lifted. The post in the left foreground is a half-kilometre marker. |
| Girragulang | 2002 | Opposite the goods bank is the passenger platform, which has fared somewhat better. |
| Girragulang | 2002 | Nestled in the trees are the remains of a cattle loading ramp. |
| Glebe Road Tunnel | 1991 | A tour train hauled by 3642 approached the eastern portal of the tunnel. |
| Glebe Road Tunnel | 1991 | A steam tour train is about to cross Johnston Street to the west of the tunnel, heading towards Rozelle Yard. |
| Glebe Road Tunnel | 1991 | The view looking back towards the city from a tour train passing along the viaduct above Wentworth Park. |
| Glen Innes | 1977 | Back when the line still saw traffic, the North Mail has stopped at Glen Innes to pick up and drop off passengers. |
| Glen Innes | 1982 | The road-side approach to the station building. This photo was taken 7 years before the line closed. |
| Glen Innes | 1982 | A line of wagons sit in the siding opposite the station. This siding has since been removed. |
| Glen Innes | 1982 | The water tank and column at the southern end of the station. |
| Glen Innes | 1997 | Eight years after closure, the yard at Glen Innes is starting to look overgrown. |
| Glen Innes | 1997 | The station building at Glen Innes has been re-used at a refreshment centre and club room. |
| Glen Innes | 1999 | The view looking north from the yard at Glen Innes. |
| Glen Innes | 1999 | The southern end of the platform, with the nameboard and water tank. |
| Glen Innes | 1999 | Look along the platform on a rather wet day. |
| Glen Innes | 2003 | The view to the north of Glen Innes, looking towards Tenterfield. |
| Glen Innes | 1999 | The return of a rail trike at Glen Innes after the first official trike run in September 1999 upon the granting of a Rail Access Agreement between RAC and New England Railway (NER) for the Glen Innes-Stonehenge Section. |
| Glen Innes | 1950 | The view looking down the line towards the station. A set of stock wagons are visible in the sidingon the left. On the right of the line can be seen the elevated water tank and the station building beyond. |
| Glen Innes | 1987 | Glen Innes station before the renovations. |
| Glenariff | 2003 | The line at Glenariff, looking back towards Nyngan. |
| Glenariff | 2003 | The view looking north towards Bourke. The line has been cut to cater for the road to the nearby property of the same name. |
| Glenariff | 2004 | The old platform sign is now on the property of same name. |
| Glenariff | 2004 | The view looking back towards Nyngan. |
| Glenariff | 2004 | The 725km post is still in good condition. The one-time station was located 50m beyond this post. |
| Glenbrook | 2004 | The view from the down end of the station, with a pair of inter-urban trains sets passing through. |
| Glenbrook | 2004 | The view looking along the up platform from the footbridge at the Sydney end. |
| Glenbrook | 2000 | A close-up view of the track indicator panel at Glenbrook. |
| Glenbrook Tunnel (1st) | 2004 | A close-up view of the up portal of the original Glenbrook Tunnel. |
| Glenbrook Tunnel (1st) | 2004 | The over-grown approach to the up portal. |
| Glenbrook Tunnel (1st) | 2004 | A close-up view of the up portal of the original Glenbrook Tunnel. |
| Glenlogan | 2004 | The view at the up end of the loop siding, looking towards Canowindra. |
| Glenlogan | 2004 | The silos are the only remaining structure at the location. |
| Glenlogan | 2004 | The bank which marks the location of the one-time station. |
| Glenlogan | 2003 | The level crossing at the up end of the yard. The town of Cowra is visible in the distance. |
| Glenlogan | 2003 | The sign on the end of the silo building. |
| Glenlogan | 2003 | The view of the silo looking towards Eugowra. |
| Glenlogan | 2003 | The ground frame at the up end of the silo siding. |
| Glenlogan | 2003 | The ground frame at the down end of the silo siding. |
| Glenreagh | 2001 | The view looking south along the branch line side of the station. |
| Glenreagh | 2001 | The view looking north along the branch line side of the overgrown station. |
| Glenreagh | 2002 | Glenreagh station, with the platform face removed. |
| Glenreagh | 2002 | A former Sydney single-deck ("red rattler") carriage sits rusting in the yard. |
| Glenreagh | 2003 | The view through the trees of the dilapidated station building. |
| Glenreagh | 2003 | A sign advising of the restoration status of the station. Progress appears to have halted. |
| Glenreagh | 2003 | Another view of the rear of the overgrown platform. |
| Glenreagh | 2001 | The first bridge on the Dorrigo branch, not far from Glenreagh. |
| Gloucester | 2004 | The up end of the station, looking south. |
| Gloucester | 2004 | The view looking down along the platform. |
| Gloucester | 2004 | The view looking up the platform, with an NR locomotive approaching. |
| Gloucester | 2004 | A closer view of the modern brick building. |
| Gloucester | 1992 | The station building at Gloucester. |
| Gloucester | 1992 | The view looking south along the station. |
| Gloucester | 1992 | The view looking north along the station. |
| Gloucester | 1982 | 44220 leading a 44 class goes through the routine staff exchange. |
| Gloucester | 1982 | Gloucester diagram showing a number of lines taken out in this 1982 picture. |
| Gobondery | 1986 | The signpost marks the location of the station. |
| Gogeldrie | 2000 | Only a platform (no track) marks the location of Gogeldrie. |
| Goninans Works | 2003 | The approach of siding to Goninan's premises. The branch to the left is a one-time line to Waratah Colliery. |
| Goninans Works | 2003 | The gate where Goninan's Siding enters the main premises. |
| Goobang Junction | 1990 | The former Goobang Junction West signal box. |
| Goolgowi | 2002 | The view looking down the line. The station was located where the white safeworking hut now stands. |
| Goolma | 2002 | The remains of a wooden bridge in the vicinity of Goolma. |
| Gooloogong | 1987 | A preserved steam locomotive heads a train through the station on its way back to Cowra. |
| Gooloogong | 2001 | Only the station nameboard (now moved to a local park) serves to remind that there was once a station here. |
| Gooloogong | 2004 | The possible remains of a jib crane at the western end of the yard. |
| Gooloogong | 2004 | The view of the silo and siding from the eastern end, looking west. |
| Gooloogong | 2004 | The view looking back up the line showing the base of a gantry crane. The main line is on the left, with the silo line on the right. |
| Gooloogong | 2004 | The view looking down the line showing the goods and passenger platforms. |
| Gooloogong | 2004 | Another view of the goods loading platform. |
| Goondah | 1980 | A photo of the abandoned platform and station 5 years after closure. |
| Gooramma | 1980 | The station nameboard hangs on a fence near the original station site. |
| Gooramma | 1980 | All that remained in this shot was the disconnected lever frame sitting next to the Gangers trike. |
| Gordon | 2002 | City-bound Tangara set T67 is stopped at platform 2, usually used for terminating services. |
| Gosford | 1987 | The view looking south from the Gosford rail yards towards the railway station. An XPT is waiting on platform 2 for departure. This station was rebuilt completely in 1992. |
| Gosford | 2004 | The turntable still sees use turning steam locomotive 3801. |
| Gosford | 1995 | The view looking north from Gosford Railway Station towards Etna Street roadbridge. Photograph taken from the drivers' cabin of locomotive 8239, which was on display at Platform One at Gosford Railway Station. |
| Goulburn | 1979 | Goulburn North Signal Box was located adjacent to the Goldsmith Street level crossing. It was decommissioned in 1979, about a week after this photo was taken. |
| Goulburn | 1979 | The staff and ticket box for the branch line to Crookwell, in the Goulburn North signal box. |
| Goulburn | 1979 | Goulburn North signal box diagram in 1979 showing the junction to the Crookwell line. |
| Goulburn | 1979 | Goulburn North frame in 1979 |
| Goulburn | 1979 | Goulburn Station Signal Box was located not far to the north of the station, on the up side of the line. It was decommissioned in 1979, about a week after this photo was taken. Behind the box is the large goods shed and platform. |
| Goulburn | 1979 | Interior of Goulburn Station box showing the lever frame. What was slightly unusual was the levers in the standard position stood straight up rather than the usual "lean". |
| Goulburn | 1979 | Goulburn Station Box diagram as it appeared 1 week before closing and decommissioning in 1979. |
| Goulburn | 1979 | Goulburn South Signal Box was decommissioned a week after this photo was taken. |
| Goulburn | 1979 | Goulburn South signal box diagram in 1979 |
| Goulburn | 1979 | Goulburn Loco Yard Box, which contained 20 levers and was able to be closed out when not required. |
| Goulburn | 1990 | Goulburn yard, with 81 and 48 class locomotives sporting the now-defunct "Candy" colour scheme. |
| Goulburn | 1990 | Another view of Goulburn yard, with a 422 and 48 class locomotives. |
| Goulburn | 1990 | Looking over the station roofs towards the north. |
| Goulburn | 1990 | 4471 in "red terror" livery, followed by a "candy" 81 class about to continue their journey south. |
| Goulburn | 1990 | The view from the station footbridge, looking south. |
| Goulburn | 2002 | The view looking north along the main platform. |
| Goulburn | 2002 | 8146 heads a train heading south through the station. |
| Goulburn | 1996 | Heritage locos 4520 and 4490 lead a charter train south up the hill from Goulburn station. |
| Goulburn | 2004 | The road side view of the main station building. |
| Goulburn | 2004 | The road-side view of Goulburn Station. |
| Goulburn | 2004 | The view looking south along platforms 2 and 1. |
| Goulburn | 2004 | The view looking south along platform 1. |
| Goulburn North Junction | 2001 | Looking south towards Goulburn, the overgrown Crookwell line sits on the right hand side. The junction was just before the curve in the distance. |
| Goulburn North Junction | 2001 | The Crookwell line begins to curve away from the Main South line, just to the south of the Mulwaree Viaduct. |
| Goulburn North Junction | 2001 | Having crossed Fitzroy Flats, the line heads under the Old Hume Highway. |
| Grafton City | 2003 | The approach to Grafton station from the south. |
| Grafton City | 2003 | Crossing the Clarence River bridge - the only double deck rail bridge in Australia (rail below, highway above). |
| Grafton City | 2003 | The loco refuelling point at Grafton opposite the platform. |
| Grafton City | 2003 | The sugar loading facility and turntable. |
| Grafton City | 2003 | The view looking back after exiting the Clarence River bridge. |
| Grafton City | 1995 | A view of the Grafton road/rail bridge. This is the view looking north. |
| Granville | 2004 | The view from the pedestrian bridge looking along platform 1 towards the city. |
| Granville | 1970 | GM3 and another GM unit sit on a siding at the Clyde Engineering Works at Granville. |
| Gravesend | 1999 | The sign board is still present, in the long grass. |
| Gravesend | 2004 | The station nameboard has been restored and turned to face the town. |
| Gravesend | 2004 | One the platform is a 4-lever frame and yard diagram. |
| Gravesend | 2004 | A close-up view of the yard diagram. |
| Gravesend | 2004 | The view looking along the overgrown platform, towards Inverell. |
| Green Swamp Road | 1998 | The platform at Green Swamp Road is still present, although the track which serviced it has been lifted. This view is looking south. |
| Greenethorpe | 2001 | A view of the silos from the approach road. |
| Greenethorpe | 2001 | Storm clouds loom over the railway crossing in the centre of Greenethorpe. |
| Greenethorpe | 2001 | Quad 48s sit at the head of a wheat train during loading operations. |
| Greenethorpe | 2001 | A close-up of 48164 during shunting operations as the silo. |
| Greenwood | 2004 | No trace remains of the station. It was located where the dark strip of vegetation now lies. This is the view looking towards Inverell. |
| Gregra | 2004 | The remains of a short platform, looking West. |
| Gregra | 2004 | The platform remains, looking up towards Orange. |
| Grenfell | 1996 | Trains no longer visit Grenfell, but the station building has been preserved by local residents. |
| Grenfell | 2000 | The entrance side of the preserved station building. |
| Grenfell | 2000 | A view of the overgrown yard at Grenfell. |
| Grenfell | 2003 | Seven years since the previous photograph, and the platform and nameboard have been restored. |
| Grenfell | 2003 | A view of the goods shed in the overgrown yard. |
| Grenfell | 2003 | A view of the goods bank and remains of the yard just behind the goods shed. There is a restoration information sign here which says the line closed mid 70s, the last steam train visited in 1979 and station masters house has been demolished. |
| Grenfell | 2003 | A view of the restored station building look from the end of the line. |
| Grenfell | 2003 | The elevated water tank near the station. |
| Grenfell | 2004 | The view looking towards Koorawatha, with the now disused goods shed & grain silo. |
| Grenfell | 2004 | The station has been repainted, new rainwater tanks installed at both ends of the building, and the platform completely restored. |
| Grenfell | 2004 | The road side view of the restored building. |
| Grenfell | 2004 | A sign advertising that the local Lions group is involved in preserving the area. |
| Grenfell | 2004 | A view of the remains of the ash pit on the turntable road. |
| Grenfell | 2004 | The stained glass panel above the front door of the station entrance. |
| Grenfell | 2004 | Only the pit remains of the one-time 50' turntable. |
| Grenfell | 2004 | A closer-view of the turntable pit wall and pivot. |
| Grenfell | 2004 | A closer-view of the elevated water tank. |
| Greta | 2004 | The view of platform 1, looking west. |
| Greta | 2004 | The small passenger shelter on the up platform. |
| Greta | 2004 | The view looking west which clearly shows the old low-level platforms and the newer ones. The one-time line serving the Whitburn and Leconfield Collieries branched off in the distance to the right. |
| Greta | 2004 | The station has been restored, but the platform is partially fenced off. |
| Greta | 2004 | 8224 at the head of a load coal train dwarfs the station building. |
| Greta | 2004 | The fenced-off older part ofthe up platform is dwarfed by the passing coal hoppers. |
| Greta | 2004 | The station buildings on the fenced off section have been boarded up. |
| Greta | 2004 | The view of the down platform, showing the modern raised section. |
| Greta | 2004 | The road-side view of the station building. |
| Griffith | 2000 | An Xplorer set sits in the platform. The number of people on the platform is explained by the fact that Countrylink was having a sausage sizzle to announce the commencement of the new Xplorer weekly service commencing the following day. |
| Griffith | 2002 | The view along the platform looking back in the direction of Temora. The signal box is at the end of the platform. The line behind the platform is the Back Platform Road, which becomes the branch line to Yanco in the distance. |
| Griffith | 2002 | The view looking towards the station building. |
| Griffith | 2002 | The view looking back up the line towards Temora, with the goods shed on the left and the main platform on the right. |
| Griffith | 2002 | The view from the station looking west. The siding to the left with the block across it leads to the turntable. |
| Griffith | 2001 | The view looking west along the fruit siding. |
| Griffith | 2001 | The view from the fruit siding looking towards the station and signal box. |
| Griffith | 2001 | The view looking down the line. The signal box can be seen under the signal gantry in the middle distance. |
| Griffith | 2001 | The view looking along the platform in an up direction. The sidings on the left are the No 1 goods siding and loop line. On the right of the platform is the obscured back platform road. The signal box is visible at the end of the station. |
| Griffith | 2001 | The view looking east towards the location of various industrial sidings. |
| Grong Grong | 2000 | The platform at Grong Grong still sports its station name board. |
| Grong Grong | 2000 | The view up the line showing the silos which dominate the location. |
| Grong Grong | 2003 | The view looking east along the unloading chutes for the grain silos. |
| Grong Grong | 2003 | The formation in place for a new siding serving a grain loader. |
| Grong Grong | 2003 | The track bed for a new siding serving the grain loader. |
| Grong Grong | 2003 | The track bed for a new siding serving the grain loader. |
| Grong Grong | 2003 | The formation in place for a new siding serving a grain loader. |
| Grong Grong | 2003 | The location for a new siding serving an AWB grain loader. |
| Groongal | 1920 | A shot of the rudimentary platform taken by Oliver Dickson Hill, a travelling sheep station expert around 1920. The men on the platform are likely to be shearers. |
| Gular | 2004 | The lever frame and staff hut stand adjacent to the 573 km post. |
| Gular | 2004 | A closer view of the 6-lever ground frame. |
| Gular | 2004 | The yard diagram. The passenger platform is no longer present. |
| Gular | 2004 | The location of the one-time station. No trace remains. |
| Gulgong | 1979 | The view looking along the platform and station, which are very typical of the area. |
| Gulgong | 1987 | A shot of Gulgong station on an overcast day, when it looked more pristine with a platform and buildings that were tended to. |
| Gulgong | 1999 | The dilapidated station building in 1999, when the line was still closed to traffic. |
| Gulgong | 2001 | By 2001, the station has been repaired, a water tank added, and the building repainted. |
| Gulgong | 2001 | A roadside view of the recently restored station building. |
| Gulgong | 2001 | The view from the yard, looking up the line towards Dunedoo. |
| Gulgong | 2001 | A view from the yard, looking up the line towards Mudgee. |
| Gulgong | 1995 | Another view of the station and yard remains, looking in the direction of Mudgee. |
| Gulgong | 2004 | The fully-restored platform looking up the line. |
| Gulgong | 2004 | The nameboard at the southern end of the station. |
| Gulgong | 2004 | A sign discussing the restoration of the station. |
| Gulgong | 2004 | The view looking down the line, showing the station-masters house. |
| Gulgong | 2004 | The road-side view of the recently painted station building. |
| Gulgong | 1967 | Girders for bridge construction on the Maryvale-Sandy Hollow line. |
| Gum Lake | 1982 | A view showing the isolated platform, station building and name-board are all in good condition. |
| Gum Lake | 1982 | A close-up of the name-board. |
| Gundagai | 1987 | Heavy clouds loom over Gundagai station 3 years after the last train ran. |
| Gundagai | 1987 | The view of the collapsing platform and the track extending towards the bridge over the Murrumbidgee River. |
| Gundagai | 2001 | The station and yard, now 17 years after closure. The platform has been rebuilt as part of local preservation efforts. |
| Gundagai | 2001 | Looking back to the Tumut end of the yard, still with the old water tank. On the other side of the cutting is the big timber trestle bridge. |
| Gundagai | 2001 | A closer view of the cutting in the above pic. The Home signal can just be made out in the cutting. |
| Gundagai | 1997 | Part of the magnificent railway bridge over the Murrumbidgee River at Gundagai. This is the view from the down end of the bridge. |
| Gundagai | 2001 | The goods shed, showing some of the knocks it received during its working life. |
| Gundagai | 2001 | The weighbridge located just behind the station. Even this small facility has been beautifully restored to complement the rest of the station precinct. |
| Gundagai | 2003 | An overall view of the station from the top of the cutting at the Tumut end of the station. yard. |
| Gundagai | 2003 | A view along the restored platform looking towards Tumut. |
| Gundagai | 2003 | A close up of the station building. |
| Gundagai | 2003 | Another view of the station, this time looking back towards Cootamundra. |
| Gundagai | 2003 | Another view of the platform looking towards Tumut. |
| Gundagai | 2004 | The landmark signal facing down trains as they approach Gundagai. |
| Gundagai | 2004 | The remains of the sidigns which served Gundagai stock yards. |
| Gundagai | 2004 | A view of the northern end of the timber viaduct. |
| Gundagai | 2004 | A view of the northern end of the timber viaduct. |
| Gundagai | 2004 | A view of the viaduct decking from the intersection of the railway with the roadway at the northern end of the viaduct. |
| Gundagai | 2004 | A view from below of the northern end of the viaduct across the floodplain to the south. |
| Gundagai | 2004 | The turntable is long gone, but the pit still remains. |
| Gundagai | 1950 | The view looking south along the viaduct. Note the regularly-spaced refuges for track workers. |
| Gundagai | 1960 | The view looking south over the viaduct over the Murrumbidgee flood plain. The road in the distance is the former Hume Highway. |
| Gundagai | 2000 | Part of the viaduct and bridge, where it crosses the main channel of the river. |
| Gundagai | 2000 | A view looking towards the station, and unrestored platform. |
| Gundagai | 2000 | The road-side view of the restored station building. |
| Gungal | 2004 | A kilometre post in the vicinity of the one-time Gungal station. |
| Gungal | 2004 | The mound which may be the only remains of the station. |
| Gungal | 2004 | The view looking down the line towards Merriwa. |
| Gungal | 2004 | The view looking up the line towards Sandy Hollow. |
| Gungal | 1986 | Repair work being performed on a culvert adjacent to the level crossing. This is the view looking towards Sandy Hollow. |
| Gunnedah | 2001 | The 6-lever frame and yard diagram on the platform at Gunnedah. |
| Gunnedah | 2001 | A close-up of the yard diagram. |
| Gunnedah | 1999 | The road-side view of the silos at Gunnedah. |
| Gunnedah | 1999 | The view of the station building from the approach on the road side. |
| Gunning | 2001 | The up platform, looking in the direction of Sydney. |
| Gunning | 2001 | The gantry crane at the down end of the station is still present, although obviously no long in use. |
| Gunning | 2004 | The view looking north along platform 2. |
| Gunning | 2004 | The view from the southern end of the platform. The building on the right was the signal box; the hole where the rodding went is still visible in the platform face. |
| Gunning | 2004 | The view looking south along platform 2, showing the old station sign. |
| Gunning | 2004 | The view looking south over the one-time location of the yard. Only the jib crane remains. |
| Gunning | 2004 | A view of the main station building on platform 1. |
| Gunning | 2004 | The view looking south along platform 1. |
| Gunning | 2004 | The road-side view and carpark looking towards the main station building. |
| Gunning | 1980 | Gunning station has changed a lot since this photo was taken. |
| Gunning | 1980 | The Gunning signal diagram. |
| Gunning | 1980 | Gunning Signal Box. |
| Gunning | 1980 | An independent disc signal in the sidings at Gunning. |
| Gunning | 1980 | An unusual signal arrangement of a lower quadrant on an upper quadrant post. The home signal for the main and the lower quadrant for the sidings. |
| Gunning | 1980 | 42102 sits in the cattle dock siding at Gunning on a Sunday in 1980. |
| Gunningbland | 1986 | Only the station sign remains of the one-time station. |
| Gurley | 2003 | The safeworking hut on the platform. |
| Gurley | 2003 | The lever frame sits on the platform adjacent to the safeworking hut. |
| Guyra | 1999 | The yard at Guyra, with goods platform, crane and shed. |
| Guyra | 1999 | The station nameboard is slightly unusual in that it includes the altitude. |
| Guyra | 1999 | The view along the platform showing the well-preserved station building. |
| Guyra | 2002 | Guyra station has had a repaint in the last couple of years. |
| Guyra | 2002 | A closer view of the station building. |
| Guyra | 2002 | The boarded up windows on the road side of the station building. |
| Guyra | 2003 | The goods shed is still intact, in this view from the down end of the yard. |
| Guyra | 2003 | The rear view of the goods shed, in the early morning sun. |
| Guyra | 2003 | Guyra Station has a farm machinery museum attached to it now. |
| Guyra | 2004 | The view looking across a snow-covered yard. |
| Guyra | 2004 | An unusual shot of a snow-covered station. |
| Gwabegar | 1997 | The stop at the end of the line at Gwabegar. |
| Hadleigh | 2004 | No trace remains of the one-time station, in this view looking towards Inverell. |
| Hamilton | 1987 | Majestic Hamilton Junction Box was situated just to the east of the fork on the Newcastle Branch, at the Beaumont Street crossing. This box controlled a number of industrial sidings in the area such as the McIntyre Mill. |
| Hamilton | 2004 | Railcars 726 and 729 pass in opposite direction through the station. |
| Hannahs Bridge | 2002 | Across the field can be seen the remains of the platform at Hannahs Bridge. |
| Harden | 2001 | The fairly low-key signage which welcomes passengers to Harden. |
| Harden | 2001 | A 48 class loco sits in the yard on a wet and overcast day. In the background is Harden South signal box. |
| Harden | 2001 | A view along the damp platform, looking in the direction of Sydney. The platform on the right served the one-time South Dock siding. |
| Harden | 2001 | The underpass which provides passenger access to the island platform. |
| Harden | 2001 | Old and new signage adorning the platform. Some wheat hoppers site in the yard in the background. |
| Harden | 2001 | The view from the north end of the station, showing the semaphore signals and Harden North signal box in the background. |
| Harden | 2001 | The overcast sky does the station no favours in this view looking generally in the Albury direction. |
| Harden | 2001 | An XPT has stopped briefly under dark skies, before continuing its journey to Sydney. |
| Harden | 2002 | The job crane still remains, although the one-time yard is gone. The station is visible in the background. |
| Harden | 1980 | Harden North Signal Box as its southern sister stands majestically as a fine example of NSWGR architecture for the structures of safety. |
| Harden | 1980 | This is the diagram of Harden North Signal Box drawn in 1943. |
| Harden | 1980 | Harden North and South had Tyers Block instruments to the last. These old but true tested instruments chimed their message of safe travel for many decades. This is the one in Harden North Box and shows the "Train on line" position. |
| Harden | 1980 | Sister to the North Box this impressive structure of Harden South Box needed some TLC in this 1980 shot. |
| Harden | 1980 | The diagram of Harden South Box shows the sidings. |
| Harden | 1980 | The South Box at Harden's Tyers two wire block instrument set at "line blocked". |
| Harden | 1980 | The old sign shows the importance of Harden as the junction for Cowra. |
| Harden | 1980 | This is the array of of instruments on the shelf at Harden South Signal Box. There is the Tyers two wire block and also the standard NSWGR block instruments which never really did oust the ancient Tyers. Also the stiker bell and repeater can be seen. |
| Harden | 1980 | The view from Harden South Box of the yard. 44222 heads south. |
| Harden | 2003 | A signalling diagram of the section between Bowning and Harden. |
| Harden | 2003 | The train indicator diagram in Harden North signal box. |
| Harden | 2003 | The train indicator diagram in Harden South signal box. |
| Harefield | 1980 | While still on the timetable in 1980, Harefield had just had its new control panel put in and the station was being looked after. |
| Harefield | 2002 | The platform viewed from the western side of the line. |
| Harefield | 2002 | A modern signalling hut with some unidentified foundations in front of it. |
| Harefield | 2003 | The view looking up the stock siding towards the silo and former station. |
| Harefield | 2003 | The view looking down the line towards the end of the Stock Siding. The main line is immediately to the left. |
| Harefield | 2003 | The view looking back up the line towards the former station. |
| Harefield | 2003 | The silo at the up end of the siding. |
| Harefield | 1980 | Harefield boasted a Kellogg key panel in 1980. Most of the time it was "switched out" so the signals were on automatic. |
| Harris Park | 2004 | The view looking towards Parramatta along the platforms. |
| Harris Park | 2004 | The view looking back towards Sydney. |
| Hawkesbury River | 2004 | The southern approach to the station, which is visible in the top left corner. |
| Hawkesbury River | 2004 | The view looking north along the platform. At the end of the embankment in in the distance, the track enter the Long Island Tunnel. |
| Hawkesbury River | 2004 | Looking south over the station, with the township of Brooklyn behind it. |
| Hawkesbury River | 2004 | The view looking south along platform 1. |
| Hawkesbury River | 2004 | The picturesque outlook from the station over the Hawkesbury River. |
| Hay | 2000 | The old water tank and goods shed in the remains of Hay yard. |
| Hay | 2000 | The station building at Hay has been preserved, and is in excellent condition. |
| Hay | 2000 | The view along the platform at Hay, showing one of the captive carriages. |
| Hazelbrook | 2004 | Approaching the western end of the platforms at Hazelbrook from the front of an Up service from Lithgow. |
| Hazelbrook | 2004 | Hazelbrook station building and passengers waiting on platform 1 for the train to Sydney. |
| Hazelgrove | 2002 | The view from the up end, looking back towards Tarana. |
| Hazelgrove | 2001 | The sign which stands at the location of Hazelgrove is not the original one. |
| Hazelgrove | 2002 | The view looking down the line towards Oberon. The loop line is visible on the left among the bee boxes. |
| Hazelgrove | 2002 | The approach to Hazelgrove from the north. Note that the large pine tree in the foreground is growing through the loop line, and therefore grew after the line closed in 1979. |
| Hazelgrove | 2002 | A closer view of the replacement station sign. |
| Hazelgrove | 2002 | The view from the north looking towards Hazelgrove. Note the station sign in the middle distance. |
| Hazelgrove | 2002 | The 135 mile post at the south end of the one-time yard at Hazelgrove. |
| Hebburn No 2 Colliery | 2001 | The formation of the line approaching the colliery is still easily discerned. |
| Helensburgh | 2004 | A view of the modern second Helensburgh station. |
| Helensburgh (1st) | 2001 | The remains of the old platform looking towards the South Coast. The tunnel can just be made out towards the left of picture. |
| Henty | 2000 | The goods shed, with it unusual curved roof, and goods platform are still present and in good condition. |
| Henty | 2001 | The view of the station from the rail side. |
| Henty | 2001 | The overgrown remains of the loading bank. |
| Henty | 2001 | The grain silos, still operated by Graincorp. |
| Henty | 2003 | The view looking along the silo siding. The station is visible in the distance. |
| Henty | 1980 | Henty Signal Box in need of repair and a paint job sits near the station sign which says "Change here for the Rand line". |
| Henty | 1980 | Henty Diagram showing the various frames through the yard and to the left is Frame D which controlled the branch to and from Rand to the mainline. |
| Henty | 1980 | Henty Frame D sat on the up side of the line with its own small box. The lower quadrant signal on the very short pole to the left was for the branch and controlled from frame D. 42220, freshly painted, arrives from Sydney with a freight. |
| Henty | 1980 | Henty Frame D diagram showing the layout of the branch to and from the main line. |
| Henty | 1980 | A close up of all the levers in Henty Signal Box, showing the release levers for the ground frames. |
| Henty | 1980 | The Henty - Rand staff and ticket box. |
| Henty | 1980 | A scene long gone, the staffs are in motion as 8017 rumbles through Henty on a north bound freight and using the automatic staff exchanger. 8017 has just collected the staff for Yerong Creek as the one from Culcairn is still swinging on the rams horn collector. |
| Hermidale | 2002 | The goods loading ramp is still present. |
| Hermidale | 2003 | The old goods ramp, looking in the direction of Nyngan, |
| Hexham | 1996 | The gauntlet track near Hexham station leading to the weighbridge. This has now been removed. |
| Hexham | 1986 | Hexham Box controlled the junction to the Richmond Vale railway. |
| Hexham | 2003 | Hexham box, hidden behind shrubs looking towards Newcastle. |
| Hexham | 2003 | The view from the island platform looking down the coal roads towards Maitland. |
| Hexham | 2003 | The view down the Hexham Straight towards Maitland. |
| High Street | 2003 | Diesel railcars 631+??? sit at High Street in this view from the footbridge looking towards Maitland. |
| Hill Top | 2001 | The famous Big Hill Cutting, at one time the deepest railway cutting in NSW. |
| Hill Top | 2001 | The short platform is all that remains of the station. |
| Hill Top | 2004 | The remains at Hill Top station. |
| Hill Top | 2004 | The view looking south. |
| Hill Top | 2004 | The view looking north towards the station. |
| Hill Top | 2004 | The view looking north along Big Hill cutting. |
| Hill Top | 2004 | The view looking south along Big Hill cutting. |
| Hilldale | 2004 | The short platform at Hilldale, looking towards Maitland. |
| Hillston | 2003 | Hillston Yard looking south. |
| Hillston | 2003 | The signal at the entrance to Hillston yard. |
| Hillston | 2003 | A view of Hillston yard looking towards Roto. |
| Hillston | 2003 | Hillston staff hut. |
| Holbrook | 1980 | In 1980, all that remained of the station was the platform and name board. |
| Holbrook | 1997 | The overgrown remains of the platform at Holbrook. |
| Holbrook | 1997 | Lurking under the weeds on the platform are a pair of signal levers! |
| Holbrook | 2000 | The crane and goods shed which lie in the yard beyond the silo. The white post is a "half-mile" post. |
| Holbrook | 2001 | A close-up view of the jib crane, with the goods shed in the background. |
| Holbrook | 2001 | The rear of the goods shed, looking in the direction of the station. |
| Holbrook | 2001 | The inside of the goods shed. The post on the right is part of a set of scales. |
| Holbrook | 2001 | Inside the goods shed is part of a set of scales! |
| Holbrook | 2001 | One of the two goods loading banks. The station is behind us, with the main township beyond the trees in the distance. |
| Holmwood | 2004 | The view looking north at the remains of the goods platform. |
| Holmwood | 2004 | The view looking south towards Cowra, with the remains of the yard. |
| Holmwood | 2000 | The view looking south towards the silos, and Cowra. |
| Holts Flat | 2000 | The points and station remains at Holts Flat. |
| Holts Flat | 2000 | The platform and station building. |
| Hopefield | 1980 | There doesn't seem to be too much hope for the station at Hopefield in this 1980 portrayal of a dying station. |
| Hornsby | 2002 | The afternoon sun catches the platforms for the Main North line, in this view looking south. Behind platform 3 are those serving the North Shore line. |
| Hornsby | 2002 | Tangara urban set T3 has just departed and is making its way through the yard. Meanwhile a pair of workers are checking the track. |
| Hornsby | 1970 | The turntable was located behind Platform No.1 (the Up Shore Platform). The occasion was the day of official photographs of the Vintage Train at Homebush Abattoirs. Locos 1243 and 1709 had run light engine to Hornsby to pick up the Vintage Cars that were stored in Hornsby Car Sheds. Loco 1243 (re-numbered 176) had just been turned on the turntable. This location is now the eastern side commuter car park. |
| Hoskinstown | 2000 | The line heads north from Hoskinstown across to the junction at Bungendore. |
| Hoskinstown | 2000 | The impressive bridge over the Molonglo River, between Hoskinstown and Captains Flat. |
| Hoskinstown | 2001 | Another view of the Molonglo River bridge. |
| Hoskinstown | 1986 | Hoskinstown platform still with railings but lacking sign in 1986. |
| Hume | 2000 | The former log loading area at Hume. |
| Hume | 2000 | The open area where logs were loaded onto wagons. |
| Humula | 2004 | The remains of the formation where it crosses the road on the way to Tumbarumba. |
| Humula | 2004 | The view looking towards the one-time location. Beyond the tree in the centre of the shot is a lever frame. |
| Humula | 2004 | A closer view of the lever frame. |
| Humula | 2004 | The formation as it approaches the station in the up direction. |
| Hurricane Hill | 1980 | Nothing remains of the one-time station, but the siding and gravel loading facilities are still present. |
| Illabo | 1980 | The early morning sun greets Illabo station in 1980 in this view looking in the down direction. |
| Illabo | 2004 | The view of the location looking north. The one-time station was located on either side of the line, beyond the silos. |
| Illabo | 2004 | The entrance to the GrainCorp silo which is still in use. |
| Illabo | 2004 | Various safeworking equipment at the down end, including a telephone, ground frame and shunter's pushbutton. |
| Illabo | 2004 | The view looking north. The one-time goods siding and shed were on the left hand side of the line just beyond the hut. |
| Illabo | 1980 | Illabo track diagram in 1980. |
| Illawarra Junction | 1960 | A view of the former elevated Illawarra Junction signal box. |
| Illawarra No 2 Tunnel | 1993 | The Down (Moss Vale) portal area. The hi-rail has just left the tunnel. |
| Illawarra No 2 Tunnel | 1993 | The Down (Moss Vale) portal. |
| Illawarra No 2 Tunnel | 1993 | The area around the Up (Unanderra) end. |
| Illawarra No 2 Tunnel | 1993 | The Up (Unanderra) portal. |
| Illilliwa | 2000 | Not much is left at the one-time location of Illiliwa Siding. |
| Industrial Sidings | 2003 | The former TNT Sydney freight terminal on the Chullora Industrial Line. TNT have now moved their operations to the Pacific National Container Terminal on the same line. |
| Industrial Sidings | 1999 | The shortened remains of the Franklins siding. |
| Industrial Sidings | 1999 | The view from the fence on the Franklins siding, looking to the connection on to the master siding. |
| Industrial Sidings | 1999 | The APM siding view from within the corridor. One siding goes into the shed the other around across the concrete pad. |
| Industrial Sidings | 1999 | The double slip leading to APM and the dead end of the Industrial branch. |
| Industrial Sidings | 1999 | The view looking towards Anzac St, with McWilliams at right, APM at left. |
| Industrial Sidings | 1999 | The Master siding run-around, with the McWilliams siding on the other side of the fence. |
| Industrial Sidings | 1999 | The view looking towards the dead end from the McWilliams siding side. |
| Industrial Sidings | 1999 | The view from the dead end looking towards Anzac St. |
| International Terminal | 2004 | The view along the platform looking in the up direction, towards Central. |
| International Terminal | 2004 | The ticket counter of the International Airport station. Ticket machines are on the opposite side. Escalators lead up to the Arrivals level of the airport. |
| International Terminal | 2004 | The view along the platform looking in the down direction, towards Wolli Creek. |
| International Terminal | 2004 | One of the four train indicator boards on the station platform. Note that the layout of the information and colour scheme on train indicator boards are different to the indicator boards found on other train stations. The names of the stations scroll up slower than the standard indicator boards, perhaps to aid tourists. |
| International Terminal | 2004 | Looking back at the gates from the inside station. The ticket machines opposite the ticket counter are visible. Note the ticket barriers are orange in colour and not the ubiquitous red. |
| International Terminal | 2004 | The view across the tracks to the opposite platform. |
| Inverell | 1980 | Inverell station looking towards the terminus. |
| Inverell | 1987 | The station building a few weeks after the last train ran, in 1987. |
| Inverell | 1996 | Very little remains of the platform at Inverell. |
| Inverell | 2002 | Grazing cattle have exposed more of what little remains of the platform. |
| Inverell | 2004 | Little has changed since the station building was removed. |
| Islington Junction | 2003 | Islington Signal Box. |
| Jct (Byrock) | 2003 | The line to Brewarinna (on the right) just after the junction at Byrock. |
| Jct (Byrock) | 2003 | The line to Brewarinna (on the right) just after the junction at Byrock. |
| Jct (Byrock) | 2003 | The view looking back towards Byrock, with the branch line on the left. |
| Jct (Byrock) | 2003 | The view looking back towards Byrock, with the branch line on the left. |
| Jct (Byrock) | 2003 | The remains of the branch line curving away as it enters private property. |
| Jct (Byrock) | 2003 | The remains of the branch line curving away as it enters private property. |
| Jct (Camellia) | 1992 | The view looking along the Sandown line towards the junction. The overhead bridge is that of Grand Avenue which parallels the Sandown line. |
| Jct (Camellia) | 2004 | The view looking towards the road-side entrace to the station. The level crossing in the foreground is the goods branch to Sandown. |
| Jct (Casino) | 2003 | 4908 and 4918 turn into the branch from the North Coast line pulling a tour train and some former Ritz Rail cars from Casino for delivery to Murwillumbah. |
| Jct (Cooks River) | 1992 | A photo of the Cooks River Yard master office with Frame 'A'. It was meant to be temporary But is still in used today (2007) as the yard master's office (Cooks River). Frame 'A' has been removed with all points and signal now controlled from Sydenham signal complex. |
| Jct (Cooks River) | 1992 | Cooks River Yard master office with Frame 'A'. The driver of the 80 class loco is exchanging the staff before proceeding. |
| Jct (Henty) | 2002 | Although the branch line to Rand is no longer used, the first section still sees occasional traffic. This is the view of the junction looking north along the Main South. |
| Jct (Henty) | 2002 | The view looking down the truncated branch line to Rand. |
| Jct (Henty) | 2002 | The view of the branch line looking towards the junction with the Main South. The coloured light signals still operate. |
| Jct (Liverpool) | 2001 | The piers where the branch line crossed the Georges River still remain, although they are now used for a footbridge. |
| Jct (Liverpool) | 2001 | The view of the Georges River bridge piers, looking back in the direction of the one-time junction. The structure behind the trees is Liverpool station. |
| Jct (Maldon) | 2001 | The underside of the north-eastern half of the incomplete bridge over the Nepean River. |
| Jct (Maldon) | 2001 | The view looking across the Nepean River to the partially-complete abutment at the far side. |
| Jct (Maldon) | 2001 | The first span of the bridge ends rather precariously. |
| Jct (Mount Thorley) | 1993 | A loaded coal train headed by 4 48-class locos is climbing up to the junction. |
| Jct (Regents Park) | 1979 | The single track railway bridge where the branch crossed the Chullora Goods line. The bridge was removed during track work sometime in the late 1980's. |
| Jct (Regents Park) | 1979 | The view looking down the branch along the bridge over the Chullora Goods line. |
| Jct (Sandgate) | 2000 | Adjacent to Sandgate station are the line to Toll's Sidings (centre), nand the old branch to Sandgate Cemetery (just out of picture). Behind the station are the 2 Coal Roads. |
| Jct (Sandgate) | 2000 | The lever frame controls the junction at the back, which leads to Toll's Sidings and the old Sandgate Cemetery branch. |
| Jct (Sandgate) | 1982 | Sandgate Cemetery Junction frame and diagram on the main line. |
| Jct (Toongabbie) | 2004 | The remains of the one-time branch are now a linear reservation, Keene Park. The childrens toys server as a reminder of the location's heritage. |
| Jct (Toongabbie) | 2004 | The formation where the line once went through a small cutting. |
| Jct (Toongabbie) | 2004 | Another view of the formation, before it is obliterated by an industrial complex. |
| Jerilderie | 1998 | Jerilderie station on a rather overcast day. The station building is apparently being used as a private residence. Behind the building lies the abandoned yard. |
| Jerilderie | 2002 | The view looking along the platform towards Tocumwal. |
| Jerilderie | 2002 | The view looking along the platform. |
| Jerilderie | 2002 | The remains of the A Lever Frame. |
| Jerilderie | 2002 | The roadside view of the station. |
| Jerilderie | 2002 | Another roadside view of the station. |
| Jerilderie | 2002 | The platform sign board. |
| Jerrawa | 1980 | The disused up home signal marks the approach to Jerrawa, which is visible in the middle distance. In this view looking towards Sydney, the points on each side are for the Up and Down Refuge Sidings. |
| Jerrawa | 2001 | The name board at Jerrawa no longer stands on a platform. |
| Jerrawa | 1980 | Jerrawa signal diagram. |
| Jewells | 2002 | The concrete platform face is all that remains at station. |
| Jewells | 2002 | The view in the down direction looking along the crumbling concrete platform. |
| Jewells | 2002 | Several hundred metres to the north of the station, a pair of concrete pylons show where the line crossed one of the creeks leading onto Jewells Swamp. |
| Jincumbilly | 2000 | Jincumbilly station and the remains of 2 louvred wagons. |
| Jindalee | 1980 | The location of the one-time station at Jindalee. The platform is in the distance to the right of the curve. |
| John Street Tunnel | 1991 | A tour train is in the deep cutting at the eastern end of the John Street Tunnel. |
| John Street Tunnel | 1991 | The eastern portal of the tunnel. |
| Johns River | 1981 | The staff instrument at Johns River. |
| Johns River | 1981 | The signal box on the platform. |
| Johns River | 1981 | The station diagram in the signal box. |
| Johns River | 1981 | The lever frame inside the signal box. |
| Johns River | 1981 | The view looking north beyond the station. |
| Joppa Junction | 1979 | The Joppa Junction Signal Box, taken a week before its closure. The line to Bombala curves away behind the box. |
| Junee | 1997 | The station and semaphore gantry at the rail centre of Junee. The gantry was destroyed on 23/12/1999 when it was struck by a container which had been dislodged on a passing freight train. |
| Junee | 2001 | The busy yard is host to CFCLA (former Australian National unit) EL54, as well as FreightCorp unit 8005 and an unidentified 81 class loco. |
| Junee | 2001 | Looking south showing the platform and yard, during a sunny break. |
| Junee | 2001 | The view from the footbridge looking north along the station. |
| Junee | 2001 | The view along the main platform looking down the line. |
| Junee | 2001 | A southbound XPT has stopped briefly before heading on to Melbourne. |
| Junee | 1971 | An unidentified 44 class loco is sitting on the turnatable witin the roundhouse. |
| Junee | 1971 | An unidentifed steam loco taking on water. |
| Junee | 1971 | A row of 4-wheel wagons sits outside the roundhouse building. |
| Junee | 2003 | The view looking towards the crossover near the end of the Wheat Sub-terminal sidings. |
| Junee | 2003 | The view looking towards the Sub-terminal loader. |
| Junee | 2003 | The view looking back from the grain loader towards Junee. |
| Junee | 2003 | The view looking towards the Sub-terminal loader. The main line is visible on the left. |
| Junee | 2003 | The view looking west from the West Junction towards the Junee Sub-terminal. |
| Kadungle | 1986 | The shortened platform and sign that makes up the station. |
| Kahibah | 2002 | The station name board is still present. |
| Kahibah | 2002 | There is no infrastructure left to denote the location of Kahibah Station, in this view looking in the direction of Adamstown. |
| Kahibah | 2002 | About 100m to the south of Kahibah, the line crossed over a creek using this concrete bridge. |
| Kalingo Junction | 2004 | All that remains of the signal box which controlled the junction is some brick foundations and some sections of connecting roads. |
| Kalingo Junction | 2004 | All that remains of the junction is the formation. The branch to the Cessnock No 1 Colliery is on the left, with the cleared area on the right leading to the rest of the collieries in the line. |
| Kalingo Junction | 2004 | Some pieces of connecting rods and some point rail. |
| Kamber | 2004 | No trace remains of the loop siding (on the left) or station (on the right). |
| Kandos | 2001 | The view along the well-maintained curved platform with intact station building. |
| Kapooka | 1980 | The austere design of Kapooka Signal Box was compensated by it's pleasant surroundings. Kapooka box was in the country and was a well used crossing loop. |
| Kapooka | 1980 | This shot taken in 1980 at Kapooka shows a working of bygone days on the south with 42203 which has just changed staffs on the Automatic Staff Exchanger. |
| Kapooka | 2001 | Nothing remains at the site, in this view looking north. The station was on the left hand side of the line, with a loop siding opposite. |
| Kapooka | 2001 | The location of the one-time Ampol siding. |
| Kapooka | 2001 | The remains of the Ampol depot once served by a siding at this location. |
| Kapooka | 1980 | Kapooka Signal Box sat off the main road and was rather an isolated box but was an important crossing point. This 1980 photo shows an automatic staff exchanger ready for an up train to Wagga. The staff was placed in the top ring for collection by the locomotive while the bottom "rams horn" took the staff from the Uranquinty section, all at speed. |
| Kapooka | 1980 | Kapooka Signal Box diagram could not show anything simpler as a passing loop. 1980. |
| Katoomba | 2004 | The view approaching the western end of the platforms at Katoomba from the front of an Up service from Lithgow. The photo shows cars on Yeoman Bridge over the station. The line of the left is the Up Refuge loop, with the second building along the platform being the signal box. |
| Katoomba | 2004 | The view looking south-east over the old yard. The track in the foreground is the No 1 Goods Siding, while the No 2 Goods Siding runs behind the jib crane and goods shed. |
| Katoomba | 2004 | A station signboard on the platform. |
| Katoomba | 2004 | The view looking west beyond the station. The track on the right is the Up Refuge Loop. The rusty siding going off the the right leads to the remains of the up yard. |
| Katoomba | 2004 | The view looking up along platform 1. |
| Katoomba | 2004 | On the north side of the station is a collection of equipment, with a sign "Simmo's Siding". |
| Kelso | 2001 | The view looking west of the site of the one-time station of Kelso. Only the grain siding remains to indicate its presence. |
| Kelso | 2001 | A close-up of the derailer at the Sydney end of the grain siding. |
| Kempsey | 2003 | Goods shed and yard |
| Kempsey | 2003 | Covered goods loading shed at rear of yard |
| Kempsey | 2003 | Platform and station building |
| Kempsey | 2003 | A rare crossing at Kempsey: Brisbane bound XPT in platform, south bound superfreighter in loop and 3801 and tour train waiting in yard siding. |
| Kendall | 1981 | 44212+44?? are heading south hauling a goods train though Kendall station. The goods shed is just visible at the far left. |
| Kendall | 2003 | The view along the platform and station. |
| Kenmore | 2001 | The A lever frame and lock at the up end of the siding. The tall white post in the middle right marks the one-time location the platform. |
| Kenmore | 2001 | The stub derail at the up end of the loop siding. |
| Kenmore | 2001 | The down end of the loop. The B lever frame has been removed. |
| Kenny Hill | 2004 | The location of Kenny Hill, on the west side of the water channel, and the north side of Narellan Rd. The direction of Camden is to the left of the picture. |
| Kerewong | 1982 | The signal box at Kerewong. |
| Kerewong | 1982 | The lever frame inside the signal box. |
| Kerewong | 1982 | A close up of the not-so-usual Guards Lever which locked a group of levers. |
| Kerewong | 1982 | A view showing the north end of the loop and the main north coast line disappearing into the trees. |
| Kerrabee | 2003 | The safeworking hut at Kerrabee. |
| Kerrabee | 2003 | The view looking towards the safeworking hut and staff exchange platform. |
| Kerrs Creek | 1924 | A copy of a photograph of Kerrs Creek Station. |
| Kerrs Creek | 1924 | Copies of photographs of Kerrs Creek. |
| Kiama | 2001 | Trackwork has closed one track at the well-presented station, on a rather overcast day. |
| Kings Cross | 1992 | A photo of the Woolloomooloo Viaduct taken from the Domain looking towards Kings Cross. |
| Kingsvale | 2004 | The view looking southwards showing the goods bank. |
| Kingsvale | 2004 | The view looking southwards showing the long passenger platform. |
| Kingsvale | 2004 | The view looking south along the line. |
| Kingsvale | 2004 | The view looking north along the line. |
| Kingswood | 2004 | The view looking across to platform 1, in a westerly direction. |
| Kingswood | 2004 | The view looking towards the city along platform 2. |
| Koloona | 1988 | The relocated station sign for Koloona at the Inverell Pioneer Museum. |
| Komungla | 2003 | No trace remains of the one-time station and siding. The platform was located on the far side of the line in the middle/right side of the photo. |
| Koolewong | 2004 | The station sign looking north. |
| Koolewong | 2004 | The view looking along the southbound (Sydney) platform towards Woy Woy. |
| Koolewong | 2004 | The northbound (Gosford) platform looking towards Woy Woy. |
| Koolewong | 2004 | The southbound platform, taken from the adjacent level crossing. |
| Kooragang Island | 2003 | Old disused wagons in one of the industrial sidings on Kooragang. |
| Kooragang Island | 2003 | The Blue Circle siding as it approaches the cement works. |
| Kooragang Island | 2003 | A derelict 45 class locomotive rests on one of the many disused industrial sidings. |
| Kooragang Island | 2003 | A side-one view of the disused 42102 and some cement wagons in the Blue Circle cement works. |
| Kooragang Island | 2003 | 42102 sits idle in the Blue Circle cement works. |
| Kooragang Island | 2003 | A view of the Blue Circle Cement Works private siding. |
| Koorawatha | 1991 | Koorawatha station is still being tended in this 1991 shot. This is the view from the northern end. The branch line to Grenfell runs behind the station before turning off to the west. |
| Koorawatha | 1991 | The letters are missing, but the text on the station name board is still clear. |
| Koorawatha | 1992 | The view of the station from the Young-Cowra road looking towards Cowra. |
| Koorawatha | 1992 | A view to the south towards Young from the rear of the former island platform. |
| Koorawatha | 2003 | The view looking north, showing one of two water tanks at the location. |
| Koorawatha | 2003 | The view looking south. The one-time station was located directly opposite the goods bank. |
| Koorawatha | 2004 | The view looking south, showing the goods platform, semaphore and train orders signals, and the steam-era water column. |
| Koorawatha | 2004 | The view looking north, showing one of the two surviving water tanks. |
| Koorawatha Junction | 1997 | Looking south from Koorawatha at the junction of the line to Grenfell. A mixture of technologies, with the steam era water tank, semaphore and train order signals. By this time, the station has been removed. |
| Kootingal | 2004 | The platform lever frame in action. |
| Kootingal | 2004 | The view looking along the modern platform. |
| Kootingal | 2004 | A Sydney bound Explorer approaches Kootingal station. The old goods loading platform is on the left. |
| Kootingal | 1999 | The yard diagram at lever frame on the platform. |
| Kotara | 2003 | Kotara island platform looking towards Newcastle. |
| Kunama | 2004 | The remains of a culvert and the possible remains of the base of the Home Signal. |
| Kunama | 2004 | A close-up of the signal base. |
| Kunama | 2004 | The view of the formation looking down the line towards the station. |
| Kunama | 2004 | The view of the formation looking back up the line towards the Batlow. |
| Kunama | 2004 | The possible remains of an old goods loading bank, looking up the line. |
| Kunama | 2004 | Possibly the remains of the old platform edge. |
| Kunama | 2004 | A sawdust pile from the old sawmill, viewed from the possible goods loading bank. |
| Kunama | 2004 | The view from above of the wooden remains of a culvert, looking down the line. |
| Kunama | 2004 | The remains of some sleepers, looking towards the station location. |
| Kunama | 2004 | A close-up of some sleeper remains in the old track bed. |
| Kunama | 2004 | The one-time station was located in the centre of this photo. |
| Kunama | 2004 | The view looking back up the track bed towards Batlow. |
| Kunama | 1941 | A photo of Kunama station in 1941, from the book "Batlow in Pictures" by Peter and Jenny Cash. Simpson). |
| Kurri Road | 2004 | The remains of Kurri Road platform, looking towards Stanford Methyr. |
| Kurri Road | 2004 | A closer view of the down-side platform. |
| Kurri Road | 2004 | The formation as is passes through the location of Kurri Road. |
| Kurri Road | 2004 | The remains of the platform, almost hidden in the undergrowth. |
| Kyogle | 2003 | A view of Kyogle station building looking north towards the Queensland border. |
| Kyogle | 2004 | The view looking in the up direction showing the boarded-up station building which was damaged by fire earlier in the month. The old Norco building can be seen in the right distance. |
| Kyogle | 2004 | The view looking in the down direction showing the closed-up signal box and fire damaged main building. |
| Kyogle | 2004 | The road-side view of the burnt-out station building. |
| Kywong | 1980 | The terminus of the branch shows the extended waiting room for no more passengers, and an unused frame A. The building behind is presumably the station master's residence. |
| Kywong | 1980 | The staff and ticket box at the station. One staff covered the whole branch. |
| Kywong | 1996 | The abandoned platform at Kywong still has its sign present. Weeds have taken over the yard. |
| Kywong | 2003 | The station sign looking back along the platform to Uranquinty. The loading bank can be seen the in the left of frame in the middle distance. |
| Kywong | 2003 | Complete platform with point lever looking along the platform towards the silos and terminus. |
| Ladysmith | 1999 | The goods platform (left) and preserved station building, with the silo in the distance. |
| Ladysmith | 1999 | The preserved station building. |
| Ladysmith | 1999 | The goods shed in the yard. |
| Ladysmith | 2002 | The current station of the station. The modern building at the far left is the new toilet block. |
| Ladysmith | 2002 | The rear view of the superphosphate shed, still featuring some of its signage. |
| Ladysmith | 2002 | The A Frame adjacent to the station building, south side. Only one of the levers still work, it's visible with the chain attached. It operates the signal on the north end of the yard. |
| Ladysmith | 2002 | The view looking down the line towards Wagga Wagga. The view from the pedestrian crossing near the A Frame, facing north. The Home Signal is just visible in the distance, past the poplar. |
| Ladysmith | 2002 | The Tumba Rail group are maintaining this site, as evidenced by this sign. |
| Ladysmith | 2003 | The view at the northern approaches, looking back towards Wagga. The landmark signal is visible in the distance. |
| Ladysmith | 2003 | The northern end of the Ladysmith yard, with the D Frame and the end of the stock siding. |
| Lake Cargelligo | 1976 | The flaking wooden nameboard sits on the platform. |
| Lake Cargelligo | 2001 | The Lake Cargelligo home signal. The post is made of two welded rails. |
| Lake Cargelligo | 2001 | The view looking back from the end of the line, showing the unusual foundations for the water tank. |
| Lake Cargelligo | 2001 | The water tank and turntable. |
| Lake Cargelligo | 2001 | A close up of the water tank, showing the concrete and steel supports. |
| Lake Cargelligo | 2004 | The safeworking hut which sits on a small piece of the original platform. The platform road was removed along with the station. |
| Lake Cargelligo | 2004 | The view looking away from the end of the line across the yard remains to the grain silos. |
| Lake Cargelligo | 2001 | The view looking towards the terminus, showing the water tank, gantry crane and overgrown yard. The station was located directly on the left. The siding next to the crane leads to the turntable and former loco servicing facilities. |
| Lake Cargelligo | 2001 | The view looking past the silos towards the end of the line. |
| Lambton Colliery | 2002 | The Upcast Shaft Headframe and the Winding Hall (behind) are preserved at the one-time location of Lambton Colliery. |
| Lapstone | 2004 | Lapstone station looking back towards Sydney. The Up Main and Platform 1 are on the left. |
| Larras Lee | 2004 | The location of the one-time station of Larras Lee. No trace remains. |
| Lawson | 2004 | The view from the eastern end of the station. From left to right, the tracks are the Down Main, Up Main and Up Refuge Loop. |
| Lawson | 2004 | The view looking west along platform 2. |
| Lawson | 2004 | The view approaching the western end of the station from the front of an Up service from Lithgow. A down service V-Set is alongside platform 2. |
| Lawson | 2004 | The lever frame and signal diagram in the old Lawson signal box. |
| Lawson | 2004 | A close-up of the signal diagram. |
| Lawson | 2004 | The electrical substation located west of Lawson station, which can be seen in the distance. This substation caught fire in 2003 causing some disruptions to Cityrail services for a number of days. Only one electric train was allowed in the section between Springwood and Wentworth Falls on the down main at a time until repairs were made. The roof is still missing on part of the building furthest from camera. |
| Leadville | 2002 | Almost engulfed by grass is the concrete-faced passenger platform. |
| Leadville | 1980 | The view looking towards Coolah from the platform. |
| Leeton | 1999 | The road-side view of the station building. |
| Leeton | 1999 | The goods shed with a few container wagons in the siding. |
| Leeton | 1999 | The view looking along the platform on a fairly grey day. |
| Leeton | 1999 | The view looking down the platform towards Yanco. |
| Leeton | 2001 | All appears locked up in this shot of Leeton station. |
| Leeton | 2001 | A view of the drop-down loading platform that was used to load the containers (2 containers on a 3 well wagon). |
| Leightonfield | 1997 | NR5 leads a pair of Victoria G-class locos into National Rail's Leightonfield yard. |
| Leightonfield | 2004 | The view looking west through the Leightonfield yard. |
| Leightonfield | 2004 | The view looking towards the entrance to the yard. The station is on the right. |
| Leura | 2004 | Thw view looking towards Sydney along platform 1. |
| Leura | 2004 | The view looking west along platform 2. |
| Lidcombe | 2000 | A view of the interior of the old Lidcombe signal box, including the train indicator diagram. |
| Lidcombe Goods Junction | 1997 | A view showing Lidcombe Goods Junction. Rookwood Cemetery is behind the trees in the background, and Lidcombe station is in the right distance. On the main suburban lines is a ballast train worked by a pair of 48s |
| Limbri Tunnel | 1994 | The Up end of the tunnel at Limbri. |
| Linden | 2004 | The view looking west along platform 2. |
| Linden | 2004 | The view looking west along platform 2 back towards Sydney. |
| Lisarow | 2004 | The view looking south towards Sydney from the pedestrian footbridge. |
| Lisarow | 2004 | The view looking north from the down end of the station. |
| Lisarow | 2004 | The view looking along the Up platform in the direction of Sydney. |
| Lisarow | 2004 | The view looking along the Down platform in the direction of Sydney |
| Lismore | 2003 | The view looking along the station. |
| Lismore | 2003 | Approaching Lismore crossing one of the wooden trestle bridges that imposes severe speed restrictions on the line. |
| Lithgow | 1977 | DMU 634/734 forming the train the Mudgee. |
| Lithgow | 1981 | The view looking down over Lithgow Yard. |
| Lithgow | 2003 | Lithgow Yard. |
| Lithgow | 2003 | A view of the Yard Box, looking west towards the station. |
| Lithgow | 2004 | The view looking down the platform towards the Sydney end of the station. The photo shows the old goods lift and station buildings. The garden in the centre of the platform was the base of the old stairs. |
| Lithgow | 2003 | The view looking down over platform 2 with a west-bound service stopped at the station. |
| Lithgow | 1966 | Lithgow loco and the eastern end of the yard in 1966. |
| Lithgow Goods Station | 2002 | The view looking towards Sydney of the station. |
| Lithgow Goods Station | 2002 | The very short down platform. |
| Liverpool | 2001 | The diagram inside the signal box at Liverpool. |
| Llangothlin | 2001 | The view looking towards Glen Innes. |
| Llangothlin | 2001 | The view looking towards Guyra. |
| Lochinvar | 1987 | The station bulding on the up platform, looking in the direction of Singleton. |
| Lochinvar | 2004 | The view looking west of the two short modern passenger platforms. |
| Lochinvar | 2004 | A close-up of the shed containing the equipment controlling the adjacent level crossing. |
| Lockhart | 1980 | The A Frame with diagram at Lockhart, with the lever H just in front of it. |
| Lockhart | 1996 | 48s 162-110-154-54 loading wheat at the silos. |
| Locksley | 2004 | A modern electrical hut now stands where there used to be a goods shed served by a short siding. The house is the former station masters residence. |
| Locksley | 2004 | The short one-time goods siding at Locksley, now used as a per-way siding. The main lines are on the far right. |
| Locksley | 2004 | The view looking back up the line towards Lithgow. The former platforms were on either side of the main lines in the foreground. |
| Loftus | 1940 | The view looking south towards the station. |
| Loftus Junction | 1985 | The little-used Loftus Junction box served the junction with the The Royal National Park line. |
| Long Island Tunnel | 1968 | The view looking north from the front of a down train as it approaches the Hawkesbury River Bridge having just exited the Long Island tunnel. |
| Lowanna | 2002 | The remains of Lowanna Station, with the building still standing. |
| Lowanna | 2002 | The view along Lowanna platform, looking toward Dorrigo. A set of carriages is rusting on a siding. |
| Lowanna | 2002 | A closer view of the derelict carrianges at Lowanna. The tree is growing between the carriages. |
| Lowanna | 2002 | A sign describing the Glenreagh Mountain Railway restoration works, at Lowanna. |
| Lowanna | 2003 | The sidings at Lowanna contain a number of decaying passenger cars. |
| Lowanna | 2003 | Another view of the cars and wagons stored in the sidings. |
| Lowlands | 2003 | All that remains at Lowlands. This view is looking towards Hillston. |
| Lucan | 2004 | No trace remains at Lucan, in this shot looking back up the line towards Blayney. |
| Lucasville | 1988 | A view of the remains of Lucasville Platform. The view is to the south, showing the middle road to the left and the top road to the right. |
| Lue | 1999 | The rear of the brick station building, which was in good condition in 1999, when the line was still closed. |
| Lue | 1999 | The station, as viewed from trackside. Weeds in the line show that the line is not in use. |
| Lue | 2001 | By 2001, the weeds have been cleared and the line has been re-opened. The station buildings have been repainted for the line opening. |
| Lue | 2001 | The view looking back in the direction of Sydney, showing the loading bank which was served by the dock siding. |
| Lue | 1985 | Lue track diagram in 1985, a year before closure. The levers were painted to avoid rusting in the unattended box. |
| Lyndhurst | 1984 | A pre-demolition view of the station, looking to the north. |
| Lyndhurst | 2001 | The view of the platform, looking in the direction of Cowra. |
| Lyndhurst | 2002 | The view from the north end of the yard shows the disconnected loop siding, with the platform visible in the distance. |
| Lyndhurst | 2002 | The main passenger platform, looking south towards Cowra. |
| Lyndhurst | 2004 | The site of the turntable on the down side of the line opposite the loading bank. |
| Lysaghts | 1980 | Allan's Creek signal box was located between Lysaghts and Cringila on the Port Kembla branch. It controlled the lines to Lysaghts and AIS sidings. |
| Lysaghts | 1986 | The diagram at Allan's Creek Signal Box was rather complicated being surrounded by the network of tracks from Lysaght's and Australian Iron and Steel. |
| Lysaghts | 1985 | A closer view of the signal box diagram. |
| Lysaghts | 1985 | A closer view of the signal box diagram. |
| Lysaghts | 1985 | 1985 sees life at Allan's creek situated between Lysaghts and Cringila this signal box controlled the siding to Commonwealth Steel. A very busy location. |
| Lysaghts | 1985 | A steel works shunter moving around its heavy cargo. |
| Macksville | 2003 | The platform at Macksville with passengers awaiting a Sydney bound XPT service. |
| Macksville | 2003 | 3801 approaches the loop at Macksville from the south. |
| Maclaughlin | 2000 | The old meatworks building at the one-time siding location. |
| Maclaughlin | 2004 | The siding which served the meatworks has been lifted. |
| Maclaughlin | 2004 | The road overbridge just to the north of Maclaughlin. |
| Maimuru | 2004 | The view looking northwards showing only the wheat silos remaining. |
| Maimuru | 2004 | The view looking south. |
| Maimuru | 2002 | The view ooking towards Demondrille across the level crossing. |
| Maimuru | 2002 | The view looking towards Cowra across the level crossing and past the silo. |
| Mairjimmy | 1983 | The platform and shelter are still present as railset 706 606 pass through. |
| Maitland | 1999 | An up loaded coal train hauled by three 90 class locomotives has stopped for a crew change. Several different styles of signage are visible. |
| Maitland | 2003 | The impressive road-side view of the station building. |
| Maitland | 2004 | An Endeavour railcar next to one of the original CPH rail motors at Maitland. |
| Maitland | 2004 | The view looking towards Maitland from a tourist train hauled by steam loco 3830. Barely visible at the distant station are an Xplorer set, steam loco 3810 and an Endeavour set. |
| Maitland | 2001 | A view of the down end of the platform showing construction work for the "Easy Access" program. |
| Maitland | 2004 | The very-unusual elevated signal box at Maitland. |
| Maitland Junctions | 2001 | Looking east towards Maitland Junctions. The lines curving off in the left distance are the start of the North Coast line. Coming in from the right is the start of the Cessnock Branch. |
| Maitland Main Junction | 2004 | All that remains of the junction is the formation. The line to Stanford Main No 2 Colliery went between the tree on the far left and the white post. The line to the other collieries went through the area on the right, near the short post. |
| Maitland Main Junction | 2004 | A sleeper still embedded in the ground. From the length of it, it was probably where the points were laid. |
| Maitland Main Junction | 2004 | A view of the formation as it heads towards Maitland Main Colliery. Further along there are the remains of two wooden bridges befor the formation bends to the right and enters private property. |
| Maitland Main Junction | 2004 | The formation where the line went to Stanford Main No 2 Colliery. It continues for about 500m before becoming indistinct. |
| Maldon | 2001 | The site of the one time platform at Maldon, near the cement works. Looking in the direction of Picton. |
| Maldon | 1989 | The shunter's diagram near the entrance to the cement works sidings. |
| Maldon | 1989 | The ground frame at the cement works junction. |
| Maldon | 1989 | The lever frame and diagram controlling the siding. |
| Maldon | 1989 | The view looking into the cement works, showing shunting operations in progress. |
| Maldon | 1989 | An Up train has arrived from Medway Quarry to the south. Shunters are standing by. |
| Maldon | 1989 | The Up train is setting back from the up main to the down main line. |
| Maldon | 1989 | The Up train is now moving forward from the down main onto the cement works siding. |
| Maldon | 1989 | The train has entered the siding and cleared the main line, with the final setting of point to allow main line operations. |
| Mandurama | 1984 | A view of the station in 1984 with the line south to Cowra running to the left of the picture. |
| Mandurama | 2001 | The short concrete platform is still in good condition. |
| Mandurama | 2002 | The view looking north from the goods bank. |
| Mandurama | 2002 | The siding has been well and truly lifted from the goods loading bank. |
| Mangoplah | 1980 | Some 30 years after the branch was closed and the track lifted, only sheep and goats use the station. |
| Mangoplah | 2000 | The station building lies in private property adjacent to a silo. The building is substantially preserved although a corrugated iron "wall" has been erected over part of the station's awning. |
| Mangoplah | 2003 | A view of the station looking towards Westby. A corrugated iron "wall" has been created under the awning. |
| Mangoplah | 2000 | The station's name board has been re-erected outside the church in the centre of town (the station lies about 1/2km to the west). |
| Manildra | 1985 | 42204 leads a train westwards through Manildra. |
| Manildra | 2004 | The silos at Manildra, with the former station-master's residence on the far left. |
| Manildra | 2004 | The location of the one-time station. No trace remains. |
| Manildra | 2004 | The view looking up the line showing the flour mill (left) and silos (right). |
| Manilla | 2001 | The loading bank on the silo siding is still present. |
| Manilla | 2001 | The remains of the lever frame are standing on the platform. |
| Manilla | 2001 | The track is quite overgrown in the view looking north along the platform. |
| Manilla | 2001 | The platform view looking south. |
| Manilla | 2002 | The jib crane and goods shed at the down end of the platform. |
| Manilla | 2002 | The unusually-ornate Up Home signal post. |
| Marambir | 2004 | A short concrete platform still remains. This is the view looking towards Moree. |
| Marambir | 2004 | The road-side view of the platform remains. |
| Marayong | 2004 | The remains of an industral siding where it crossed a nearby road. |
| Marayong | 2004 | The view of Marayong station looking back towards Sydney. |
| Marilba | 2001 | A shot of the formation about 1km south of the Hume Highway. |
| Marinna | 1980 | Closed on 19th July 1975 Marinna station still still sits waiting for passengers 5 years later. This view is looking in the down direction. |
| Marinna | 2002 | Overall view of the silo, looking towards Cootamundra. |
| Marooma | 2003 | No trace remains of the one-time station at Marooma. This is the view looking towards Nyngan. |
| Marooma | 2003 | The view of the line looking towards Bourke. |
| Marrangaroo | 2004 | The original stone viaduct with the modern replacement just visible behind it. |
| Marrangaroo Tunnel | 1993 | The view looking down into the cutting of the down portal. |
| Marrangaroo Tunnel | 1993 | The down tunnel portal. |
| Marrar | 2001 | The now-disconnected lever frame still sits on the platform. |
| Marrar | 2001 | The overgrown platform still sports a name board. The portal at the bottom left was where the signal wires and rods extended out to the points and semaphore signals in the yard. |
| Marrar | 2001 | The view looking down the line to Narrandera. The silo siding evidently still sees some traffic. |
| Marrar | 2002 | A view of the overgrowing platform and silos looking towards Narrandera. |
| Marrar | 2003 | The view looking east towards the silos. |
| Marrar | 2003 | The view looking west towards the large grain bunker. |
| Marrar | 2003 | The view looking east along the silo siding. The former platform is visible on the right in the middle distance. |
| Martin Place | 2001 | The local panel at Martin Place station. |
| Martins Creek | 2001 | The view looking north from the station. The siding on the right leads to the nearby quarry. |
| Martins Creek | 2001 | The view looking south along the platform, towards Maitland. |
| Martins Creek | 2001 | The nearby quarry which supplies material for track ballast. |
| Marulan | 1980 | A view of Marulan station, looking back in the direction of Sydney. The dock platform is visible at the right. |
| Marulan | 2002 | The view of the down platform and station building, looking south. |
| Marulan | 2002 | The view looking north along the down platform. |
| Marulan | 2002 | The dock platform at the southern end of the down platform. |
| Marulan | 2004 | A RIC ballast train sits in the goods siding to the north of the station. |
| Marulan | 2004 | The view looking north from the up and of the station. A RIC work train is refuged in te goods siding, and an Endeavour railset is heading north. |
| Marulan | 2004 | The view looking south across at the main platform. |
| Marulan | 2004 | An Endeavour set is approaching the station from the south. |
| Marulan | 1980 | One of the two sets of block instruments in Marulan Signal Box 1980. |
| Marulan | 1980 | Marulan Signal Box diagram. |
| Marulan | 1980 | The unusual lattice post down distant at Marulan waits for the next train. |
| Mary Vale | 2002 | Supports for an abandoned bridge on the branch line to Gulgong. |
| Mascot | 2004 | The view looking up the line towards the city. |
| Matakana | 1998 | The short steel platform which makes up the station at Matakana. |
| Matakana | 2003 | The western end of the loop siding at Matakana. |
| Matakana | 2003 | The view from the platform looking east towards Euabalong West. |
| Matakana | 2003 | The spartan platform at Matakana, with what appears to be a gangers shed behind. |
| Mathoura | 1923 | A historic photograph of Mathoura station. |
| Matong | 2003 | The view looking east towards the large grain bunker. |
| Matong | 2003 | The view looking west towards the one-time station location, on the right hand side in the middle distance. |
| Matong | 2003 | The view looking east along the silo siding. |
| Matong | 2003 | The view looking west. The stattion was located on the right foreground, with the goods shed and platform on opposite on the left hand side. |
| McAlister | 1980 | The view looking back towards Goulburn. The loading bank is on the left, and the one-time station location is at the right foreground. |
| McAlister | 2001 | The one-time location of McAlister platform is in the distance under the trees. |
| Meadowbank | 1973 | Timber waiting rooms adorned both platforms at Meadowbank in this view looking south in 1973. The ticket office was at the left, out of view. The building visible above the locomotive is a railway residence which stands on the site of the current day commuter car-park. The original Parramatta River bridge can be seen in the distance. |
| Meadowbank | 1974 | The waiting room on the down platform at Meadowbank in 1974. |
| Medlow Bath | 2004 | The view looking west along platform 1. |
| Medlow Bath | 2004 | The view looking south across towards platform 1. |
| Medlow Bath | 2004 | The view looking towards Sydney along the down platform. |
| Medlow Bath | 2004 | The view looking west across towards the down platform. |
| Medway Junction | 1987 | Between Tallong and Marulan lies Medway Junction Signal Box which served the Medway Quarry Siding. 4422 heads a train on the Down Main. |
| Medway Junction | 1980 | Medway Junction diagram. |
| Medway Junction | 1980 | Medway Junction Box. |
| Medway Junction | 1980 | The block instruments in Medway Junction Box, for Tallong & Marulan. |
| Medway Junction | 1980 | Medway Junction's red staff & ticket box for the branch to the Quarry. |
| Meehan Street | 2004 | The view of the Meehan Street crossing, looking back up the line towards Rossie and Bridge Streets. |
| Meehan Street | 2004 | The view looking across the Meehan Street crossing, in the general direction of the end of the line. |
| Meehan Street | 2004 | The view looking down the line. The entracne to Yass yard can be seen in the distance. |
| Megan | 2001 | The overgrown and decaying station and platform. This is the view looking towards the terminus at Dorrigo. |
| Megan | 2002 | Megan station has its nameboard and a couple of buildings on the platform, although the latter are in danger of collapsing. |
| Megan | 2002 | The overgrown remains of the yard at Megan. There is some rusting rolling stock on one siding. |
| Megan | 2003 | A shot of Megan station and surrounds, taken from the nearby road. |
| Melinga | 1981 | Although the station closed to passengers in 1975 the signal box on the platform was still working in 1981. The view of the station is taken from the Sydney side looking north. |
| Melinga | 1981 | The unusual sign consisting angle iron proudly depicts the station name. |
| Melinga | 1981 | Melinga diagram in 1981 showing the refuge loop gone, as shown by the white out. |
| Menangle | 1996 | Tuscan-coloured 42220 leads up Griffith train (SL16) off the Menangle viaduct in the late afternoon |
| Menangle | 1985 | The Menangle Signal Box lever frame. |
| Menangle | 1980 | A late afternoon shot of Menangle station. |
| Menangle Park | 1983 | The view looking south to Menangle Park station. The one-time Racecourse Sidings left the main line here and proceeded through the gate (which was normally closed on non-race days). |
| Menangle Racecourse | 2002 | A view of part of the long racecourse platform at Menangle Park looking south. The Main South can be seen in the left of frame. |
| Menangle Racecourse | 2002 | Another view of the platform. |
| Menangle Racecourse | 2002 | A view of the end of the platform looking south. The actual Menangle Park station is just out of shot to the left. |
| Menangle Racecourse | 2002 | The old entrance to the racecourse can been seen behind this north looking view of the platform. |
| Mendooran | 2003 | Mendooran looking towards Troy Junction. |
| Menindee | 2000 | The view along the platform. |
| Menindee | 2000 | Menindee's isolation is reflected by the presence of three large elevated water tanks in the yard. |
| Menindee | 2000 | The 1006km post, near the station. |
| Menindee | 2000 | A sign providing information on Menindee's rail history. |
| Menindee | 2000 | A sign providing information on Menindee's rail history. |
| Merah North | 2003 | The view looking along the wheat siding towards Narrabri. |
| Merah North | 2003 | The view looking down the wheat siding towards Walgett. |
| Merah North | 2003 | The crossover from the main line on the right to the loop siding. This is taken looking towards Narrabri. |
| Merah North | 2003 | The A frame and staff hut. |
| Merah North | 2003 | A close-up of the A frame. It has been relocated from the main platform. |
| Merah North | 2003 | The view looking along the former station platform in the direction of Narrabri. |
| Merah North | 1998 | The yard diagram at Merah North. |
| Meranburn | 2004 | The distinctive round elevated water tank. |
| Merriwa | 1988 | Merriwa Station looking up the line in the direction of Sandy Hollow. |
| Merriwa | 2001 | The station building, gantry crane and goods shed. This is the view looking towards Sandy Hollow. |
| Merriwa | 2002 | The view looking at the down-side terminus station at Merriwa. The goods shed and gantry crane are still present nearby. |
| Merriwa | 2002 | The view looking down the platform towards the end of the line. |
| Merriwa | 2002 | This impressive buffer stop marks the end of the branch line from Sandy Hollow. |
| Merriwa | 2002 | The view from the turntable back up the yard. In the distance are the goods shed and station building. In the centre was the location of the engine-shed. The water-column is still present on the right although the tank has gone. |
| Merriwa | 2002 | The yard still features its turntable. |
| Merriwa | 1984 | 48125 at the head of a short goods train sits in the station. |
| Merriwa | 1984 | An early moring shot of Merriwa yard just just before starting the shunt. |
| Merriwa | 1969 | 3088 heads a small train that has arrived at the station (visible behind the carriages). |
| Merrygoen | 2001 | A view of the station and yard remains. The elevated water tank is still present. |
| Merrygoen | 2003 | The view looking along the platform in the direction of Binnaway. The line on the left is the cross-country line from Dubbo, that on the right is from Sydney. |
| Merrygoen | 2003 | The view looking down the yard in the direction of Binnaway. The station is in the distance behind a tree. |
| Merrygoen | 2003 | The short raised platform holding the ground frame controlling the yard. |
| Merrygoen | 2003 | The landmark signal on the approach to Merrygoen yard. |
| Merrygoen | 2003 | A pair of elevated water tanks. |
| Merrygoen | 2003 | A view of the interior of the signal box. |
| Merrygoen | 2003 | The view of the junction between the cross-country line to Dubbo (on the left) and the line to Wallerawang and Sydney (on the right). |
| Merrygoen | 2003 | A close-up of the ground frame in the yard. |
| Merrygoen | 2004 | The remains of the original water tank built in 1917. This tank was replaced with the current steel tanks in 1926. No trace remains of the locomotive yards and pits that were built alongside this tank. |
| Merrygoen | 2004 | The lever frame at the junction of the main line to Wallerawang and the branch to Dubbo. |
| Merrygoen | 2004 | The junction at Merrygoen. The branch line to Dubbo is on the left and the main line to Wallerawang is on the right. |
| Merrylands | 1967 | The one time signal box at Merrylands. This was situated at the southern end of the up platform, directly adjacent to the Merrylands Road level crossing. |
| Merrylands | 1967 | The lever frame inside the signal box. |
| Merrylands | 1996 | 4850 and 4910 combine for the weekly shunt at the flour mills at Merrylands. |
| Merrylands | 1983 | Merrylands station on a lazy afternoon 1983. |
| Merrywinebone | 2004 | The view looking south from Merrywinebone. The siding in the distance in the Namoi Cotton Co-op siding. |
| Merrywinebone | 2004 | The massive silo at Merrywinebone which is now the end of the branch line. |
| Merrywinebone | 2004 | The Merrywinebone staff hut. |
| Merrywinebone | 2004 | The view looking towards the stop block which marks the current end of the line. |
| Merrywinebone | 2004 | The RTM's Southern Aurora train has stopped here while on tour. |
| Meryula | 2003 | The only sign of this one-time location is the nearby property of the same name. |
| Metford | 2004 | The stark footbridge and lifts serving the comparatively new station of Metford. |
| Metford | 2004 | The view of the island platform looking west towards Newcastle, with the Coal Roads on the far left. |
| Miandetta | 2003 | The water tank is all that remains of the one-time crossing station. |
| Michelago | 1989 | A three-car diesel railcar set sits at Michelago station. |
| Michelago | 2000 | The station at Michelago. |
| Michelago | 2000 | The front of the station is basking in the late afternoon sunlight, as a storm approaches. |
| Michelago | 2000 | A view to the north of the station. On the left is a ganger's shed. |
| Michelago | 2003 | A view looking along the recently-restored station. |
| Michelago | 2003 | The view looking north from the northern end of Michelago. |
| Milbrulong | 2001 | The view of the station location, looking west towards Lockhart. |
| Milbrulong | 2001 | The remains of the short down side platform. |
| Millthorpe | 2002 | View of Milthorpe station from the south side looking north across the rail line. |
| Millthorpe | 2002 | View of Millthorpe station from the car-park side. |
| Millthorpe | 2002 | View of Millthorpe station from the car-park side. |
| Millthorpe | 2002 | The loading dock at the Blayney end of the station. |
| Millthorpe | 2002 | An uprooted crane lying in the carpark. |
| Millthorpe | 2002 | Part of the uprooted crane lying in the carpark. |
| Milsons Point | 1968 | The view looking down from the south-east pylon of the Harbour Bridge, as a city-bound service approaches the tunnel and Wynyard station. |
| Milsons Point | 1967 | The view looking south from the station towards the bridge, as a north-bound "red rattler" service approaches the station. |
| Mindaribba | 1977 | A view of the down side platform, with signal box at the Sydney end. Electric staff safeworking was still in use at the time of this photo. |
| Mindaribba | 2001 | The short platform that is Mindaribba. |
| Mindaribba | 2001 | A northbound XPT races past the short loop which services the platform. |
| Mindaribba | 2003 | The local control panel at Mindaribba. |
| Minimbah | 2004 | The local control panel at Minimbah. |
| Minmi Open Cut | 2001 | This restored guard's van is located in Railway St, on the hill above the site of the one-time mine. The "B" indicates it was owned by J and A Brown Abermain Seaham Collieries. |
| Minore | 1996 | 48117 has paused in the late afternoon sun for safeworking duties at the staff station of Minore. |
| Miowera | 1975 | A shot of the basic platform and shed at Miowera, taken some time in the 1970s. |
| Mirrool | 2004 | The Mirrool station sign has been removed to a playground adjacent to the local hotel which can be seen in the background |
| Mirrool | 2004 | The disused Mirrool passenger platform, from which an annual "kick a football over the silos" competition is held annually. |
| Mirrool | 2004 | Mirrool passenger platform. A sign halfway down the platform advertises the football kick competition. |
| Mittagong | 2001 | The two-storey station building in the up platform. At the time of the photo, the non-operational parts of the station were available for lease. |
| Mittagong | 2001 | The ticket office on the up platform. |
| Mittagong | 2001 | In contrast, the down platform boasts only a small shelter. |
| Mittagong | 2001 | A single Endeavour coach sits in the goods siding, presumably as a result of some mechanical problem. |
| Mittagong | 2001 | The Mittagong Signal Box is nestled under the footbridge at the northern end of the down platform. |
| Mittagong | 2001 | The road-side view of the station buildings on the up platform. |
| Mittagong | 1980 | Mittagong Signal Box. |
| Mittagong | 1980 | One of the original enamel signs on Mittagong station. |
| Mittagong Junction | 1980 | Mittaging Junction box was at the south end of the Picton-Mittagong loop line and was seldom used. |
| Mittagong Junction | 1980 | Somewhat rare emergency levers used in unmanned boxes such as here at Mittagong Junction. |
| Mittagong Junction | 1980 | Mittagong Junction diagram in 1980. |
| Moama | 2002 | The station building has now been removed. Only the wooden-face platform remains. |
| Moama | 1997 | A81 carries empty rice wagons over the Murray River bridge and on through Moama. |
| Moama | 1870 | A historic photo of Moama Station. |
| Moama | 1937 | A historic photo of Moama Station. |
| Mogongong | 2004 | The loading bank, with its siding now lifted. The station was probably directly opposite. |
| Mogongong | 2004 | The probable location of the one-time station. |
| Mogongong | 2004 | Before you enter the station yard from Grenfell the line crossed a low lying area which was spanned by a wooden bridge, still in good shape. |
| Mogriguy | 2004 | The view looking up the line. The one-time station was on the right hand side of the main line. |
| Moira | 1923 | A historic photo of Moira Station. |
| Molong | 2004 | The view looking along the station in the direction of Sydney. Note that the track has been slewed away from the platform. |
| Molong | 2004 | The water column at the up end of the station. |
| Molong | 2004 | The road-side view of the station building, looking back up the line. |
| Molong | 2004 | The view of the station looking down the line. The junction for the line to Dubbo is in the distance, just beyond the level crossing. |
| Molong | 2004 | The silo at the up end of the yard. The bridge is for the Mitchell Highway. |
| Molong | 2004 | The overgrown dock platform platform at the up end of the station. |
| Molong | 2004 | The view looking down the platform showing the restored station building. |
| Molong | 2004 | The junction of the Broken Hill line (left) and former branch line to Dubbo (right). |
| Molong | 2003 | The view looking along the platform in the direction of Sydney. |
| Molong | 2003 | The view looking across towards the station building. |
| Molong | 2003 | The road-side view of the station building. |
| Monteagle | 2004 | The view looking south along the long passenger platform. |
| Monteagle | 2004 | The view looking south. |
| Monteagle | 2004 | The view looking south of the remains of the goods platform. |
| Morandoo | 2003 | The entrance to the former BHP steelworks. |
| Morandoo | 2003 | A shunting loco sits inside the former BHP site. |
| Morandoo | 2003 | An old FreightCorp brake van sites between some open V-Line wagons. |
| Morandoo | 1987 | The BHP sidings at Tighes Hill, showing the various locomotives used to haul coal trains to the nearby BHP blast furnaces. |
| Morandoo | 2000 | Saturday afternoon sees 8112 shut down in Morandoo Sidings. |
| Morandoo | 2003 | Three NR locos site idle in the yard. |
| Morandoo | 1981 | 4715 and 4708 moving through the yard at Morandoo. |
| Morandoo | 2003 | BHP junction looking back into Morandoo yard. |
| Moree | 2001 | Moree platform and station from track level. |
| Moree | 2001 | The station building has been boarded up. |
| Moree | 2001 | The siding to the left is used to refuge Xplorer cars overnight. It is surrounded by razor wire. |
| Moree | 2001 | The view from a track maintenance vehicle, approaching Moree from the north. The semaphore is the Moree Up Home signal. |
| Moree | 1999 | The view of the station buildings from the adjacent car-park. |
| Moree | 2001 | A view of the vegetable oil siding looking towards Moree. |
| Moree | 2001 | The view from the Bulluss Drive level crossing towards the silo. |
| Moree | 2001 | A closer view of the approaches to the silos. |
| Moree | 2001 | A view from the Sydney end of the vegetable oil siding towards the silo. |
| Moree | 1990 | The view looking south from an engine leaving Moree. On the left can be seen Moree Loco. Behind the white fence at the far left is the siding leading to the turntable. In the distance, the main line in on the right, with the Inverell branch on the left. |
| Morpeth | 2000 | The view of Morpeth station looking in the up direction, showing a rather curious platform arrangement. |
| Morpeth | 2001 | The view looking along the platform, in the down direction. |
| Morpeth | 2001 | The front of the station building which sits at the top of the rise, above the platform level. |
| Morrisons Hill | 1980 | Only the platform faces remained in 1980, in this view looking down the line. |
| Morundah | 1975 | Morundah station was still manned when photographed from the Tocumwal passenger service, looking south in May 1975. |
| Morven | 1980 | By 1980 the platform has gone, but the overgrown loop siding is still present. |
| Moss Vale | 1977 | Passengers have just disembarked from CPH32 after it has arrived from Wollongong. |
| Moss Vale | 1977 | CPH32 is in the up dock siding while 44100 sits heads north along the Up Main. |
| Moss Vale | 2001 | The steel girder bridge where the main line crosses over Argyle Street, to the south of the station. |
| Moss Vale | 2001 | A Countrylink XPT pauses at the station before continuing its journey. The jib crane is a relic from earlier days. |
| Moss Vale | 2001 | A Countrylink XPT train, on its scheduled stop at Moss Vale. |
| Moss Vale | 2001 | The somewhat utilitarian down-side station view. |
| Moss Vale | 2001 | The station name-board under the shelter on the down platform. |
| Moss Vale | 2001 | The elevated Signal Box with three 80 class locos, as seen from the up platform. |
| Moss Vale | 2001 | The view looking south towards Melbourne along the up platform. |
| Moss Vale | 2001 | A Campbelltown-bound Endeavour approaches its stop on the up platform. |
| Moss Vale | 2001 | The view looking north along the up platform. |
| Moss Vale | 2001 | The well-kept garden next to the station. |
| Moss Vale | 2002 | Moss Vale Yard and signal box showing 3830, 3112 and 2705 in steam. Behind 2705 is 4833. |
| Moss Vale | 2004 | The barrier indicators and other signage at the entrance to the station. |
| Moss Vale | 1985 | 4204 stabled in yard, 4836 idly waits to take the up passenger later in the day and Rail Motor 34 sits with engine off in the dock soon to be woken for the run to Wollongong via Robertson. |
| Moulamein | 1927 | A historic photo of Moulamein Station. |
| Moulamein | 2004 | A view of the track heading west beyond Moulamein. |
| Moulamein | 2004 | The remains of the buffer stop at the end of the elevated grain siding. |
| Moulamein | 2004 | The main line and grain siding at the western end of the yard. |
| Moulamein | 2004 | The main silo at Moulamein. |
| Moulamein | 2004 | The grain silo and loading facility at the eastern end of the location. |
| Mount Colah | 2001 | The view looking south along Mount Colah station as a northbound freight passes through. |
| Mount Colah | 2001 | The view looking north along the up platform. |
| Mount Druitt | 2004 | The view looking from the footbridge towards Sydney. |
| Mount Druitt | 2004 | The view of up end of the station, looking west. |
| Mount Druitt | 1966 | The former down platform building on the site of the original station. |
| Mount Druitt | 1966 | The road-side view of the former down platform building. |
| Mount Druitt | 1966 | The contracters board during the building of the current Mount Druitt station. |
| Mount George | 2003 | 3801 at the head of a tour train is about to enter the loop at Mount George. |
| Mount George | 2004 | The view looking down of the dir bank which is all the remains of the platform. |
| Mount George | 2004 | The modern safeworking hut. |
| Mount Gipps | 2002 | Platform structure at Mt Gipps, about 7km east of Broken Hill. |
| Mount Hope | 2003 | Not much remains at Mount Hope. This piece of track in the area that was the end of the line. |
| Mount Hope | 2003 | Pieces of track and demolished buildings are all that remains at the ruins at Mount Hope. |
| Mount Hope | 2003 | More ruins. |
| Mount Horeb | 1976 | Ashley Hay, the guard for this run, poses beside CPH 24 while it waits at Mount Horeb station. |
| Mount Horeb | 1976 | The nameboard on the station. |
| Mount Horeb | 1999 | A view of the Mount Horeb yard, from the semaphore signal at the south end. |
| Mount Horeb | 1999 | A view of the goods platform taken from the remains of the passenger platform. |
| Mount Horeb | 1999 | The points lever and semaphore signal at the down up of the yard. |
| Mount Horeb | 1980 | Mount Horeb frame was always subject to weather conditions. |
| Mount Horeb | 1980 | A weathered sign board on the platform. |
| Mount Horeb | 1980 | Staff and ticket boxes for the sections to Gundagai and Gilmore. |
| Mount Horeb | 1980 | A lonely Mount Horeb station in 1980. |
| Mount Knowles | 1982 | The platform and name-board are still present in this 1982 shot. The goods siding also appears to still be connected to the main line. |
| Mount Kuring-Gai | 2001 | The view along the platform looking towards Sydney. |
| Mount Kuring-Gai | 1968 | The view looking north along the platform as a City-bound U-set approaches. |
| Mount Murray | 1980 | Mount Murray station when it was still in use. Note that at this time the line was only single-track. |
| Mount Murray | 1996 | 8139/8132 squeal their way past the abandoned station of Mount Murray at the beginning of the descent to Wollongong. |
| Mount Murray | 1996 | Mount Murray station sees no more passenger traffic. Its somewhat out-of-the way location has ensured it is in relatively good condition. |
| Mount Murray | 2003 | A view looking across at the station building. |
| Mount Rae | 1980 | Only a pair of collapsing banks betray existence of the one-time station at Mount Rae. |
| Mount Russell | 1980 | Railmotor 403 passenger service Moree to Inverell, crossing the Weed Killer Train (Poison Train), which is in the goods siding behind. |
| Mount Russell | 2004 | Apart from the grain facilities, only a pair of lever frames are visible. The station was probably located on the left-hand side. |
| Mount Victoria | 2004 | The view from the overhead pedestrian bridge located towards the Sydney end of Mt Victoria Station. The is the view looking towards Lithgow. |
| Mount Victoria | 2004 | The view from near the entrance to the Up yard west of Mount Victoria station. |
| Mount Victoria | 2004 | A collection of modern and older signs at the entrance to the station on platform 2. |
| Mount Victoria | 2004 | The roadside view of the (up) station building, and upstairs museum. |
| Mount Victoria | 2004 | The old barracks building situated north of the station near the Up yard. |
| Mount Victoria | 2004 | The trackside view of the old barracks building. |
| Mount Victoria | 2004 | The view looking across at the up platform and the old ballroom. |
| Mount Victoria | 2004 | The view looking across at the down platform and the old tea rooms. |
| Mount Victoria | 2004 | The gantry at the end of the electrified up storage sidings . |
| Mount Victoria | 2002 | The view looking across to the two-storey station building and signal box. |
| Mount Victoria | 2002 | A closer view of the signal box. |
| Mount Wolgan | 1968 | The remains of some derelict wagons in the former marshalling yard. |
| Mudgee | 1979 | A 620/720 railcar has terminated at Mudgee after a run from Lithgow. |
| Mudgee | 1982 | A view from the road side of the impressive station building, taken when the line was still a going concern. |
| Mudgee | 2001 | The impressive rail-side view of Mudgee station. The sign above the awning shows the station's opening date - 1884. The small building in the far left hand edge is the preserved remains of the foot warmer heating ovens from the days of the Mudgee Mail. |
| Mudgee | 1995 | The view of Mudgee station before the line was returned to service. The view is looking away from Lithgow. |
| Mudgee | 2004 | The dock siding at the up end of the platform. |
| Mudgee | 2004 | The extended passenger platform, with the very long goods loading bank behind it. |
| Mudgee | 2004 | An overall view of the station looking north. |
| Mudgee | 2004 | The goods platform and shed at the up end of the yard. |
| Mudgee | 2004 | The road-side view of the up end of the station. |
| Mudgee | 2004 | The road-side view of the down end of the station. |
| Mudgee | 2004 | The station signboard and remains of the old footwarmer ovens. |
| Mudgee | 2004 | The rail-side view of the station, looking in the direction of Sydney. |
| Mudgee | 2004 | The view looking south along the platform. |
| Mudgee | 2004 | The view looking north along the platform. |
| Mudgee | 2004 | The view looking back up the line from the platform. |
| Mudgee | 2002 | The newly restored Mudgee goods shed looking across the main line with up (Sydney) to the right. |
| Mudgee | 1981 | The signal repeaters behind the frame. |
| Mudgee | 1981 | The Mudgee - Gulgong Staff & ticket box. |
| Mudgee | 1981 | An electric staff instrument inside the signal box. |
| Mudgee | 1981 | The yard diagram. |
| Mulgrave | 1977 | The signal box on the platform at Mulgrave station. |
| Mulgrave | 1985 | Prior to electrification the sleepy station of Mulgrave on the Richmond line shows a pair of up Railmotors arriving to take on minimal passengers. |
| Mulgrave | 1984 | Mulgrave station in 1984. The track in the foreground is the goods siding, with the loading bank just visible on the left. |
| Mulgrave | 1984 | The station diagram. |
| Mullengudgery | 2003 | The station sign board has been moved and now identifies a local property. |
| Mullumbimby | 2003 | The platform and station view. |
| Mullumbimby | 2003 | The view looking along the platform, in the direction of Casino. |
| Mumbil | 2002 | Evidence for a siding in the form of some rails embedded in a concrete pad. |
| Mumbil | 2004 | The view looking down the line to the north of the location. |
| Mumbil | 2004 | The remains of a loading bank, the siding having being lifted. |
| Mungindi | 2004 | The station building at Mungindi, used from about 1966 to 1974, is now a private residence. |
| Mungindi | 2004 | The reas of the station. The platform is visible in the right background. |
| Mungindi | 2004 | The former station-master residence, now privately-owned. The track ran alongside the house. |
| Mungindi | 2004 | Beside the disused track and a short distance past Mungindi station are these buildings which appear to have once been used for railway purposes. |
| Mungindi | 2004 | A loop track from Mungindi railway station (to the right) passed these buildings and the water tower in the background. |
| Mungindi | 2004 | The remains of the loop line at Mungindi terminus. The old station building lies in the background. |
| Munna | 2001 | A view of the railway bridge over the Cudgegong River, near Munna. |
| Munyabla | 2001 | The station nameboard - now located at the front entrance of the property next to the station. |
| Munyabla | 2001 | The remains of the station platform and loading banks. |
| Munyabla | 2001 | Foundations of the original weighbridge. |
| Muronbung | 2003 | Only the grain silos and loop remain of the crossing station at Muronbong. |
| Murrumburrah | 1980 | Originally Harden carried the name Murrumburrah when it opened in 1877, but when the name was changed in 1879 the new Murrumburrah was opened and changed to its current location in 1900. It was closed on February 8th, 1976. |
| Murrumburrah | 2001 | A sign recording the location of the one-time Murrumburrah station. |
| Murrumburrah | 2001 | The pit is all that remains of the signal box. |
| Murrurundi | 2004 | The walled-up fireplace in the waiting room. |
| Murrurundi | 2004 | The road-side approach to the station. |
| Murrurundi | 2004 | A closer view of the down end of the newly repainted station building. |
| Murrurundi | 2004 | The view looking down the platform in the direction of Werris Creek. |
| Murrurundi | 2004 | The view looking back up the line in the direction of Sydney. |
| Murrurundi | 2004 | Some old luggage trolleys which are being stored under the pedestrian footbridge. |
| Murrurundi | 2004 | Looking along the station facade in the direction of Werris Creek. |
| Murrurundi | 2004 | The down end of the repainted station building. |
| Murrurundi | 2003 | The control panel inside the signal box. |
| Murrurundi | 2003 | The view looking down on the Sydney end of the platform. |
| Murrurundi | 2003 | The view looking along the platform in the down direction, with some perway equipment paused on the main line. |
| Murrurundi | 1983 | Murrurundi frame and diagram in 1983. |
| Murrurundi | 1983 | Murrurundi diagram in 1983. |
| Murrurundi | 2002 | FL220, JL403, 4836, 4904 and EL52 working grain train to Sydney. |
| Murwillumbah | 2001 | The long curved platform at Murwillumbah, looking in the up direction. The track through the trees on the left leads to the turntable. |
| Murwillumbah | 2002 | Ex-State Rail unit 42107, now owned by the Northern River Railway, stands at the station at the head of the Ritz Rail tourist train. |
| Murwillumbah | 2003 | The modern sign at the station advising the available services. |
| Murwillumbah | 2003 | The road-side view of the station building. |
| Murwillumbah | 2003 | The view looking along the platform. |
| Murwillumbah | 2003 | The rusty turntable. |
| Murwillumbah | 2003 | The water tower, unusually a circular brick base with a circular steel tank on top. An incomplete water column is on the right. The siding disappearing into the distance ends at the turntable. |
| Murwillumbah | 2003 | The Sunstate Cement silo and siding past Murwillumbah station towards Condong. |
| Murwillumbah | 2003 | The current end of the line beyond Murwillumbah station towards Condong. The siding holds several former Ritz Rail cars under a new owner. Three more cars had just been delivered when this shot was taken. |
| Murwillumbah | 1985 | Murwillumbah station with the Gold Coast Motorail. |
| Murwillumbah | 1985 | One of the small station lever frames. |
| Museum | 2002 | A Tangara train has stopped on the southbound platform. This station features fake 1920's style advertising posters and modern destination indicators. |
| Muswellbrook | 1982 | 4705 sits idle in the yard at Muswellbrook. |
| Muswellbrook | 2000 | Looking south along the platform, with a Freightcorp coal train rolling through the station. |
| Muswellbrook | 2000 | Looking north along the platform, with an empty Freightcorp coal train heading to one of the northern collieries. |
| Muswellbrook | 2000 | There are no lingering farewells at this station! |
| Muswellbrook | 2000 | The covered section of the platform, showing an impressive array of plants. |
| Muswellbrook | 2000 | A pair on National Rail locos sit idle in a siding opposite the platform. |
| Muswellbrook | 2000 | The signal box at Muswellbrook. |
| Muswellbrook | 2000 | Muswellbrook is in the heart of the Hunter coal fields. This photo shows a restored coal skip just outside the station. |
| Muswellbrook | 2004 | The old roundhouse and turntable at Muswellbrook. |
| Muswellbrook | 1986 | A photograph of Muswellbrook Loco was taken from the departing 5202 train. |
| Muswellbrook | 1986 | Muswellbrook Signal Box around 1986. The shunters humpy is visible on the left of the shot. |
| Muswellbrook | 1984 | A view of the inside of the signal box showing the control panel. |
| Muswellbrook No 2 Colliery | 1987 | A 47 class loco at the head of a train being loaded. Water vapor from Bayswater Power station is plainly visible. |
| Muswellbrook No 2 Colliery | 1987 | Loading operations being performed by a front end loader. |
| Muttama | 1975 | A view of the station building. |
| Muttama | 1975 | The view looking over the goods yard and shed from the Tumut end of the somewhat overgrown platform. |
| Muttama | 1999 | The points at the up end of Muttama siding. |
| Nammoona | 2004 | The view of the ballast siding, looking north as a Sydney-bound XPT train passes through. |
| Nammoona | 2004 | A view of the large piles of ballast next to the siding. |
| Nanami | 2004 | A 2-lever frame is visible in the yard. The mound on the right may be the remains of a platform. |
| Nanami | 2004 | A pair of rotting S-class wagons sit in the adjacent sawmill siding. |
| Nanami | 2004 | Three more rotting S-class wagons in the adjacent sawmill siding. |
| Nanami | 2004 | The view looking looking west across the yard. |
| Nanami | 2004 | The view from the western end looking back east, showing the abandoned wagons in the sawmill siding. |
| Napier | 2001 | The site of the one-time passenger platform. Only a mound of dirt remains. This is looking in the direction of The Rock. |
| Naradhan | 1996 | The water tank at Naradhan has some unusual bracing. The silo in the background still sees rail traffic. |
| Naradhan | 2001 | The turntable and water tank are relics of the steam era, but Naradhan still sees seasonal traffic, as evidenced by the two 48 class locos which have detached from the wheat train in the background. |
| Naradhan | 2001 | A view looking towards the dead end, as a train shunts the grain silo. The goods siding is on the up side. |
| Narara | 2004 | The view looking north in the direction of Newcastle. |
| Narellan | 1984 | The remains of Narellan platform. |
| Narellan | 2004 | The view looking towards the location of Narellan. The line crossed the road from the left in the middle distance before continuing down the right hand side of the road. |
| Narrabri | 2001 | The rear of the station building. |
| Narrabri | 2001 | The platform sign, with the now-obsolete "Change here for Walgett Line". |
| Narrabri | 2001 | The view down the length of the platform. |
| Narrabri | 2001 | A modern Countrylink baggage cart. |
| Narrabri | 2001 | A baggage cart from a previous generation. |
| Narrabri | 1990 | The Excelsior Flour Mill, adjacent to the station. The fence, the mill and the building in this photo are now all removed. |
| Narrabri Junction Platform | 1975 | The Frame A controlling the junction. |
| Narrabri Junction Platform | 1975 | A close-up of the diagram above A Frame, located on the platform. |
| Narrabri Junction Platform | 1975 | The view looking south of the short curved platform that sat inside the triangle at the junction. |
| Narrabri West | 1975 | The view looking across from the station area to the engine shed. |
| Narrabri West | 1975 | The view looking across to the road-side of the station building. The tracks it he foreground at the No 1 and 2 Marshalling Sidings. |
| Narrabri West | 1975 | The view looking towards the station building entrance. |
| Narrabri West | 1975 | The view looking along the platform in the up direction. |
| Narrabri West | 1975 | The rear of the station building. It was unusual in that you had to cross tracks to reach it. |
| Narrabri West | 1975 | The view looking west through the yard. A set of passenger cars sits on the Perway Siding, with the engine shed visible in the distance. |
| Narrabri West | 1975 | The view looking along the station in the direction of Narrabri Junction. |
| Narrabri West | 1975 | Several 2AA bogies are stacked in the yard. |
| Narrabri West | 1975 | The Chargeman's Office. |
| Narrabri West | 1975 | The bath-house building. |
| Narrabri West | 1975 | The view inside the engine shed. |
| Narrabri West | 1975 | Railcar 401 sits inside the engine shed. |
| Narrabri West | 1975 | A passenger car sits just outside the engine shed in this view looking east. |
| Narrabri West | 1975 | The view looking east towards the engine shed. |
| Narrabri West | 1975 | The jib crane, with 2 elevated water tanks in the background. |
| Narrabri West | 1975 | The view looking across to the engine shed. |
| Narrabri West | 1975 | The remains of the tender for steam locomotive 5801. |
| Narrabri West | 1975 | A semaphore signal sits in the yard. |
| Narrabri West | 1975 | The view looking across towards the two elevated water tanks. |
| Narrabri West | 1975 | A filled-in ash pit, with the lowered track on the right being all that remains of the former coal stage. |
| Narrabri West | 1975 | An FO car site coupled to a water gin in the yard. |
| Narrabri West | 1975 | The 50 foot Sellers turntable at the western end of the yard. |
| Narrabri West | 1975 | A timber storage structure in the middle of the yard. |
| Narrandera | 2001 | The view from the western end of the station, looking in the direction of Hay. The lines branching to the left are the Mill Siding and overgrown No 1 Siding. The Main and Loop lines extend into the distance, with the Back Road and perway shed on the right. |
| Narrandera | 2001 | The view from the western end of the yard, looking back towards the station. The disused line in the right foreground is the start of the disused branch to Jerilderie and Tocumwal. |
| Narrandera | 2001 | The station building, on the down side of the line. |
| Narrandera | 2001 | The view looking west along the platform, with the perway shed and Train Order signal on the right. |
| Narrandera | 2001 | At the western outskirts of the yard the disused line to Tocumwal branches off the the left. The main line once went all the way to Hay, but now only reaches as far as Wilbriggie. |
| Narrandera | 2003 | The turntable is still present although currently no longer usable. |
| Narrandera | 2004 | A view of the grain silos from the south. |
| Narrandera | 2004 | A view of the grain silos from the north. |
| Narrandera | 2004 | The remains of the cattle loading platform. |
| Narrandera | 1960 | The view looking up the line at the Sydney end of the yard. The wagons are sitting in the Sand Siding, with the Shell & Vacuum siding behind it. |
| Narrandera | 1960 | The view looking down the line towards the station. On the left is the dock siding, with the main, loop and back roads opposite the platform. The sidings on the far right leads to the Rail Motor shed (dark building) and the loco facilities. In the distance is the Wise Brothers Mill. |
| Narrandera | 2003 | The view looking west towards the Narrandera Wheat silos. |
| Narrandera | 2003 | The view looking east from the western end of the wheat siding. |
| Narrandera | 2003 | The view looking west towards Narrandera from the wheat silo. |
| Narrandera | 2003 | The view looking east from the wheat loading chute. |
| Narromine | 2002 | The turntable has been preserved but is no longer in use. |
| Narromine | 2003 | National Rail locos BL 27 and BL33 in SteelLink livery sit in the Narromine yard. |
| Narromine | 2004 | 8173 heading west across Dandaloo St railway crossing. |
| Narromine | 2004 | 8173 waiting at Narromine Station. Av view from junction of Mitchell Hwy & Dandaloo St. |
| Narromine | 2004 | Close up of western end of station platform. |
| Narromine | 2004 | Looking south at Dandaloo Street railway crossing (western end of station platform). |
| Nashua | 2003 | The location of the one-time platform, looking towards Murwillumbah. |
| Nashua | 2003 | The nameboard has been relocated to a nearby property. |
| Nashua | 2003 | The view looking back towards Sydney. The platform was on the right in the middle distance. |
| Neath | 2001 | The main line has been removed from the down platform, but the station still boasts a name board. |
| Neath | 1987 | Neath station was opened in 1908 and the 16 lever signal box is shown still with signals in the yard. The line in the left background led to the Neath Colliery. |
| Neath | 2003 | Neath platform. |
| Neath | 2001 | The view of Neath's down platform, showing the small toilet/storage block and the signal box, which controlled the Neath Colliery branch. This branch left the main line on the middle background, and crossed the road just behind the platform. |
| Neath | 2001 | The view along the platforms in the up direction. The signal box is just visible behind the bushes on the left. |
| Neath | 1995 | The waiting room on the Up platform at Neath Station. The photo was taken when Neath signal box & a portion of the former down main was still in use. The section of the down main towards Abermain & the associated crossover was in use as a crossing point at this time. |
| Neath | 2004 | The remains of the Down Main are still embedded in the road, just to the south of the station. |
| Neilrex | 2003 | The view of the silos at Neilrex, looking back towards Merrygoen. |
| Nevertire | 2002 | One of several silos at Nevertire. |
| Nevertire | 2002 | The lever frame controlling the junction to the short branch to Warren. |
| Nevertire | 2002 | A close-up of the signal diagram located at the A frame. |
| Nevertire | 1997 | 48156 and 4887 head a wheat train stopped for staff exchange duties at the safeworking hut. In the foreground is the line from Warren. |
| Nevertire | 2002 | The view looking south-east towards Dubbo. Several large silos can be seen. The line on the far right is the line to Nyngan, next to it is the Warren line, the line in the foreground is a short siding. |
| Nevertire | 2002 | The view looking west, with the Warren Branch diverging off to the right. |
| Nevertire | 1997 | The lever frame at Nevertire, the junction of the Warren branch with the main western line. |
| Nevertire | 2003 | A line of wagons sit in wait in front of the silos. |
| Newbridge | 2001 | The view of Newbridge from a short distance up the line. |
| Newbridge | 2001 | The somewhat starkly vegetated up side platform, looking in the direction of Sydney. This was once the up main, but is now the single bi-directional track. |
| Newbridge | 2001 | The goods shed and jib crane are still present, although no longer served by rail. |
| Newbridge | 2001 | The one-time down side platform. The track on the left was once the down main; it is now just a perway siding. |
| Newbridge | 2001 | The boarded up signal box is a relic of a time when Newbridge was a more important location. This is looking in the direction of Blayney. |
| Newbridge | 2001 | The now disused down platform, with the former down main relegated to the status of a perway siding. |
| Newbridge | 2001 | The former up platform (now the only one in use), only sees the XPT stopping by prior arrangement. |
| Newbridge | 2001 | The still-intact goods shed, and jib crane. |
| Newbridge | 2001 | The view from the end of the platform, looking in the direction of Blayney. |
| Newbridge | 2002 | The view from the pedestrian overbridge, looking west. |
| Newbridge | 2002 | The view from the pedestrian overbridge, looking east. |
| Newbridge | 2003 | The local control panel at Newbridge. |
| Newcastle | 2003 | The view looking along platform 1, with an inter-urban set waiting to leave. |
| Newcastle | 2003 | The view looking down the line towards Woodville Junction. |
| Newcastle | 2003 | Newcastle Signal Box, located to the north of the station. |
| Newcastle | 2000 | Saturday afternoon sees 2 V-sets and an Endeavour set idling at Newcastle station. |
| Newcastle | 1975 | On the left is the Intercity Express, bound for Sydney, while on the right is a 620/720 DMU which has arrived from Maitland. |
| Newcastle | 1986 | A view overlooking the Newcastle car sheds and sidings. This area is now public parkland. |
| Newcastle | 2000 | The view to the west from Newcastle station. |
| Newcastle | 2004 | A view looking down over Newcastle and the adjacent park from the nearby viewing tower. |
| Newcastle | 1975 | 44230 sits at the head of a passenger train bound for Sydney. At the left is the part of the extensive goods yard, now long gone. |
| Newcastle | 1985 | The Newcastle diagram in 1985 which still has the arrival and departure roads to the car sidings shown as they were still in use. Subsequent years have seen the lengthening of the platform and removal of the Market St. gates. |
| Newcastle | 1985 | Market St level crossing controlled by Newcastle box, showing the gates open. When they closed they had a habit of bouncing. |
| Newcastle | 1985 | The Newcastle controlled Market St. gates shown down in this 1985 picture. This happened many times a day and traffic problems were frequent. |
| Newcastle | 1985 | Newcastle frame as seen in 1985, with not too many spare (white) mini levers then. |
| Newdell Junction | 1987 | The all-brick Newdell Junction Signal box which served Liddell and Newdell Colliery sidings as well as the State Coal Mine siding. |
| Newdell Junction | 1987 | The all-brick Newdell Junction Signal box which served Liddell and Newdell Colliery sidings as well as the State Coal Mine siding. |
| Newnes | 2003 | The platform still remains at Newnes station. |
| Newnes Junction | 2003 | A view of the desolate station, taken from the rear of a down train. |
| Newnes Junction | 2003 | The view looking towards Sydney. The signal box was cut in and a coal train from the nearby Clarence Colliery can be seen on the left waiting for its path to Port Kembla. |
| Newnes Junction (1st) | 2004 | The formation of the Newnes Branch on the left, with the modern balloon loop serving Clarence Colliery on the right. |
| Newnes Junction (1st) | 2004 | A cutting where former Newnes branch once passed. |
| Newnes Junction (1st) | 2004 | A cutting where former Newnes branch once passed. |
| Newnes Junction (1st) | 2004 | The vicinity of the 1st Newnes Junction station; Dargans Creek deviation proceeds straight ahead between the two trees. The Zig Zag Railway is extending its line along this formation towards Newnes Junction. |
| Newnes No 2 Tunnel | 1986 | North of Deane, the line passes through two tunnels. This is the northern entrance to Tunnel No 2. Today it is well-known for its collection of glow worms. |
| Niagara Park | 2004 | The view looking north towards Newcastle, with the Sara Lee factory visible in the distance. |
| Nimmitabel | 2001 | The view looking south the the station area. |
| Nimmitabel | 1981 | The view of the station looking down the line towards Bombala, 5 years before the line closed. |
| Nimmitabel | 1981 | The view looking down the line towards Bombala. |
| No 1 Mortuary Station | 2003 | A nearby plaque commemorating the restoration of some of the original structures om 2001. |
| No 1 Mortuary Station | 2003 | The view looking up the line, with an inset showing the appearance around 1890. |
| No 1 Mortuary Station | 2003 | The view of the line between No's 1 and 2 stations, looking back up the line. |
| No 1 Mortuary Station | 2003 | The western entrance to the station. |
| No 1 Mortuary Station | 2003 | The location of the line, looking south. The line ran along the left-hand side of the road. |
| No 1 Mortuary Station | 2003 | The view looking down the line, with an inset showing the appearance around 1890. |
| No 1 Mortuary Station | 2003 | The culvert where the line crossed over an open brick channel. |
| No 2 Mortuary Station | 2003 | The line where it approaches the station, looking back up towards the No 1 Station. |
| No 2 Mortuary Station | 2003 | The curved platform was located where the graves now are. This is the view looking down from the up end of the former platform. |
| No 2 Mortuary Station | 2003 | The view looking back up the line. The platform was on the left, with the track where the grass now is. |
| No 3 Mortuary Station | 2003 | The approach curve to the station, which was located to the left of the shot. |
| No 3 Mortuary Station | 2003 | The grassed area which marks the location of the one-time station. |
| No 4 Mortuary Station | 2003 | No 4 platform was located just beyond the bus shelter seen mid-photograph. The Refuge Siding at the down end ran directly through the foreground. |
| Noonbinna | 2004 | The view looking south at the wheat silos. |
| Noonbinna | 2004 | The view looking north towards Cowra. |
| Normanhurst | 2004 | The view looking south towards Thornleigh. |
| North Goulburn | 1979 | Goulburn North station sits in a picturesque setting on a cool autumn day in 1979. |
| North Goulburn | 2001 | The view along the abandoned North Goulburn platform, looking south in the direction of Goulburn. |
| North Kurri Kurri | 2001 | Only the down platform remains at North Kurri Kurri. Barely noticeable in the middle of the photo is the remains of the original platform. At some point it was extended by about 5m. |
| North Star | 2001 | An early-morning view of the utilitarian station build at North Star. The near track is the loop siding. |
| North Star | 2001 | The recently-painted station name board at North Star betrays the lack of passenger services - it faces away from the platform. |
| North Star | 2001 | The large grain silos at North Star. |
| North Star | 1990 | The scene of a derailment involving 4 48 class locos. |
| North Strathfield | 1982 | A 44 class loco hauls the Newcastle Express (N21) past the 76-lever Strathfield North Signal Box. |
| North Strathfield | 2004 | The view looking down onto platform 1 in a northerly direction. The track on the right is the Up Relief line. |
| North Strathfield | 2004 | The view looking north along platform 1. |
| North Strathfield | 1988 | A van at Arnott's Biscuit factory as XPT passes. |
| North Strathfield | 1988 | A louvre van in the loading dock at the Arnott's Biscuit factory. |
| North Strathfield | 1988 | A view from the freeway overbridge of vans in the sidings for the Arnott's Biscuit factory. |
| North Sydney Car Sidings | 2003 | The approach to the car sidings, looking over Lavendar Bay. |
| North Sydney Car Sidings | 2003 | The sidings and sheds at the Lavendar Bay car storage yard. |
| North Sydney Car Sidings | 1968 | The view looking towards the end of the car sidings, with the near train comprising a mixture of single- and double-deck cars. The northern pylons of the Harbour Bridge are visible at the far right. |
| Norwood | 2001 | The line as it crosses the Middle Arm Rd near the intersection of Norwood Rd, just before the one-time location of Norwood platform. |
| Norwood | 2001 | One of the many curves in the line as it climbs the hills to Crookwell. |
| Nubingerie | 2004 | The concrete platform still remains, in this view looking up the line. The one-time loop siding would have been in the foreground, and the mound on the far right is all that remains of the goods bank. |
| Nubingerie | 2004 | Many of the sleeprs have been remoed from this section of the track, resulting in severe buckling over time. Thsi is the vierw looking down the line past the goods bank. |
| Nubingerie | 2004 | The view looking back up the line. The mound in the centre is all that remains of the goods bank. |
| Nyngan | 2003 | Nyngan station looking back in the direction of Dubbo. The station building is now a museum. |
| Nyngan | 2003 | The view of yard beyond the station, looking west. The one-time junction of the Main West and Cobar branch was about 2km further along. |
| Nyngan | 2003 | Wheat hoppers being filled at the wheat silo. |
| Nyngan | 2004 | A view of the station building from north side. |
| Nyngan | 2004 | The southern end of the footbridge at the western end of the station. |
| Nyngan | 2004 | The view looking west from the footbridge, showing the goods shed. The turntable is located on the siding the branches off in the middle distance. |
| Nyngan | 2004 | The view looking east from the pedestrian footbridge. |
| Nyngan | 2004 | The roadside (southern) view of the station building. |
| Nyngan Junction | 2003 | Some pieces of rail are all the remain of the track in the vicinity of the junction. The Cobar branch runs along the levee bank in the right background. |
| Nyngan Junction | 2003 | The level crossing where the Cobar branch curves around towards Cobar. The telegraphs are where the main west would have continued on had the junction not been removed after the 1989 floods. |
| Nyrang Creek | 2004 | The main line and loop siding, looking in the direction of Eugowra. The mound of the left may be the remains of the station. |
| Nyrang Creek | 2004 | The view of the down end of the loop, looking bck towards Cowra. |
| Nyrang Creek | 2004 | A view of the remains of a platform. |
| Nyrang Creek | 2004 | The view looking back up the line, showing the silo siding and main line. |
| Oakhampton | 2001 | The view of the very short down side platform. |
| Oaklands | 1980 | The diagram for the dual-gauge yard. Solid lines are standard (NSW) gauge, the hollow lines are broad gauge (Victoria) and the dashed lines are dual (third rail) gauge. |
| Oaklands | 1980 | A view of the yard at Oaklands looking south. The tracks to the left are broad gauge, with a dual gauge line in the foreground. This view is looking towards Victoria with the station in the background. |
| Oaklands | 1980 | A section of dual gauge track in the yard where the common rail shifts from the left to the right (to facilitate the standard gauge junction in the background). The view is looking north, and the junction led to the one-time loco servicing facilities. |
| Oaklands | 2002 | The rear (railway) side of the stationmaster's house. |
| Oaklands | 2002 | Overall view of what's left of the yard, looking south west. All remaining trackage is Victorian broad gauge. |
| Oaklands | 2002 | A view of the now-disconnected loading bank. |
| Oatley | 2004 | The indicator diagram at Oatley station. |
| Oatley | 2004 | The signaller's clearing point list instructions at Oatley. |
| Oberon | 1992 | A view of the station, which by this time had been converted into a rudimentary museum. |
| Oberon | 1992 | A view of the former yard, looking towards Tarana. |
| Oberon | 2001 | The station building is now being re-used as a museum. |
| Oberon | 2003 | A pair of preserved passenger carriages sit adjacent to the station. |
| Oberon | 2003 | The view looking towards the terminus of the line. The tracks from left to right are the Goods Siding, Loop and Main Lines, and the Loco Siding. |
| Oberon | 2003 | The view looking down the yard towards the station. |
| Occidental Mine | 2003 | Pieces of track close to the Occidental Mine remains. |
| Occidental Mine | 2003 | Occidental Mine. All track has been lifted in the vicinity. |
| Old Casino | 1989 | TAM carriage 874 sits in the dock while 44227 approaches with the Up Motorail. |
| Old Casino | 2001 | The old station at Casino was on the branch line to Murwillumbah and is currently being used as a residence in this view looking back to the junction with the main line to Brisbane. |
| Old Junee | 2002 | A view of the platform with silos in the background looking towards Junee. |
| Old Junee | 2002 | A close-up of the safe working hut on the platform looking back to Junee. |
| Old Junee | 2002 | Another view of the safe working hut and the end of the platform at the Narrandera end. |
| Old Junee | 2002 | A view of the platform from the Junee end looking towards Narrandera. |
| Old Junee | 2003 | The view along a set of wheat wagons in the silo siding. |
| Old Main Tunnel | 2004 | The southern portal of the tunnel. |
| Old Main Tunnel | 2004 | The northern portal of the tunnel. |
| Olympic Park | 1998 | The view looking towards the station entrance, showing the impressive architecture of the building. |
| Olympic Park | 1998 | A view looking down on the platforms, taken on the opening day. |
| Omega | 1985 | The simple platform at Omega situated on the down side of the line. |
| Oolong | 1980 | The unused platform and signal box in 1980. This view is looking back towards Sydney. |
| Oolong | 1980 | This upper quadrant signal is unusal as it has a flat arm and was located between Oolong and Jerrawa. |
| Oolong | 1980 | The Pilotman's lock in Oolong Signal Box. This was often used when a pilot was needed for wrong line running or emergency work. |
| Orange | 1979 | Passengers wait under the ornate shelter roof at platform number 1. |
| Orange | 2004 | A view of the bus interchange facility outside the station. |
| Orange | 2004 | The jib crane is still present in the yard. |
| Orange | 2004 | The Back Platform road has been lifted, but the one-time Fruit Siding still remains. This is the view looking in the down direction. |
| Orange | 2004 | The view looking down over the main platform in the direction of Sydney. |
| Orange | 2004 | The view looking down in the direction of Dubbo. |
| Orange | 2004 | The view looking down along the main platform. |
| Orange | 2004 | A view of the station from the road-side. |
| Orange | 2004 | The remains of the short dock siding at the down end of the station. |
| Orange | 2004 | A view looking down over the goods siding, shed and loading bank. This is all that remains of the up yard. |
| Orange | 2004 | The view looking towards the end of the platform in the Sydney direction. |
| Orange | 2004 | The view looking towards Sydney of the Orange Signal Box, situated between the Loop Siding and Main Line. |
| Orange | 2004 | The view looking along the platform in the down direction. |
| Orange | 2004 | The view looking along the platform in the up direction. |
| Orange | 2003 | The diagram inside the signal box at Orange. |
| Orange East Fork Platform | 2001 | Th location is a very simple short platform on the down side of the line. |
| Orton Park | 2004 | The sign on the hut protecting a nearby level crossing. |
| Orton Park | 2004 | The view looking towards Sydney. The Omya Minerals siding on the left appears to have had little recent use. The one-time station is believed to have been on the right hand side of the line in the distance beyond the level crossing. |
| Otford | 2004 | The signal box from Otford has been re-assembled at Albion Park as part of the Illawarra Light Railway Museum. |
| Otford | 2004 | The signal diagram and safeworking instruments inside the preserved signal box now at Albion Park. |
| Otford | 2004 | The lever frame inside the preserved signal box now at Albion Park. |
| Ourimbah | 2004 | The view looking north towards Newcastle. |
| Ourimbah | 2004 | The view looking south towards Sydney. |
| Ourimbah | 2004 | The main station building on platform 1. |
| Ourimbah | 2004 | The view looking north over the buildings on platform 1. |
| Ourimbah | 2004 | The gap in the footbridge which once spanned a pair of sidings. |
| Ourimbah | 2004 | The car park which now resides in the location of the refuge loop, and goods siding serving a goods and packing shed, and a loading bank for Millmaster Feeds. |
| Ourimbah | 2004 | A closer view of the one-time Millmaster Feeds loading bank. |
| Ourimbah | 2004 | The interior of the down platform waiting room. |
| Ourimbah | 2004 | The safeworking hut on platform 2. |
| Ourimbah | 2004 | An unusual station name board. |
| Ourimbah | 1950 | A historic photo of Ourimbah, looking south towards Sydney. |
| Pacific National Terminal | 2003 | Part of Pacific National's container terminal at Chullora. 8148 is one of the resident shunters. |
| Padstow | 2003 | Padstow, looking towards the airport/city. |
| Pamandi | 2002 | The up-side loading bank is all that remains at this location. This is the view looking back towards Junee. |
| Pangela | 1976 | The staff is about to be exchanged with an up train at Pangela Signal Box in January 1976. |
| Parkes | 2000 | The platform and yard at Parkes station. |
| Parkes | 1978 | A view of Parkes looking to the west and the box in 1978. The signal box boasted 55 levers and 24 Kellogg Keys. |
| Parkes | 2004 | The view along the platform looking in the direction of Broken Hill. |
| Parkes | 2004 | The view along the platform looking in the direction of Sydney. |
| Parkes | 2004 | Another view along the platform looking in the direction of Sydney. |
| Parkes | 2004 | The road-side approach to the station building. |
| Parkes | 2004 | The signal box and level crossing at the down end of the yard. |
| Parkes | 2004 | A view looking over the yard at the up end of the platform. |
| Parkes | 2004 | A plaque commemorating 50 years of the Silver City Comet train to Broken Hill. |
| Parkes | 2003 | Locomotive 42210 and various wagons sit idle in the yard. |
| Parkes | 2004 | The view looking west from the Newell Highway level crossing, at western end of station. |
| Parkes | 2004 | The view looking east from the Newell Highway level crossing, towards the western end of station. |
| Parramatta | 1980 | Parramatta Signal Box, a 56-lever box with Kellogg Keys. |
| Parramatta Road Crossing | 2004 | The level crossing looking east down Parramatta Road. |
| Parramatta Road Crossing | 2004 | A close-up of the signal box which controls the level crossing. |
| Parramatta Road Crossing | 1984 | Parramatta Road Signal Box controls the level crossing with the busy main road. The line often featured shortened trains due to lack of available power on the line. The two car set is about to cross the road and terminate at Clyde station. Note also the spare booms arms - the booms at this crossing have a short lifespan due to inattentive car drivers! |
| Parramatta Road Crossing | 1984 | The interior of Parramatta Road Crossing Box, taken in 1984. |
| Parramatta Road Crossing | 2001 | A more modern version of the control panel inside the signal box. |
| Paterson | 2001 | The platform and station buildings, looking in a northerly direction. |
| Paterson | 2001 | The remains of the yard and goods shed. The Rail Motor Society is on the left hand side. |
| Paterson | 2004 | The road-side view of the station building at Patterson. |
| Paterson | 1994 | A view looking across to the station in a southerly direction. |
| Peak Hill | 1986 | The view looking across at the station building. |
| Peak Hill | 2003 | All that remains of the station is the staff hut and lever frame platform. |
| Peak Junction | 2003 | Peak Junction on The Peak Branch line. The Cobar Branch line is in the background. |
| Peak Junction | 2003 | The scarce remains of The Peak Branch as it crosses the road after Peak Junction and heads towards Wades Siding. Wades Siding is now built over by engineering and mining business. |
| Pelaw Main | 2003 | A view showing the unearthing of a portion of the buried floor of the Pelaw Main engine sheds. |
| Pelaw Main | 1991 | A view looking across to the site of the screens taken from the site of the rail sidings. The brick piers were the supports for the screens, and the brick building was the haulage house for the mine's endless rope skip haulage system. |
| Pendle Hill | 1835 | A photo of a photo taken circa 1924. Source of original photo is unknown, but has a small tag in the bottom right of photo reading: Pendle Hill C.1924 (1835) This photo is hanging in a frame in the Station Masters office. |
| Pendle Hill | 2004 | The view looking beyond the up end of the station. |
| Pendle Hill | 2004 | The view looking west along the platform. |
| Pennant Hills | 2004 | The view looking south along the platforms. |
| Pennant Hills | 2004 | The view looking north along the platforms. |
| Penrith | 2004 | The view looking west along platform 1. The line in the foreground leads to the adjacent electric car sidings. |
| Penrith | 2004 | The modern southern road-side approach to the station. |
| Penrith | 1988 | 3801 and 4472 Flying Scotsman at Penrith during the 1988 bi-centennial. Taken from the western end looking east toward Sydney with the signal box at the back. |
| Penrith | 1988 | 3801 and 4472 Flying Scotsman at Penrith during the 1988 bi-centennial. Taken from the western end looking east toward Sydney with the signal box at the back. |
| Penrith | 2001 | A view of the signaller's control desk at Penrith. |
| Penrose | 2004 | The modern furniture and help point on the down platform. |
| Penrose | 2004 | A close-up of the station name board on platform 2. Note that the "S" appears to have been mounted upside-down. |
| Penrose | 2004 | A view of the up platform complete with ramshackle corrugated iron sheds. |
| Penrose | 2004 | The view of platform 1 looking north. |
| Penrose | 1980 | Penrose Signal Box diagram. |
| Perisher | 2001 | The interior at Perisher station. |
| Perthville | 2004 | The remains of the loading bank used to load rock from nearby quarries. |
| Perthville | 2004 | The old loading bank, looking back towards Sydney. |
| Perthville | 2004 | The dead end of the loading bank siding. The one-time weighbridge was located in front of the doors of the fire brigade shed. |
| Perthville | 2004 | The curved loading bank, looking west towards Orange. |
| Perthville | 2004 | The view looking west towards the platform site. The one-time station was located just beyond the tree on the left. The goods shed and platform would have been in the left foreground. |
| Perthville | 2004 | The location of the goods loop, looking in the up direction. |
| Petersham | 1988 | One of the oldest examples of a pneumatic signal box was Petersham. Although little used for many years it was opened for emergency working and sidings, there was also a frame B. The diagram shows its age. |
| Petersham | 1988 | The frame itself reveals an unusual design for the mini levers with the release being a plunger on top of the lever. |
| Petersham | 1988 | The frame itself reveals an unusual design for the mini levers with the release being a plunger on top of the lever. |
| Pettitts | 2003 | The rebuilt halt at Pettitts, looking towards Cootamundra. |
| Pettitts | 2003 | Another view of the halt. |
| Picton | 1982 | Picton Signal box, with 48 levers and 1 mini lever. |
| Picton | 2001 | A more recent shot of the signal box at Picton. |
| Picton | 2001 | The view of Picton station looking in the direction of Sydney. |
| Picton | 2001 | A few passengers are awaiting the next service to Sydney in this view looking down the line. |
| Picton | 2004 | The viaduct on the south side of Picton station which was completed in 1865. |
| Picton | 2004 | The yard diagram at Picton. |
| Picton | 2004 | The train indicator diagram and lever frame at Picton signal box. |
| Picton Tunnel | 2004 | The view of the down (south) portal of the Picton Tunnel. |
| Picton Tunnel | 2004 | The view of the up (north) portal of the Picton Tunnel. |
| Pippita | 1981 | A 48 shunts while a passenger train waits for workers. |
| Pippita | 1978 | 44209 is sandwiched between two Guards Vans at Pippita station. |
| Pippita | 1979 | The simple rickety Pippita platform is seen here in this 1979 photo. Ahead is the line to Abattoirs which boasted a twice daily Rail Motor service. |
| Pippita | 1979 | The disc shunting signals at Pippita controlled by Flemington Goods Jct. |
| Pleasant Hills | 1980 | Standard design of the branch lines is shown in this 1980 photo of Pleasant Hills 5 years after the line's closure. The station was located on the down side of the line. |
| Pleasant Hills | 2001 | Site of the station. Note that the nameboard is not the original. |
| Pleasant Hills | 2001 | View of the silos, still used by Graincorp. The tracks have been covered by gravel. |
| Pleasant Hills | 2001 | Lever frame "E", overgrown by trees. |
| Pokataroo | 2003 | The view looking towards the end of the line at the terminus station of Pokataroo. |
| Pokataroo | 2002 | The base of the jib crane. |
| Pokataroo | 2004 | The remaining tracks at Pokataroo are well and truly overgrown. |
| Pokataroo | 2004 | The buffer stop at the end of the line, which never reached Collarenebri. |
| Pokataroo | 2004 | The view from behind the stop block looking towards Merrywinebone. |
| Pokataroo | 2004 | A small bridge not far from Pokataroo. |
| Pokataroo | 1968 | A view of the remote terminus station 7 years before it closed. |
| Polona | 2002 | The Sydney to Dubbo XPT passing through the one-time location of Polona. |
| Port Kembla | 1987 | The brick Port Kembla signal box. |
| Port Kembla | 1987 | The diagram inside Port Kembla signal box. The diagram shows the balloon loop and nearby siding entrances. The box used a rotary switch panel. |
| Port Kembla | 2000 | The tracks beyond Port Kembla extended to the Eastern Breakwater, and were used by construction and maintenance trains. |
| Port Kembla | 2000 | The disused construction track along the Eastern Breakwater. |
| Port Kembla North | 1987 | Port Kembla North signal box was a busy location using levers. In front of the box is an Lysaght locomotive shunting the sidings. |
| Port Kembla North | 2004 | The view looking down the line of the unattended station. |
| Port Kembla North | 1987 | Port Kembla Sidings North diagram. |
| Port Kembla North | 1987 | Port Kembla Sidings North frame. |
| Port Kembla North | 1987 | Port Kembla Sidings North Box. |
| Port Waratah | 1986 | 8126 + 8116 and another 81 duo are at the coal facility just south of BHP at Selwyn St. |
| Portland | 2004 | Only the formation remains of the short branch which extended to the Commonwealth Portland Cement Company. |
| Portland | 2004 | The view looking north towards Mudgee from the one-time station location. |
| Portland | 2004 | The view looking south towards Wallerawang from the one-time station location. |
| Portland | 2004 | All that remains at the location is a concrete pad with rails which served a gangers shed. |
| Portland | 1974 | Portland station viewed from the town direction. A loaded train from the cement factory is arriving at the station. |
| Portland | 1974 | Portland station viewed from the town direction. A loaded train from the cement factory is arriving at the station from the Commonwealth Portland Cement Company's branch. |
| Portland Cement Works | 1974 | Waiting between runs at the cement factory. |
| Portland Cement Works | 1974 | Shunting at the cement factory. The town of Portland is visible in the background. |
| Portland Cement Works | 1974 | Shunting at the cement factory. |
| Portland Cement Works | 1974 | Empty wagons being hauled up the hill to the cement factory. |
| Portland Cement Works | 1974 | Running two loaded wagons down the hill to the main line. |
| Portland Cement Works | 1974 | A loaded train with wagons containing bagged cement heads to the exchange sidings next to Portland station. The full wagons are left there and empties taken to the factory. |
| Powerhouse Museum | 2003 | The two lines which make up the Powerhouse Sidings. The original siding (on the left) passes through the cafeteria, and is used for static display purposes. The new sidings (adjacent to the cars) is intended for loading passengers on tour trains. The flange gaps are covered by removable metal plates. |
| Powerhouse Museum | 2003 | The new Powerhouse siding is adjacent to the original Darling Harbour line, now used as part of the Central - Lilyfield light railway. |
| Powerhouse Museum | 2003 | Preserved steam loco 3830 stands on display on the original siding. |
| Premer | 1996 | An abandoned wagon sits in a siding at Premer. |
| Premer | 2001 | The small station building and platform at Premer. These days the station is only used for safeworking purposes. |
| Premer | 2001 | The modern signalling hut sits on the platform. |
| Premer | 2001 | The view looking down the line towards Werris Creek. |
| Premer | 2001 | The view up the line towards Binnaway. |
| Premer | 2001 | 8143 heads west through the station at night. |
| Prunevale | 2004 | No trace remains at this location, as this area of the line had been upgraded. |
| Pulletop | 1934 | A Westby-bound train has stopped at the station. This is a view taken from the goods platform looking back up towards The Rock. |
| Pulletop | 1994 | No trace remains of the station, with the formation now being used as a road. |
| Pulletop | 2000 | All that remains of Pulletop is the overgrown goods platform. |
| Punchbowl | 1985 | A line-up of "Red Rattlers" (suburban single-deck electric trains) taken in the Car Sidings at Punchbowl. |
| Pymble | 2004 | A 6-car R set is heading south towards the city, before returing to Hornsby via the Main North. |
| Quakers Hill | 2004 | The view looking back towards Sydney, from the footbridge. |
| Quakers Hill | 2004 | The view looking down the line towards Richmond. |
| Quandialla | 2003 | The view looking south to the silo siding. Note the presence of the gantry crane and large elevated water tank. The station was located just beyond the tank, on the same side of the line. |
| Quandialla | 2004 | The view looking north adjacent to the A frame, showing the 1927 water tank, silos and elevated dead-end siding. Three different types of wheat silo are present: the "D" type (1967), capacity 14,950 tonnes; concrete silo (1928-34), 2,450 tonne capacity; 1959 timber framed bulkhead capacity 2,700 tonnes. |
| Quandialla | 2004 | The view looking north from the gravity siding. |
| Quandialla | 2004 | The view looking north of the "D" type silo, between the loop and main lines. |
| Quandialla | 2004 | The A lever frame, controlling the southern end of the wheat siding. |
| Quandialla | 2004 | The view looking north of the 515 km post, elevatated water tank and gantry crane. The one-time station was located at the near siding of the tank. |
| Quandialla | 2004 | The view looking south, with the former station site on the right. |
| Quandialla | 2004 | The view looking south. Between the existing tracks were the goods and loop sidings, which were lifted on 1/10/1986. |
| Quandialla | 2004 | The view looking north of the northern end of the silo siding. |
| Queanbeyan | 1999 | The impressively-presented station building, from the road approach. |
| Queanbeyan | 2002 | Preserved steam locomotive 1210 running tender first through Queanbeyan yard. |
| Queanbeyan | 2002 | The turntable in the yard at Queanbeyan. |
| Queanbeyan | 1989 | A view looking across to the station in the direction of Sydney. |
| Queanbeyan | 1989 | A closer view of the F frame signal box. |
| Queanbeyan | 1986 | The signal box diagram. At the far right, the lines to Bombala and Canberra diverge. |
| Queanbeyan | 1986 | Staff instruments for the the sections that start or end at the location. |
| Queanbeyan | 2003 | The signal diagram for F Frame. |
| Queanbeyan | 2003 | The signal box diagram in 2003. The up dock siding and associated crossovers have been excised from the diagram. |
| Queens Wharf | 2002 | A view of the original Queens Wharf platform looking towards East Maitland. Its replacement was made of wood and no trace of it remains. |
| Quipolly | 1998 | The local control panel at Quipolly. |
| Quirindi | 2004 | The view looking down the platform towards Werris Creek. |
| Quirindi | 2004 | The view of the station looking down in the direction of Werris Creek. |
| Quirindi | 2004 | An up coal train heading through the station. |
| Quirindi | 2004 | The road-side view of the station building. |
| Quirindi | 2004 | An historic site marker on the station building. |
| Quirindi | 2004 | The down end of the station with the nearby silos. |
| Quirindi | 2004 | Various signs along the station platform. |
| Quirindi | 2004 | The silo and siding at the down end of the yard. |
| Quirindi | 2004 | The station building has been re-used as an arts and craft shop. |
| Quondong | 2004 | The view looking across the location in the direction of Koorawatha. |
| Quondong | 2004 | The view looking back up the line. |
| Quondong | 2004 | The former station sign, now on a nearby property. |
| Raglan | 2004 | The unusual faded metal name board on the platform. |
| Raglan | 2004 | The track-side view of the boarded up station building. |
| Raglan | 2004 | The view of the station looking towards Bathurst. |
| Raglan | 2004 | The view looking down along the platform towards Bathurst. |
| Raglan | 2004 | The view looking up along the platform towards Sydney. |
| Raglan | 2004 | A closer view of the waiting room and ticket office doors, looking in the direction of Sydney. |
| Raglan | 2004 | The view looking towards Bathurst from the western end of the platform. A small loading bank is visible on the right of thr track. |
| Raglan | 2004 | The view looking towards Sydney from the eastern end of the platform. |
| Ralvona | 2004 | The location of Ralvona. The passenger platform is marked by a low mound on the left, with a similar mound on the right being the loading bank. |
| Ralvona | 2004 | A closer view of the remains of the loading bank. |
| Ralvona | 2004 | The deck view of the bridge over Willow Tree Creek, on the Holbrook side of the station. |
| Ralvona | 2004 | A side-on view of the bridge over Willow Bend Creek. |
| Rand | 1980 | The station building 5 years after its closure. |
| Rand | 1980 | The Staff and Ticket box at Rand still existed 5 years after closure in this 1980 photo. |
| Rand | 1997 | Trains no longer disturb the silence at Rand any longer. This is the view from the end of the line looking back towards the silos. |
| Ranelagh House | 2002 | The simple platform serving the nearby tourist attraction of the same name. This is the view looking towards Wollongong. |
| Rankins Springs | 1981 | The view from the terminus looking across to the elevated water tank. |
| Rankins Springs | 1981 | Another view of the water tank. |
| Rankins Springs | 1981 | The turntable, looking in a southerly direction. |
| Rankins Springs | 1981 | The turntable, looking towards the end of the loco siding. |
| Rankins Springs | 1996 | The old turntable and water tank show that Rankins Springs was once a significant terminus for steam operations. |
| Rankins Springs | 1996 | A closer view of the water tank. |
| Rankins Springs | 2002 | The large water tank remains from the days of steam locomotives. |
| Rankins Springs | 2003 | A 48 class parked at the eastern end of the yard which looked like its been here for a while. |
| Rankins Springs | 2003 | Possible remains of the station building. |
| Rankins Springs | 2003 | The turn table at the western end of the yard. |
| Rankins Springs | 2002 | The view from the end of the line at Rankins Springs, looking east towards the silo. |
| Rappville | 2003 | The signal hut at the small town of Rappville. |
| Raspberry Colliery | 2003 | A section of the rail has been preserved outside Marathon Stadium. |
| Raspberry Colliery | 2003 | The remains of the branch line, embedded in the road where it crosses Vista Parade, Kotara South. The cycle track adjacent roughly follows the line as it heads towards the Scholey Street Junction. |
| Raspberry Colliery | 2003 | The concrete supports in the stormwater channel are where the branch line crossed over adjacent to Griffiths Road Broadmeadow. |
| Raspberry Colliery | 2003 | The location of the colliery is now marked by this sign, near Kirkdale Drive, Charlestown. |
| Raspberry Colliery | 2003 | The reserve which now marks the location of the one-time Raspberry Colliery. |
| Razorback | 1980 | The A lever frame, diagram and signal telephone at the up end of this dead end siding. |
| Razorback | 1980 | Razorback diagram sits on a raised platform with the frame in the middle of nowhere. |
| Redfern | 2004 | This is a view of the old Suburban Car Workshops at Redfern looking in the direction of Macdonaldtown. The yard and shed is barely a shadow of its former self in railway's heyday. There are rumours that this site is soon to be redeveloped. |
| Redfern | 1968 | A shot of steam loco 3246 just outside of Redfern station. |
| Redfern | 1970 | 4002 sits on the turntable at Eveleigh. |
| Redfern | 2001 | A view of the indicator panel serving platform 12. |
| Redhead | 2002 | The base of the probably the Down Home signal. Like most of the rest of the infrastructure, it was been cut up and pushed over the embankment. |
| Redhead | 2002 | The view looking south along the Loop Line side of the platform. |
| Redhead | 2002 | The view looking down the remains of the platform. The formation of the Main Line is on the left. |
| Redhead | 2002 | The concrete base is all that remains of the shelter and signal box. |
| Redhead | 2002 | The supports of the water tank, at the down end of the platform. |
| Redhead Tunnel | 2002 | At the up end of the one-time crossing loop is Redhead Tunnel. This is the view the approach to the down portal. |
| Reefton | 2004 | The view of the silos from the road-side. |
| Reefton | 2004 | The silo road does not look like it has seen traffic recently. |
| Reefton | 2004 | The small signboard identifying the location. |
| Reefton | 2004 | The rail-side view of the silos. |
| Regents Park | 1979 | The view from the Princes Road crossing looking towards the Babcock & Wilcox siding (out of view on right). |
| Regents Park | 1979 | The view looking down the Commonwealth Siding after it has crossed Princes Road. |
| Regents Park | 1979 | The point where the Commonwealth Siding crossed Princes Road. |
| Regents Park | 1979 | A closer view of the semaphore arm for No 4 signal. |
| Regents Park | 1979 | The view looking along to Commonwealth Siding towards its junction with the main line. |
| Regents Park | 1979 | The view looking along the Commonwealth Siding towards Regents Park, at the Park Road crossing. |
| Regents Park | 1979 | The view looking down the Commonwealth Siding after it has crossed Park Road. |
| Regents Park | 1981 | The very rarely used Regents Park Junction Box. |
| Regents Park | 1979 | The view looking south towards Regents Park from the former Jenkins St. pedestrian bridge. Inbetween the track can be seen the Regents Park Signal Box. The one-time branch to Potts Hill reservoir left the main line on the left side at this point. The Commonwealth Siding can be seen leading behind the bank on the right. |
| Reka | 1999 | Some poor condition rail is all that's left of the one-time Reka Siding. |
| Revesby | 2003 | Revesby, looking towards East Hills. |
| Rhodes | 2004 | The view looking north towards Meadowbank. |
| Rhodes | 2004 | The tracks and entrance to the old Union Carbide Works. |
| Rhodes | 2004 | The tracks leading to the entrance to the old Union Carbide Works. |
| Rhodes | 2001 | A view of the emergency panel at Rhodes. |
| Richmond | 1977 | CPH 18 with two others draws into the station. |
| Richmond | 1977 | The station building and nameboard. |
| Richmond | 1985 | The view looking across to the platform, looking in the direction of Sydney. |
| Richmond | 1985 | DMU606 sits at the buffer stop at the end of the branch line. |
| Richmond | 1985 | DMU 606 has terminated at the station before heading back towards Sydney. |
| Richmond | 2004 | A Tulloch trailer car sits in the platform shortly before they were all withdrawn from service. |
| Richmond | 1981 | A trio of Rail Motors waiting for duty at the Richmond Engine shed with the local landmark of the tall palm tree. |
| Richmond | 1984 | The rickety engine shed. |
| Richmond | 1984 | The station building. |
| Richmond | 1984 | A view looking west across Richmond yard towards the engine shed and station. |
| Richmond | 1984 | The Richmond yard diagram, showing the turntable, engine shed and goods shed. The curved line above the platform is all that remains of the former line to Kurrajong. |
| Richmond | 2001 | The signal control board at Richmond. |
| Richmond Main Colliery | 2004 | A view of Richmond Main Platform looking towards Pelaw Main. |
| Richmond Vale No 1 Tunnel | 1995 | A shot of the western portal. |
| Richmond Vale No 3 Tunnel | 1989 | The remains of the Surveyors Creek viaduct, near the tunnel. |
| Riverstone | 1977 | An electric train has stopped at Riverstone, at the time the limit for electrification of the line. |
| Riverstone | 1977 | 736/636 have stopped at the station. |
| Riverstone | 2004 | The view looking up the line in the direction of Sydney. |
| Robertson | 1977 | CPH32 has paused at Robertson to pick up passengers before resuming its journey to Moss Vale. |
| Robertson | 1977 | The nameboard on the platform. |
| Robertson | 2002 | The view looking down on the station from the bank opposite. |
| Robertson | 2002 | The signal box on the platform. |
| Robertson | 2002 | The gangers shed and level crossing at the Wollongong end of the station. |
| Robertson | 2004 | The roadside view of the station building, then being used for a historic railway display. |
| Robertson | 2004 | The modern nameboard. |
| Robertson | 2004 | The vioew looking down along the platform towards Moss Vale. |
| Robertson | 2004 | A close-up of the older nameboard. |
| Robertson | 2003 | The view looking west along the station, as per-way equipment sits in the loop siding. |
| Rock Flat | 2000 | The remains of the platform at Rock Flat. The track in the foreground served the goods platform. |
| Rock Flat | 2000 | The view from the north. The points in the foreground diverge to the goods platform on the right. |
| Rockdale | 2003 | A view of the unused platform 1, looking towards Sydney. |
| Rockdale | 2003 | A view of the unused platform 1, looking away from Sydney. |
| Rockview | 2002 | An unidentified platform located on what was once a down loop siding. |
| Rocky Ponds | 1966 | A view of the two platforms and buildings at Rocky Ponds, believed to be looking in the direction of Sydney. |
| Rocky Ponds | 1980 | The site of Rocky Ponds station. No trace remains today. |
| Rookwood | 1978 | A 442 leads a "U" Interurban train to the west, past the abandoned platforms of Rookwood station. |
| Rooty Hill | 2004 | The view looking west from the footbridge. |
| Rooty Hill | 2004 | The view looking from the footbridge towards Sydney. |
| Ropes Creek | 1998 | Another signal post at Ropes Creek. |
| Ropes Creek | 1998 | Another view of the station, from track level. |
| Ropes Creek | 1998 | The signal diagram at Ropes Creek. Note that the section from St Marys to near Ropes Creek was electrically signalled, and from there on was mechanical signalling. |
| Ropes Creek | 1998 | A couple of semaphores signals controlling the approach to Ropes Creek station from the north. Note the remnants of catenary hanging in the background. |
| Ropes Creek | 1998 | The lever frame at Ropes Creek station. Some of the levers still operate! |
| Ropes Creek | 1998 | Ropes Creek station, viewed from the footbridge. |
| Ropes Creek DE | 1998 | The buffer stop at the end of the branch, several hundred metres north of Ropes Creek Station. |
| Rosehill | 2004 | The view looking north along the platform towards Carlingford. |
| Rosehill | 2004 | The view looking south along the platform towards Clyde. Note the length of platform 1, and the signals mounted mid-platform. |
| Rosehill | 1992 | Another view of the signal box. |
| Rosehill | 1992 | A view taken from the overhead footbridge looking towards Clyde showing the skewed platform arrangement, platform mounted signal box - the removed horse unloading platform was located approximately in the distance on the right at the top of the signal post. |
| Rosehill | 1981 | The Rosehill block instruments. |
| Rosehill | 1992 | The platform-mounted Rosehill signal box (now demolished), looking towards Camellia. |
| Rosehill | 1992 | The view of the signal box, looking towards Clyde. |
| Rosehill | 2004 | The view looking across to platform 1, with the racecourse stands in the background. |
| Rosehill | 1981 | The interior of Rosehill Box. |
| Rosehill | 1982 | 4904 4915 head up from the Sandown branch with a load of oil tankers past Rosehill (Racecourse) station. Rosehill Signal Box was "switched out" most of the time and usually only used on race days. |
| Rosewood | 1984 | A view of the vandalised Rosewood station looking in the up direction. |
| Rosewood | 2004 | The approach to the railway crossing which was adjacent to the station. The platform was on the left hand side. |
| Rosewood | 2004 | The worn sign warning of the level crossing. |
| Rosewood | 2004 | The view looking up the line towards Wagga Wagga. |
| Rosewood | 2004 | The view looking down the line at the station remains. The platform bank is on the left. |
| Rosewood | 2004 | The low bank is all that remains of the station. |
| Roslyn | 2001 | The goods loading bank is one of the few remaining signs at Roslyn. |
| Roslyn | 2001 | A second short platform of uncertain purpose, about 50m down the line from the one-time station location. |
| Roslyn | 2001 | The location of the junction for the branch line to Taralga. The bank behind the line is the remains of the formation, which curved around to the right of the stand of trees and out to the the right of the frame. |
| Rossi Street | 2004 | The view of the line at the intersection of Rossi and Dutton Streets. |
| Rossi Street | 2004 | The road-side view of the former crossing. |
| Rossi Street | 2004 | The approach to the Rossi Street crossing, looking towards the terminus. |
| Rossi Street | 2004 | The view looking towards Rossi Street, after the track has crossed the nearby river. |
| Rossi Street | 2004 | The view looking towards Rossi Street, in the direction of Yass Junction. |
| Rossi Street | 2004 | The view looking across the Rossi Street crossing, in the general direction of the end of the line. |
| Roto | 1982 | 8008 heads an up train which has paused for safeworking duties. |
| Roto | 1982 | A view of the short platform and station building, looking west. |
| Roto | 1982 | The signal diagram. |
| Roto | 1982 | The 8-lever frame in the signal box. |
| Roto | 2003 | Roto 'yard', looking towards Matakana. |
| Roto | 2003 | The south junction of Roto triangle, looking directly towards the Broken Hill line about 300m away. |
| Roto | 2003 | The south junction of Roto triangle, looking towards Hillston. |
| Roto | 2003 | Roto East Junction. |
| Roto | 2003 | The west junction of Roto triangle was lifted in 1987. |
| Roto | 2003 | The location of the one-time east triangle junction. |
| Roto | 2003 | The remains of the south-east leg of the triangle, looking towards Hillston. |
| Roto | 2003 | Container flats and the water tank, in a view looking towards Broken Hill. |
| Roto | 2003 | A derelict building at Roto. |
| Roto | 2003 | An old water gin sits appropriately next to the elevated water tank, looking towards Broken Hill. |
| Roto | 2003 | A closer view of the abandoned water gin. |
| Roto | 2003 | The remains of a water tank. |
| Rowan Street | 2002 | Beyond the site of Rowan Street, the line line traverses an impressive viaduct before the bridge over the Namoi River in the distance. |
| Rowena | 2004 | The 682 km post just south of Rowena, looking north. |
| Rowena | 2004 | The overgrown goods bank, and silos. |
| Rowena | 2004 | Another overgrown loading bank at Rowena. |
| Rowena | 2004 | Silos at Rowena, looking north. |
| Royalla | 2004 | A view of the staff hut on the platform. |
| Royalla | 2004 | Some rolling stock at the northern end of the yard. |
| Royalla | 2004 | A close-up view of the staff hut. |
| Royalla | 2004 | Another view of the rolling stock and the northern end of the platform. |
| Rozelle Yard | 2003 | A 3801 Ltd tour train crosses a Freight Australia grain train with T388 in the lead, in the yard. |
| Rozelle Yard | 2003 | The start of the former line to Darling Harbour, now the current end of the Sydney Light Rail line at Lilyfield. Rozelle Yard near the Balmain Rd Signal Box. |
| Rozelle Yard | 2003 | The current state of Rozelle Yard |
| Rozelle Yard | 2003 | An extension to the Rozelle Yard runs alongside the Glebe Island container terminal. |
| Rozelle Yard | 2004 | The view looking west over the Goods Yard. The former Gordon Street sidings are on the right, with the main yard in the distance. In the yard are some Tulloch passenger cars awaiting demolition and a freight train on the arrival road. Note the tracks cut in the foreground, which led to the grain and freight loading facilities at White Bay. |
| Rutherford Racecourse | 1992 | A view of the approach to the dilapidated racecourse station. |
| Rutherford Racecourse | 1992 | The station with one of the old trams sitting adjacent. |
| Ryan | 2001 | The remains of the one-time loading bank. |
| Ryan | 2001 | The milepost 100m from the down end of the platform. |
| Rydal | 2002 | The view looking down the line towards Rydal Station. The empty sleepers carried the recently-lifted Up Main. |
| Rydal | 2002 | The station building is on the down platform, in this view looking towards Bathurst. |
| Rydal | 2002 | The signal box on the down platform. |
| Rydal | 2002 | The down end of the platform shows the now partially-filled dock platform. |
| Rydal | 2004 | The building at the up end of the platform is now the local library. |
| Rydal | 2004 | The mostly-gutted signal box still contains a 12-lever frame. |
| Rydal | 2004 | The station building has a sign showing its construction date, 1869. |
| Rydal | 2004 | The view looking up the line towards Sydney. |
| Rydal | 2004 | The Countrylink sign on the up platform, which is no longer served by trains. |
| Rydalmere | 1989 | A platform elevation of the now demolished and replaced Rydalmere Station from the then goods yard. |
| Rydalmere | 1990 | A closer view of the now demolished and replaced Rydalmere Station looking towards Camellia. Between the short creek crossing and the Up Camellia Landmark signal in the distance is the entry into the now removed Rheem Siding. |
| Rydalmere | 1990 | Rydalmere Station looking towards Camellia from the Victoria Road overbridge. This station building and platform has since been demolished and replaced in the same position but on the opposite side of the main line where the short goods sidings are seen in the picture. The Up Camellia Landmark signal is visible in the distance. |
| Rydalmere | 2004 | The northern end of the relocated Rydalmere station. Note the use of wooden supports for the overhead. |
| Rylstone | 1999 | A photo showing the well-preserved station at Rylstone. |
| Sandgate | 2003 | A fully loaded coal train waits for the road on a rainy afternoon at Sandgate. |
| Sandgate | 2003 | The locked gates at the entrance to Toll's Siding. |
| Sandgate | 2003 | A fully loaded coal train waits for the road on a rainy afternoon at Sandgate. |
| Sandgate | 2003 | An EL class loco sits next to stacked containers in the Toll Siding. |
| Sandgate | 2003 | A busy day at Sandgate! An empty coal train heads back to the colliery, an up Endeavour railset has paused at the station, and a freight train headed by JL401 sits in Toll's Siding. |
| Sandgate | 2003 | Empty and loaded coal trains pass each other on the coal roads. |
| Sandgate | 2003 | A train headed by JL401/JL403/JL404/??? in different liveries, works Toll's Siding. |
| Sandgate | 2003 | A southbound XPT and freight trains pass through Sandgate. |
| Sandgate | 2004 | A great night-time shot of the station, looking down the line. |
| Sandgate | 2004 | A close-up of the remote points equipment controlling the entrance to Tolls siding. |
| Sandgate | 2004 | A night view of the illuminated station sign. |
| Sandgate Cemetery | 2003 | The rails are just visible through the grasss as the line curves towards the station. |
| Sandgate Cemetery | 2003 | The rails are still evident as the line curves towards the junction at Sandgate station. |
| Sandgate Cemetery | 2003 | The platform and the B lever frame which controlled the up end of the loop siding. |
| Sandgate Cemetery | 2003 | The view of the platform looking towards the end of the line. The remains of the run-around siding are also visible through the grass. |
| Sandgate Cemetery | 2001 | A close-up of the brick platform. |
| Sandgate Cemetery | 2001 | The platform has been extended north with a wooden structure. |
| Sandgate Cemetery | 2004 | A road sign indicates the one-time use of the branch line. |
| Sandgate Cemetery | 2003 | The approach to the junction. The line in the right foreground is Tolls Siding. |
| Sandgate Cemetery | 1992 | The station and loop, and up lever frame are still substantially intact, in this view taken 7 years after the short branch was closed. |
| Sandgate Cemetery | 1982 | Sandgate Cemetery in 1982 showing a cemetery train which had no passenger traffic, the interest in the train by this time was dead. |
| Sandown | 1992 | Sandown signal box, looking towards the end of the line, one part of which curves away to the left behind the signal box towards the Parramatta River. The other siding runs into the Shell Refinery. The Boral Plasterboard factory is in the background on the right. |
| Sandown | 2004 | The Shell sidings which branch off the line at the intersection of Grand Ave and Durham Ave. |
| Sandown | 2004 | A shutdown X53 loco sits outside the Shell refinery. |
| Sandown | 2004 | Looking down Grand Ave from the Shell sidings. |
| Sandown | 2004 | Looking at the location of Sandown today. |
| Sandown | 2004 | Beyond Sandown is the Steel Plate loading platform, just visible in the distance. |
| Sandown | 2004 | The view looking down along the Steel Plate loading platform, towards the end of the line. |
| Sandown | 2003 | The view looking up the line towards Camellia, with Silverton 45s1 shut down in a siding. The photo is taken from the location of the Sandown platform. |
| Sandown | 1992 | Sandown signal box, before it was demolished. |
| Sandown | 1986 | A diesel railmotor set approaches Sandown platform in 1986, looking straight down the line to Camellia. |
| Sandown | 2003 | Silverton 44s2 (ex-4471) sits shut down on a wet Sunday. |
| Sandown | 2003 | The view looking towards the end of the line. Silverton 45s1 and 44s2 sit in the siding. The one-time platform was on the right hand side of the empty line. |
| Sandown | 1983 | RM's 18 and 12 wait at the stark Sandown platform in 1983. |
| Sandy Flat | 2001 | The overgrown remains of the platform, looking towards Wallangarra. |
| Sandy Hollow | 2003 | The remains of the line heading north towards Merriwa. |
| Sandy Hollow | 2003 | The view looking towards the former station location and the junction of the branch line. |
| Sandy Hollow | 2002 | The junction of the one-time main line to Sandy Hollow. The line to Ulan and Gulgong curves away on the left, with the first 100m of the branch line available as a perway siding. |
| Sandy Hollow | 2003 | The view looking towards the junction and the former station location. |
| Sandy Hollow | 2003 | The view looking towards the junction from the stop block that marked the end of the branch when it had been truncated to a siding. |
| Sandy Hollow | 2003 | The view from the former level crossing towards the main line to Ulan. |
| Sayers Lake | 1982 | The very minimal steel platform at Sayers Lake, looking east. |
| Sayers Lake | 1982 | The view of the station, looking north. |
| Scarborough | 1980 | Scarborough Signal Box. |
| Scarborough | 1986 | Scarborough diagram showing very little changes over the years. |
| Scarborough | 1986 | Scarborough Box was opened in 1916 and by tradition a plate was placed over the door. These were sought after by many a collector. This one remains secure in 1986. |
| Scarborough | 1982 | The view looking aouth, at the southern end of the station. On the left is the signal box and former dock siding. Behind the locomotive can be seen the yard and South Clifton Colliery sidings. |
| Schofields | 2004 | The modern station building. |
| Schofields | 2004 | The view looking along the platform in the direction of Sydney. |
| Scone | 2000 | The nondescript road side of the station. As well as being the northern limit of CityRail operations, the building also provides a coffee shop. |
| Scone | 2000 | The view south along the relatively narrow platform. |
| Scone | 2000 | The goods crane is still present, just beyond the southern end of the station. |
| Scone | 2000 | The view north along the platform, showing the station building. |
| Scouts Camp Platform | 2002 | The fallen 17 mile post, which would have been just beyond the location of the one-time Scouts Platform. |
| Sefton Park South Junction | 2004 | The diagram and points levers inside Sefton Park Junction signal box. |
| Sefton Park South Junction | 2004 | The lever pulling list onside the signal box. |
| Seven Hills | 2004 | The view looking along the platforms towards Sydney. |
| Seven Hills | 2004 | The view from the footbridge looking west. |
| Shepherds | 1980 | A lonely sign stands in this 1980 photo of the location of Shepherds Siding. |
| Shepherds | 2002 | The silo and level crossing at Shepherds, looking the up direction. |
| Sigway | 1983 | The basic platform and sign at Sigway. |
| Silverton | 1997 | The abandoned station building at Silverton. |
| Silverton | 1997 | A light-weight water tank is lies near the approach to the station. |
| Silverton | 1982 | The view looking east towards the station remains. |
| Silverton | 1982 | The view looking west towards the small water tank. |
| Silverton | 1982 | A closer view of the small elevated water tank. |
| Silverton | 1982 | A closer view of the small elevated water tank. |
| Silverton | 1982 | The view looking east towards the station and Broken Hill. |
| Silverton | 1982 | A scotch block on the track at the western end of the location. |
| Silverton | 1982 | A bridge abutment on the Broken Hill side of Silverton. |
| Silverton | 1982 | A bridge abutment on the Broken Hill side of Silverton. |
| Silverton | 1982 | The remains of a small bridge, looking towards Silverton. |
| Silverton | 1982 | Another view of the remains of a small bridge, looking towards Silverton. |
| Silverton | 1982 | The view looking from the former bridge along the formation towards Broken Hill. |
| Silverton | 1982 | The view looking across the former level crossing towards the famous Silverton Hotel. |
| Singleton | 2004 | The view looking along the platform towards Maitland. |
| Singleton | 2004 | The road-side view of the station. |
| Singleton | 2004 | |
| Singleton | 2004 | The view looking north along the platform. |
| Sodwalls | 2004 | The formation and viaduct still remain from before the line was deviated to its current position. |
| South Gundagai | 1987 | The displaced sleepers from the former crossing over the Hume Highway. |
| South Gundagai | 1987 | The cabin used to activate the warning lights at the one-time level crossing over the Hume Highway. |
| South Wyalong | 2004 | Nothing is visible to denote the locaiton of the one-time station. |
| South Wyalong | 2004 | A narrow paddock which was once the access road from Wyalong to the station. |
| Spring Hill | 2002 | The view from the well-preserved up platform at the remains of the down platform. |
| Spring Hill | 2002 | The view looking towards Sydney of the well-preserved brick up-side platform. |
| Spring Hill | 2002 | The view of the up end of the yard, showing the base of the jib crane. In the middle distance were the one-time wheat loading sidings. |
| Spring Hill | 2002 | The up dock platform is still present, although overgrown. |
| Spring Hill | 2002 | 3801 on a tour train passing through Spring Hill. |
| Spring Ridge | 1996 | 8130 pulling an ARHS tour crosses 8215/8141 wheat train at Spring Ridge. |
| Spring Ridge | 1998 | The location diagram inside the signal box. |
| Springwood | 2004 | Looking down at Up Main and Platform 1 from the adjacent multi-storey commuter carpark. |
| Springwood | 2004 | The view looking along platform 1 from the Sydney end of the platform. The Up Main is on the right of picture. |
| Springwood | 2000 | The signaller's control desk at Springwood. |
| St Heliers | 1986 | St Heliers Signal Box on was situated between Grasstree and Muswellbrook. This 52 lever box served the junction to the Muswellbrook No.2 Colliery Branch. The utilitarian design of the box was destroyed by a runaway train on August 28th, 1987. |
| St Heliers | 1986 | The interior of the St Heliers Signal Box. |
| St Heliers | 1988 | After saint heliers signal box was destroyed by a run away coal train there was a temporary signal box erected; this was used for about 2 years. |
| St James | 2001 | The older-style bench seat and station sign board typical of the station. |
| St James | 2001 | A view of the station entry barriers showing some of the original fixtures. |
| St James | 2001 | The view along platform 2 showing the old architectural features in contrast with a new train status displays. |
| St James | 2002 | View of the southbound platform at St James station, looking towards the back of the train (north). |
| St James | 2001 | The wall tiles, iron railings and wooden handrails which are a feature of the station. |
| St Marys | 2004 | The view looking towards the city along Platform 1. |
| St Marys | 2004 | The view looking west from the footbridge. |
| St Marys | 2001 | A view of the signaller's control desk at St Marys. Of note is that this is the point where the Main West reduces fro 4 tracks to 2. |
| St Peters | 2004 | The view looking north towards Erskinville. |
| St Peters | 2004 | The view looking south, showing the old and new platforms. |
| St Peters | 2004 | The view looking north along the platforms. |
| Stanfield | 2004 | The view looking north showing the loop line platform. |
| Stanfield | 2004 | The view looking south, showing the ruins of the staff hut, and the up platform. |
| Stanford Main No 2 Colliery | 2001 | The view from the road shows a number of surviving buildings. |
| Stanford Merthyr | 2004 | The view looking towards the one-time location of Stanford Merthyr Colliery. No trace remains today. |
| Stanford Merthyr | 2004 | The Station Hotel still stands opposite the location of the one-time passenger platform. |
| Stanwell Park | 1996 | Looking down on Stanwell Park. The station is at the far right, just beyond the tunnel. A "V Set" is heading up the hill towards Sydney. |
| Stockinbingal | 1976 | The view looking west along the pair of platforms making up the station. |
| Stockinbingal | 1976 | The wooden nameboard, advertising the existence of the branch line to Forbes. |
| Stockinbingal | 2001 | The station basks in temporary sunshine, in this view from the road. |
| Stockinbingal | 2001 | The view looking west from the platform end. The left hand running line goes to Temora, while the right hand one heads towards Parkes. |
| Stockinbingal | 2001 | The platform and station, looking in the direction of Cootamundra. The station shares its unusual architecture with Canowindra. |
| Stockinbingal | 2001 | A gangers' trolley sits on a short section of rail opposite the platform. |
| Stockinbingal | 2001 | The view along the well-maintained station, looking in the direction of Cootamundra. |
| Stockinbingal | 2001 | These days, Stockinbingal station's role is reduce to that of a signal box. |
| Stockinbingal | 2001 | Another view on the platform. |
| Stockinbingal | 2001 | The view in the direction of Cootamundra and Sydney. |
| Stockinbingal | 2003 | The diagram inside the signal box. |
| Stockinbingal | 2003 | The 25 lever frame inside the signal box. |
| Stockinbingal | 2003 | Another view of the level frame and the two staff instruments. |
| Stockinbingal | 2003 | The modern sign outside the signal box. |
| Stockinbingal | 2003 | A close-up of the staff instrument for the Stockinbingal - Parkes section. |
| Stockinbingal | 2003 | A close-up of the staff instrument for the Stockinbingal - Cootamundra West section. |
| Stockinbingal | 1997 | The view looking towards Sydney. The track from left to road are the silo road, siding, Parkes and Temora lines. |
| Stockinbingal | 1997 | The western end of the yard. The siding ends and the two main lines diverge. |
| Stockinbingal | 1997 | The view looking towards Sydney. Note the two semaphore arms on the gantry. |
| Stockinbingal | 1983 | Stockinbingal showing two platforms in better times with passenger trains. 44205 and a 48 lead an up freight. |
| Stokers | 2003 | The station building at Stokers now serves as a general store. |
| Stonehenge | 2001 | The view looking towards Glen Innes. |
| Stonehenge | 2001 | The view looking towards Guyra. |
| Stony Crossing | 2004 | The location of a low bank which appears to be all that remains of the one-time station. |
| Stony Crossing | 2004 | The view looking east with the embankment on the right. |
| Stony Crossing | 2004 | The view looking west. |
| Stony Crossing | 2004 | A low mound which may be the remains of a goods bank. |
| Strathaird | 1980 | 23 years after the line closed, Strathaird still retained its basic shelter and sign board. |
| Strathaird | 1980 | The view looking back towards Roslyn, showing the station and overgrown loading bank. |
| Strathaird | 2001 | The formation is clearly visible near where it crosses the dirt road between Mount Rae and Strathaird. |
| Strathfield | 1997 | A down North Coast XPT approaches platform 3 as passengers wait to board. |
| Stroud Road | 1982 | The goods shed, looking south. The station is on the right. |
| Stroud Road | 1982 | The yard and station, looking towards Sydney. |
| Stroud Road | 1982 | A closer view of the station. |
| Stroud Road | 2002 | The view looking south from the short platform at Stroud Road platform. The car in the platform is Rail Motor Society's No 1. |
| Stroud Road | 2002 | The Rail Motor Society's No 7 and 1 cars stopped at the short platform at Stroud Road. |
| Stroud Road | 2002 | The Rail Motor Society's No 7 and 1 cars stopped at the platform, in this view looking south. |
| Stroud Road | 1995 | The view looking south from the Stroud Road Railway Station. |
| Stuart Town | 2002 | The view looking up the line towards Sydney. Note the raised platform built on top of the original, to bring it up the height of modern passenger trains. |
| Stuart Town | 2002 | The view looking up the line showing the platform and station building. |
| Stuart Town | 2002 | The rear of the restored station building reveals the preserved entrance gates. |
| Sugarloaf Tunnel | 1987 | The western end of the tunnel, near the site of Six Mile Loop. |
| Sulphide Junction | 1981 | A goods train headed by 4474 and 4851 is about to exchange staffs outside the Sulphide Junction signal box. The train appears to be running "wrong road" on the Down Main. |
| Sulphide Street | 1998 | A photo of the Sulphide Street station, now a museum. |
| Summervale | 2003 | Little remains at the one-time staff crossing station of Summervale. |
| Summervale | 2003 | Another view of the remains. |
| Sunnyside | 2001 | The view looking towards Tenterfield. |
| Sunnyside | 2001 | The view looking towards Tenterfield. |
| Sunnyside | 2001 | The view looking towards Wallangarra. |
| Sutherland | 2003 | The view from a Tangara set, looking along the platform. |
| Swan Ponds | 2004 | The view looking south. The platform on the left served the one-time loop siding. The derelict hut is the staff hut - all the remains of the station. |
| Swan Ponds | 2004 | A close-up of the remains of the staff hut. The platform it once sat on is gone. |
| Swan Ponds | 2004 | The water tank at the down south end of the location. |
| Swan Ponds | 2004 | The view looking north showing the larger water tank and associated water columns. |
| Sydenham | 2004 | An up Millenium train approaches Sydenham platform 1. |
| Sydenham | 1984 | Interior of Sydenham Box showing the 70 mini lever frame although at the time of the photo only the first 59 were in use, all the rest were "spare" or missing and the plates as well. |
| Sydenham | 2004 | The busy track-work to the south of the station. The main Illawarra lines extend to the middle distance, with the tracks on the right leading to the Bankstown line and the Meeks Road servicing centre. The bridge over the top carries the Botany Goods Line. |
| Sydenham | 2004 | The somewhat unusual roadside entrance to the station. |
| Table Top | 2001 | The station was situated on the opposite (down) side of the line. No trace remains today. |
| Table Top | 1980 | The simplistic Signal Box diagram at Table Top. |
| Table Top | 1980 | Table Top station still neat and tidy stands quiet in the early morning of a November day. The Signal Box is to the left on the platform. |
| Tahmoor | 2001 | A sunny view of Tahmoor station. |
| Tahmoor | 1987 | Before extensions and modernization Tahmoor showed itself as a typical country station.. |
| Tahmoor | 1980 | Tahmoor station seems to be a bike track on a Sunday in 1980. |
| Talbragar | 2004 | The view looking up the line towards Dubbo, from the goods loading bank. The one-time station nameboard now adorns the adjacent property, at the right. |
| Talbragar | 2004 | The view looking down the line towards Coonamble. |
| Talbragar | 2004 | The goods loading bank has been raised to allow direct loading of railway ballast from the nearby Boral mine. |
| Talbragar | 2004 | The adjacent property, possibly an ex-railway residence, now sports the station nameboard. |
| Tallawarra Power Station Siding | 2004 | The Branch left the main Line here, Just to the left of the metal post which holds the electrified line you can see where it is being used as an access road to the ash settling ponds which are to the right. It then turned back to the left and crossed the centre of the photo. Where you can see a concrete structure it then turned to the right and followed the embankment straight down before again turning to the left. |
| Tallawarra Power Station Siding | 2004 | The line then crossed a small creek via this steel bridge, The bridge has had concrete poured over it for road usage. |
| Tallawarra Power Station Siding | 2004 | A side-on shot of the bridge. |
| Tallawarra Power Station Siding | 2004 | The point where the line crossed the road is visible in the tar. |
| Tallawarra Power Station Siding | 2004 | After the line crosses the road it then bends to the right and follows the power lines. |
| Tallawarra Power Station Siding | 2004 | A small cutting further along, From here onwards the line gets very hard to follow. |
| Tallimba | 2003 | The view of the approaches to the station, looking towards Rankins Springs. The station was located beyond the elevated water tank. |
| Tallimba | 2003 | The level crossing at the Barmedman end of the yard. |
| Tallimba | 2003 | The lever frame and Train Order signal at the up end of the yard. |
| Tallong | 1980 | A sleepy Sunday afternoon photo of Tallong station. |
| Tallong | 2004 | The view looking south form the down end of the station. |
| Tallong | 2004 | The view looking across at the shelter on the up platform. |
| Tallong | 2004 | The view looking south along the platforms. |
| Tallong | 2004 | The view looking north at the up end of the station. |
| Tallong | 2004 | The water tank to the north of the station. The up platform is visible in the distance. |
| Tallong | 1980 | Interior of Tallong Signal Box showing the blocks instruments. |
| Tallong | 1980 | Tallong Signal Box diagram in 1980. |
| Tallong | 1980 | A 1980 view of a quiet Tallong station. |
| Tamworth | 2001 | The view of the very much in-use station at Tamworth, from the road side. |
| Tamworth | 2001 | The view along the well-kept platform. |
| Tamworth | 2002 | The road-side entrance to the impressive station building. |
| Tamworth | 2003 | The Country Music Express train crossing Tamworth Viaduct heading towards West Tamworth. |
| Tamworth | 2003 | The view from the cabin of an Xplorer as it approaches the Peel River bridge, heading towards Tamworth. |
| Tamworth | 1997 | The yard diagram at West Tamworth. The former branch to Barraba enters from the right bottom. |
| Tarago | 2002 | The road-side view of the station building. |
| Tarago | 2002 | The platform features modern seating and a new coat of paint. |
| Tarago | 2002 | The railway-side view of the station. |
| Tarago | 2002 | The view looking along the platform. |
| Tarago | 2002 | The goods shed at Tarago. |
| Tarago | 2004 | The yard diagram, located inside the signal box on the southern end of the platform. |
| Taralga | 1980 | The view looking up the line of the remains at Taralga. The passenger platform is on the right. |
| Taralga | 2001 | The view looking across towards Taralga. The loading bank is visible on the left and the remains of the turntable pit are on the right. The station was opposite the bank near the large tree. |
| Taralga | 2001 | A recent shot looking towards the end of the line. The passenger platform is on the left. |
| Tarana | 2004 | The view looking along the down platform in the direction of Sydney. |
| Tarana | 2004 | The view looking along the up platform in the direction of Sydney. |
| Tarana | 2004 | The view looking along the platforms towards Bathurst. |
| Tarana | 2004 | The view fom platform level of the large elevated water tank and pedestrian footbridge. |
| Tarana | 2004 | The view looking down at the elevated water tank. |
| Tarana | 2002 | The view looking towards Bathurst from the footbridge. The station buildings have been recently painted. |
| Tarana | 2002 | The western approaches to the station. |
| Tarana | 2002 | The view from the up end of the station showing the truncated water column (the water tank is out of sight behind the left end of the footbridge). |
| Tarana | 2002 | The view looking towards Sydney. The structure in the foreground is the signal box. |
| Tarana | 2002 | The remains of the dock siding at the down end of the platform. |
| Tarana | 2002 | The remains of the yard. A couple of tracks are still used as Perway Sidings. The line to the left of the short white post in the distance is the beginning of the branch line to Oberon. |
| Tarana | 2002 | Not long after leaving the Main West, the line crosses the Fish River over a steel span bridge. |
| Tarcoon | 2003 | The remains of the yard at Tarcoon, facing in the direction of Brewarrina. The platform on the left is the loading platform. |
| Tarcoon | 2003 | Remains of the partially-lifted siding. |
| Tarcoon | 2003 | The up end of the lifted siding. |
| Tarcoon | 2003 | The remains of the station, looking north towards Brewarrina. |
| Tarcutta | 1984 | Tarcutta station had obviously seen better days when this photo was taken in 1984. At the time it was being used as a depot by the Department of Main Roads. |
| Tarcutta | 2000 | The station building and platform are almost hidden by scrub in this pre-fire photograph. |
| Tarcutta | 2000 | The small goods shed, which appears to be a much shortened version of the G2 type. This was being used as a storage depot for road crews at the time this photograph was taken. |
| Tarcutta | 2001 | A newspaper report of the burning down of Tarcutta Station (supplied by Debra Argus). |
| Tarcutta | 2001 | Photos from the newspaper report of the burning down of Tarcutta Station (supplied by Debra Argus). |
| Tarcutta | 2001 | The yard is mainly buried under gravel and grass. This view shows the gantry crane, the remains of the station and platform, the lamp hut, and another unidentified building. |
| Tarcutta | 2001 | Not much remains in this post-fire view of the station and platform. |
| Tarcutta | 2001 | Only the chimneys and some corrugated iron remain of the station building. |
| Tarcutta | 2001 | The 6-lever frame is suspended among the ashes of the station building. |
| Tarcutta | 2000 | The men's toilet and lamp room, this is the only building left standing after the fire in early 2001. |
| Tarcutta | 2001 | The lamp room and toilet hut, with the gantry crane in the background. |
| Taree | 2003 | Just north of Taree station is a short branch line to the Dairy Farmers milk and Allowrie butter factories |
| Taree | 2003 | Taree yard with 3801 at the head of a tour train. |
| Taree | 2003 | Former goods depot at Taree, now used by the local model railway club. |
| Taree | 2003 | Taree station platform with a tour train. |
| Taree | 2003 | Taree station building. |
| Taree | 1987 | 44209 on the North Mail running 5 hours late passes the gates at Taree North. |
| Taree | 1987 | Taree North Diagram in 1987. |
| Taree | 1987 | The gates over Macquarie Street, controlled by Taree North signal box. |
| Taree | 1987 | Taree North gate wheels and levers were work for the Signalman. |
| Taree | 1987 | Taree North Box |
| Taree | 1987 | Taree South Box. |
| Taree | 1987 | Taree South diagram. |
| Taree | 1987 | Taree South diagram close up. |
| Taree | 1987 | An assortment of signals, controlled by Taree South signal box. |
| Taree | 1987 | Two 80 class locomotives on a south bound freight waiting for clearance. |
| Taree | 1987 | Taree yard looking south. |
| Tarrion | 2003 | The old station sign now at entrance to property of same name. |
| Tarro | 1996 | A Newcastle-bound Endeavour set pauses momentarily at the unattended station of Tarro. The Coal Roads are visible at the far right. |
| Tarro | 1996 | 8202 leads an empty coal train past a loaded train at Tarro. |
| Tascott | 2004 | The station sign in the car park adjacent Glenrock Pde, looking south. |
| Tascott | 2004 | The southbound platform, with room for only one car. Brisbane Water can be seen in background. |
| Telarah | 2004 | The view looking north from Telarah Street of the sidings. Telarah station is in the far distance. |
| Telarah | 2004 | A closer view of the sidings. The line to the left leads to a pair of perway sidings. |
| Telarah | 2004 | The view looking south from the northern end of the yard. NR83 waits opposite the station for the afternoon XPT to cross over before it can head north on to the single-track line. |
| Telarah | 2004 | The view of Telarah station from the vicinity of the perway sidings. |
| Telarah | 2004 | The northern end of the triangle loop which connects to the Main North heading west. |
| Telegraph Point | 1982 | The lever frame inside the signal box. |
| Telegraph Point | 1982 | A close-up view of the automatic staff exchanger which was ready for a north bound freight. |
| Telegraph Point | 1982 | Taken in 1982 shows the how the Station Master was proud of his green thumb and received some local awards for his vegetation displays. |
| Telegraph Point | 1982 | The view looking north across the yard towards the station. |
| Telegraph Point | 1982 | The view looking south as a north-bound passenger service passes through. |
| Telegraph Point | 1982 | The yard diagram. |
| Telopea | 2004 | The view looking north along the platform. |
| Telopea | 2004 | The pedestrian crossing at the southern end of the station. There are comparatively few pedestrian crossings in the Sydney metropolitan area. |
| Telopea | 2004 | The view looking north, showing the lightness of the infrastructure. |
| Temora | 1976 | A 600 class railcar has stopped to exchange passengers before heading on to Lake Cargelligo. |
| Temora | 1976 | The decaying nameboard on the platform, showing the destinations available from Temora. |
| Temora | 1997 | The sign reads, "Change here for Griffith, Hillston, Lake Cargelligo, Rankins Springs, Burcher and Naradhan Lines". Only Griffith is currently served by passenger trains. |
| Temora | 1997 | The semaphore signals at the down end of the platform. |
| Temora | 2004 | The Temora yard diagram. |
| Temora | 2004 | The view along the platform looking toward Barmedman. |
| Temora | 2004 | The view along the platform looking toward Cootamundra, showing the platform scales. The building at the end is the signal box. |
| Temora | 2004 | The lever frame in the signal box. |
| Temora | 2004 | Another view inside the signal box. |
| Temora | 2004 | A close-up of the safeworking instruments behind the lever frame. |
| Temora | 2004 | The emergency fog equipment in the signal box. |
| Temora | 2004 | The exterior of the signal box. |
| Temora | 2004 | The restored station sign, showing all the original destinations. |
| Temora | 2004 | The diesel refuelling point, at the end of the platform. |
| Temora | 2004 | The diagram for the diesel refuelling point. |
| Temora | 2002 | A view looking towards Cootamundra, showing a loading bank, silos and possibly a grain shed. |
| Temora | 2002 | 8150 sits in a siding at the northern end of the yard. |
| Temora | 1997 | An oil tanker sits in the dock. |
| Temora | 1997 | The view looking across at the silos and the oil dock. |
| Temora | 2003 | The Temora yard diagram. |
| Tenterfield | 1977 | The North Mail, hauled by 4441 in tuscan livery, has terminated at Tenterfield before beginning its journey back south. |
| Tenterfield | 1977 | The unusual lettering of the station nameboard. |
| Tenterfield | 1996 | The brick-faced platform and nameboard in recent times. |
| Tenterfield | 1996 | The view from the northern end of the platform. |
| Tenterfield | 1996 | The view looking north along the restored platform. |
| Tenterfield | 1996 | The view from the southern end of the platform. |
| Tenterfield | 1996 | The baggage scales on display at the railway museum. |
| Tenterfield | 1996 | A view of the one-time crew barrack building. |
| Tenterfield | 1997 | The station building at Tenterfield has been preserved as a museum by locals. |
| Tenterfield | 1998 | The angled light highlights the architecture of the station building. |
| Tenterfield | 1998 | The view along the station looking up the line towards Sydney. |
| Tenterfield | 2002 | The platform now looks more like a jungle than a railway station! |
| Tenterfield | 2002 | The ornate decorations of the road-side view of the station are well preserved. |
| Tenterfield | 2002 | The view looking down the platform in the direction of Sydney. |
| Tenterfield | 1996 | A baggage cart on display at the railway museum. |
| Tenterfield | 1996 | A baggage cart on display at the railway museum. |
| Tenterfield | 1996 | A baggage cart on display at the railway museum. |
| Tenterfield | 1999 | A restored luggage trolley sits on the platform. |
| Tenterfield | 1999 | The restored parcel van which sits on the platform road. |
| Tenterfield | 1999 | Restored desk equipment, which is part of the museum now residing in the station building. |
| Tenterfield | 1996 | A restored fettler's cart on display at the museum. |
| Tenterfield | 1996 | Restored platform signs. |
| Tenterfield | 1999 | The restored ticket cabinet on display at the museum. |
| Tenterfield | 1999 | A restored rail trike is in display in the waiting room at the museum. |
| Tenterfield | 1999 | Restored section telephone and safeworking equipment on display at the museum. |
| Tenterfield | 2003 | The view looking north towards the turntable. |
| Tenterfield | 2003 | A side-on view of the turntable and pit. |
| Tenterfield | 1998 | A view looking north along the preserved station. |
| Teralba | 2002 | The view of the station and down platform. |
| The Gib Tunnel | 2001 | A northbound Xplorer set, having just left the Gib Tunnel. |
| The Gib Tunnel | 2001 | The north portal of the new Gib Tunnel. |
| The Gib Tunnel (1st) | 2001 | The Old Gib tunnel is now private property, being used by the Mittagong Mushroom company. |
| The Halt | 2003 | The view looking east from what would have been the first road crossing on the branch. Nothing remains of platform that was in the vicinity of this location. |
| The Halt | 2003 | Bridge pylons are visible along the formation between The Halt and Tyumba. |
| The Halt | 2003 | Another view of the pylons along the formationbetween The Halt and Tyumba. |
| The Rock | 1997 | The Rock Station, with the adjacent silos and the landmark peak in the background. The line in the centre is the beginning of the branch to Oaklands. |
| The Rock | 2000 | 8161 has just attached to a grain train headed by 4x48 class locos. This train has recently arrived off the branch line to Oaklands. |
| The Rock | 2003 | The view looking south along the silo siding. |
| The Rock | 2003 | The view looking south along the former grain storage area. |
| The Rock | 1970 | A crossing of trains at The Rock. |
| The Rock | 1980 | The Rock Signal Box was a classic example of a NSWGR Signal Box down to the ubiquitous finials. |
| The Rock | 1980 | Diagram in The Rock Signal Box shows how the station boasted an engine shed, turntable, stockyard are and of course this was the junction to the Oaklands Branch. |
| The Rock | 1980 | This unused gas lamp was a reminder of the old days for many years on The Rock station. |
| The Rock | 1980 | On a very wet November day in 1980 The Rock station looked dreary except for a bicyclist on the platform. |
| The Rock ABA Terminal | 1997 | The ABA grain loading facility, which is located on the Up side of the branch line, about 3kms from the mainline junction. |
| The Rock ABA Terminal | 1997 | The base of the silos and loading structure at the ABA grain facility. |
| The Royal National Park | 2001 | The view looking along the station towards the end of the line. |
| The Royal National Park | 2001 | The signal box at the terminus station, now repainted in a rather unusual colour scheme. |
| The Royal National Park | 2001 | The gutted coloured light signal post, which was once the departure signal. |
| The Royal National Park | 2001 | The approach to the station. In the original layout, the platform was directly behind the box, with two sidings to the right and three to the right. The concrete base on the left was for Frame B, and is a relic of the original yard. |
| The Royal National Park | 2002 | A section of abandoned signal troughing near the terminus. |
| Thirlmere | 1983 | The nameboard and station building. |
| Thirlmere | 1993 | The view along Thirlmere's platform, looking south towards Mittagong. The RTM premises are out of shot on the right. |
| Thirlmere | 2004 | Locomotive 5096 awaiting restoration at Thirlmere |
| Thirlmere | 2003 | The view looking across towards the station and signal box. |
| Thirlmere | 2003 | 4803 stands at the head of a tourist train at the station. |
| Thirroul | 1986 | Thirroul Signal Box had a tremendous view of the ranges and a decent size yard to look after. |
| Thirroul | 1986 | Thirroul Signal Box had a tremendous view of the ranges and a decent size yard to look after. |
| Thirroul | 1986 | Thirrould had a Frame B on the south side of the platforms, the diagram shows location and control parameters. |
| Thirroul | 1966 | Looking out of the roundhouse north towards the turntable at Thirroul. 5597 was returning to Sydney on a tour to Kiama. |
| Thirroul | 1966 | Thirroul's electric turntable looking to the east in October 1966. 5597 was returning to Sydney on a tour to Kiama. |
| Thirroul | 1966 | Thirroul yard from near the station looking north in October 1966. |
| Thornleigh | 1981 | The view looking south along the down platform. |
| Thornleigh | 1978 | View of the 16 lever frame at Thornleigh Signal box. |
| Thornleigh | 2004 | The view looking down along platforms 3, 2 and 1. |
| Thornleigh | 2004 | The view looking north towards Hornsby, showing the emergency crossovers just beyond the station. |
| Thornleigh | 2004 | The view looking north along platform 3. |
| Thornleigh | 2004 | The view looking south as an inter-urban set approaches the station. The tracks on the outer left and right are the up and down relief lines. |
| Thornleigh Quarry | 2004 | The site of a small bridge over Zig Zag creek. |
| Thornleigh Quarry | 2004 | An embankment cut to allow the line to pass. |
| Thornleigh Quarry | 2004 | A view of the formation near the bridge site. |
| Thornleigh Quarry | 2004 | A view of the formation looking in the direction of the main line. |
| Thornleigh Quarry | 2004 | A view of the formation looking towards the quarry. |
| Thornton | 2003 | The view looking back towards Newcastle. |
| Tichborne | 1986 | The overgrown platform still has a signboard. |
| Tikkara | 2003 | The Tikkara station board has been moved to a nearby location. |
| Tocumwal | 1998 | Tocumwal station from the north. The lines to the right are the broad gauge line from Victoria. They are used for container transfer and picking up grain, from silos approx 1 km to the north-east. The area to the left housed the standard gauge yard. |
| Tocumwal | 1998 | This standard-gauge turntable is still present, north-west of the station. Tocumwal station is visible in the left distance. |
| Tocumwal | 1998 | The station building at Tocumwal is still present. A recent attempt was made to preserve it, but the building is currently boarded up. |
| Tocumwal | 1998 | This lever frame is actually on the platform, on the western side of the platform. |
| Togar | 1998 | The local panel at Togar signal box. |
| Tomingley West | 1986 | The truncated platform still has a primitive shelter and signpost. |
| Toongabbie | 2004 | Toongabbie station, looking towards Sydney. The one-time Prospect Quarry branch left the main line in the right middle distance. |
| Toongabbie | 2004 | The view looking west. |
| Toongi | 2001 | The area has been disturbed by non-railway activities, but the shelter and lever frame can be seen in the view looking south. |
| Toongi | 2004 | The view from the down end of the station. The roof-less signal box is just beyond the far end of the platform. |
| Toongi | 2004 | The view from the down end of the yard, showing scattered pieces of track as well as a 3-lever ground frame. |
| Toongi | 2004 | A close-up of the 3-lever frame at the down end of the yard. |
| Toongi | 2004 | The station building is visible in the distance beyond the lever frame. |
| Toongi | 2001 | A view of the line beyond the station where it passes alongside a house. |
| Tootool | 2001 | The site of the one-time passenger platform. |
| Tootool | 2001 | The grain silos, which are still in use. |
| Top Points | 1980 | 1072 departing Top Points for the bottom station. |
| Toronto | 2004 | The lamp room at the up end of the platform. |
| Toronto | 2004 | A closer view of the station building, looking towards the end of the line. |
| Toronto | 2004 | The up end of the station, looking towards Fassifern. |
| Toronto | 2001 | The view looking towards the terminus. |
| Toronto | 2004 | The view looking towards the end of the line. |
| Toronto | 2003 | The view looking down along the platform. |
| Toronto | 2001 | The well-preserved station building and platform. |
| Toronto | 2001 | The view looking down from station entrance. |
| Toronto | 2001 | The up home signal at the approaches to Toronto station. Lake Macquarie is visible between the trees on the left. |
| Toronto | 2003 | The platform and station are built into a cutting, with a main road running above roof level behind the station. |
| Tottenham | 1986 | The view looking across at the one-time station building. |
| Tottenham | 2003 | The remains of the goods shed. |
| Tottenham | 2003 | The view looking along the turntable road towards Bogan Gate. The grain silos are at the right. |
| Town Hall | 1999 | The view looking down over platforms 1 and 2. The "Zoo Train" is stopped at the station. |
| Towrang | 1980 | The original Towrang Signal Box on the truncated platform in 1980. |
| Towrang | 1980 | Towrang Signal Box diagram. |
| Trajere | 1997 | The home signal is still present, but it appears that no train has run to Trajere recently. This is the view looking towards Eugowra. |
| Trajere | 2004 | The remains of the platform. |
| Trajere | 2004 | The staff hut, adjacent to the platform. |
| Trangie | 2004 | 8144 heads a wheat train, in this view looking towards Nyngan. |
| Trangie | 2003 | The view looking across towards the station, in the direction of Bourke. |
| Trewilga | 1940 | Workers pose in front of the sign board on the platform. |
| Trewilga | 1940 | Bagged wheat being loaded onto wagons. |
| Troy Junction | 2004 | 4908 waits on the Merrygoen Branch for permission to proceeed to Dubbo. The Coonamble branch line is on the right. |
| Trundle | 1986 | The view looking across at the station buildings. |
| Trundle | 2001 | The 509 mileage post, at the location where the up home signal once stood. This view is looking back towards Bogan Gate. |
| Trundle | 2001 | The view in Trundle yard, looking south towards Bogan Gate. |
| Trundle | 2001 | The remains of the up home signal, since removed. Train Order Working now controls movements on this branch. |
| Trundle | 2001 | The grain siding and silo at Trundle. |
| Trundle | 2004 | Only the platform remains of the station, in this view towards Tottenham. |
| Trundle | 2004 | The loading bank and silos. The yard is largely untouched, with all sidings still in existence. |
| Trundle | 2004 | The former staff hut, now out of use as, Train Order working has taken over. |
| Trundle | 2004 | Large piles of new timber sleepers being used in the resleepering of the Tottenham line. This is being carried out by 2 gangs working 7 days a week. |
| Tuggerah | 2002 | The view looking south along the two platforms making up the station. |
| Tuggerah | 2004 | The view looking south along the platforms towards Sydney. |
| Tuggerah | 2004 | The view looking north along the platforms towards Newcastle. |
| Tuggerah | 2004 | The view looking north as a south-bound freight train passes through the station. |
| Tuggeranong | 2002 | The remains of the goods loading bank at Tuggeranong. |
| Tullamore | 1986 | The view looking across at the station buildings. |
| Tullamore | 2001 | The view looking towards Bogan Gate. |
| Tullamore | 2001 | The remains of Tullamore yard. |
| Tullamore | 2001 | The view from the Sydney end looking towards the Goods and Silo siding. |
| Tullamore | 2001 | The view from the north looking along the Goods siding towards Sydney. |
| Tullibigeal | 2001 | The view looking towards town in the up direction. The Up Home signal arm has been removed. |
| Tumbarumba | 1976 | The rear of the station building. Some graffiti on the building reads, "Tumba Railway + RIP". |
| Tumbarumba | 1987 | A close up of the wooden-faced platform and station building. The area is still in good condition considering it is 13 years since the last train ran. |
| Tumbarumba | 1987 | Another view of the station and surrounding area. |
| Tumbarumba | 1997 | Ten years later, all traces of the platform and station are gone. The goods platform and main line are still present. The line in the foreground is the one-time engine siding. |
| Tumbarumba | 1997 | The elevated water tank is still present in the remains of the yard. |
| Tumbarumba | 2004 | The buffer stop remains on the edge of the main road, at the end of the line. |
| Tumblong | 2004 | Looking back up the line at the site of Tumblong station. The loading bank is just behind the tree, with the platform being located opposite. The house is the former station-masters residence. |
| Tumut | 1976 | The A Frame and diagram at Tumut. |
| Tumut | 1976 | Passengers and staff wander on the station, as CPHs 11 and 1 wait before starting on the return journey. |
| Tumut | 1997 | The station building at Tumut was re-used for the short-lived Mountain High Railway. |
| Tumut | 1999 | The former station master's residence, on the south-westerly side of the yard. |
| Tumut | 1999 | The view of the station building looking down the yard to the buffer stops. |
| Tumut | 1999 | The former entrance to the Station Masters office - it had been reused as an art and craft shop. |
| Tumut | 1999 | The road side view of the station building. Beyond the chimney is the remains of the small loading platform for goods and parcels, made out of sleepers. |
| Tumut | 1999 | The gents lavatory constructed out of corrugated iron, a typical design used extensively throughout NSW country locations. |
| Tumut | 1999 | The view looking towards Gilmore. Lever Frame A stands silent sentinel just beyond the platform ramp. |
| Tumut | 2002 | The end of the siding at the old Butter Factory. |
| Tumut | 2000 | A view looking towards the station building. |
| Tyagarah | 2003 | This platform is all the remains of the one-time station and loop siding. |
| Uardry | 2000 | The area is littered with rusting remains of pieces of infrastructure. |
| Ulan | 1999 | The signal control board at Ulan, controlling the entry and exit of trains from the Ulan Coal Loader balloon loop. |
| Ulan Coal Loader | 2004 | Ulan coal mine and Loader. |
| Ulan Junction | 2004 | The view looking towards the coal loader. The line in the foreground is the main line between Sandy Hollow and Gulgong, with the other tracks forming the balloon loop. |
| Ulan Junction | 2004 | The view looking towards the coal loader. The line in the foreground is the main line between Sandy Hollow and Gulgong, with the other tracks forming the balloon loop. |
| Ulan Junction | 2004 | The hut controlling the Ulan Mine entrance level crossing. |
| Ulan Junction | 2004 | The hut controlling the Ulan Mine entrance level crossing. |
| Ulan Junction | 2004 | The view looking west along the line from mine entrace level crossing. |
| Ulan Junction | 2004 | The view looking west along the line from mine entrace level crossing. |
| Ulong | 2002 | Ulong station still sports its small shelter and nameboard. |
| Ulong | 2003 | The station shelter has been recently painted, and the platform restored. |
| Ulong | 2003 | The yard contains a number of wagon, including a water gin. |
| Ungarie | 2004 | The safeworking hut which, as at Lake Cargelligo, sits on a small piece of the original platform. |
| Ungarie | 2004 | Looking west, the line to the left of the junction is to Naradhan, that to the right is to Lake Cargelligo. |
| Ungarie | 2001 | The view looking towards Temora, standing next to the No 1 siding. The Lake Cargelligo branch is to the right and the grain siding is in front of the bunker, on the left. |
| Ungarie | 1983 | Railset 704 604 have stopped at Ungarie before heading south towards Sydney. |
| Uralla | 2000 | A view of Uralla Station, with yard remains in the background. |
| Uralla | 1992 | The view looking north as 4484 heads a northbound train through the station. |
| Urana | 1980 | Urana station is looking rather disheveled in this 1980 photograph. |
| Urana | 1980 | The diagram in the signal box. |
| Urana | 1980 | Urana was a staff exchange station in 1980. Boree Creek has lost its staff station status at this time, as evidenced by the new label. |
| Urana | 1998 | This view shows the approach to the silo from the buffer stop on the end of the elevated silo siding. The line to the right is the main line. The town of Urana is behind the trees in the right background. |
| Urangeline East | 1980 | A view of the station 5 years after closure. |
| Uranquinty | 2001 | A view of the yard looking south. The platform with a signalling hut still remains. The silos are still in use. The one-time branch to Kywong left the loop siding behind the silos. |
| Uranquinty | 1980 | This 1980 picture of Uranquinty station shows it still in use and boasting a station staff. |
| Uranquinty | 1980 | 4201 resplendent in "125" colours sits alone in the loop in Uranquinty after detaching itself from a short freight from the south and awaits the arrival of 4822 from the north. |
| Uranquinty | 1980 | Uranquinty Signal Box diagram. |
| Uranquinty | 1980 | Uranquinty was the junction for the Kywong branch which was closed 5 years earlier, but the staff and ticket box still remained in the Signal Box. |
| Uranquinty | 1980 | 4201 in patriotic green and gold trundles into Uranquinty yard with a short freight from the south in 1980. Even the well-utilised "S" trucks still were in use. |
| Vales Point Coal Unloader | 1982 | A 442 class loco at the head of a train being unloaded on the balloon loop. |
| Valley Heights | 2001 | A view of Valley Heights station, looking in the direction of Sydney. The tracks from left to right are the Down Main, Down Refuge Siding, Engine Loop and Coal Storage Siding (just visible in distance). |
| Valley Heights | 2004 | The 60ft turntable is operational and is being used to turn preserved steam locomotive 3526. |
| Valley Heights | 1993 | A view of the turntable and surrounding roundhouse. |
| Victoria Street | 2004 | 8203 heads a loaded coal train past the station, in this view looking towards Maitland. |
| Victoria Street | 2004 | The view looking up the line towards Newcastle at the tail end of a loaded coal train. |
| Villawood | 1980 | The view looking west towards the station and the Southern Portland Cement sidings. |
| Vineyard | 2004 | The simple unattended platform at Vineyard, looking back up the line towards Sydney. |
| Vineyard | 1984 | A very tattered Vineyard station in 1984. |
| Wagga Wagga | 2000 | The view looking long the platform in the direction of Albury. |
| Wagga Wagga | 2000 | The view of the yard, from the platform looking in the direction of Sydney. The three lines extending under the gantry into the distance are the Platform Loop, Main Line and former branch line to Tumbarumba. |
| Wagga Wagga | 2002 | A collection of railway equipment opposite the station. |
| Wagga Wagga | 2003 | A close-up of the roadside view of the station. |
| Wagga Wagga | 2003 | The bus interchange area, adjacent to the station building. |
| Wagga Wagga | 2003 | The view looking along the roadside facade. |
| Wagga Wagga | 2003 | The view looking along the platform, in the direction of Sydney. |
| Wagga Wagga | 2003 | The interior of the waiting room. |
| Wagga Wagga | 2004 | Preserved locomotive 3801 is passing the remains of the Tumbarumba branch (foreground) as it approached Wagga station. |
| Wagga Wagga | 1980 | Wagga diagram as it appeared in 1980, the Tumbarumba branch can be seen top left. |
| Wagga Wagga | 1980 | A close up view of Wagga's diagram showing the positions of the frames. |
| Wagga Wagga | 1980 | Frame D controlled the operations of points & catch points between the 2 loco sidings and Nos 1, 2 & 3 sidings. 1. |
| Wagga Wagga | 1980 | Frame E controlled the points from the through road to No.1 Siding which became the branch to Tumbarumba. 6E controlled the signal from the siding to the branch which was linked to a clearance bar. |
| Wagga Wagga | 1980 | Frame F controlled the crossover and slip points between the through & platform roads and also the No.2 goods siding which lead to the North Dock. |
| Wagga Wagga | 1980 | A very late running No.4 Spirit of Progress due to locomotive failure sits opposite the Signal Box at Wagga Wagga. The view looking south shows the rear of the train with the two sleeping cars. |
| Wagga Wagga | 1980 | The Signal Box in 1980. |
| Wagga Wagga | 1980 | The staff instruments to Kapooka (left) & Bomen on the right. 1980. |
| Wagga Wagga | 1980 | 42217, 4438 & 48134 head north on a freight in 1980. Note the slip points on frame F have just been disconnected. Yard simplification had just started. |
| Wakool | 1910 | A historic photo of Wakool Station. |
| Wakool | 1999 | The station building and platform remains at Wakool. |
| Walcha Road | 2002 | A view of the station and yard, facing north. |
| Walcha Road | 2002 | The view of the station looking towards Sydney. |
| Walcha Road | 2002 | The back platform at the station, with its track now lifted. |
| Walcha Road | 2004 | The sign marking the highest point on the still-open NSW network, between Walcha Road and Wallun. |
| Walgett | 2003 | The view of the yard remains, looking back up in the direction of the wheat terminal which is now the terminus of the branch. |
| Walgett | 2004 | A close-up of the fenced off goods shed and jib crane base. This is looking towards the end of the line. |
| Walgett | 2004 | The view looking along the goods bank towards the remains of the station. The goods shed and the terminus are in the distance. |
| Walgett | 2004 | The base of the supports is all that remains of the carriage shed. |
| Walgett | 2004 | The loading bank which served the stockyards. |
| Walgett | 2004 | The elevated water tank at the up end of the yard. Visible behind the tree in the centre is the turntable pit. The engine shed was located in the bushed on the right. |
| Walgett | 2004 | The Down Home signal at the outskirts of the yard. |
| Walgett | 2003 | The view looking along the painted goods loading bank away form the terminus. |
| Walgett Wheat Terminal | 2003 | The view looking towards the wheat terminal. |
| Walgett Wheat Terminal | 2003 | The stop block which marks the end fo the line. The final 4km to Walgett is no longer in use. |
| Walla Walla | 1980 | The station is rather the worse for wear in this photo. |
| Wallangarra | 2001 | The NSW/Qld border plinth on the platform at Wallangarra. |
| Wallangarra | 2001 | A view to the west along the border looking across the narrow gauge yard. |
| Wallangarra | 2001 | A wooden diagram showing the layout of the station and yard. |
| Wallangarra | 2001 | A restored room inside the station building. |
| Wallangarra | 2001 | The view from the NSW end of the platform. The NSW platform is on the right, the Queensland platform is on the left. |
| Wallangarra | 2001 | The view from the Queensland end of the platform. The NSW platform is on the left, the Queensland platform is on the right. |
| Wallangarra | 2001 | The view looking west of the goods store shed and crew barracks. |
| Wallangarra | 1988 | A shot of part of the dual gauge triangle in the yard. This is at the top of the wye, with the main line running from the south (left) to the north (right) in the background. The south leg on the left is standard gauge. The narrow gauge south leg is visible just behind the person standing on the rail. |
| Wallangarra | 1988 | A close up of view of the water column on the NSW Railway side of the station. |
| Wallangarra | 1988 | A view showing the Queensland Railway bull-nose awning as against the NSW Railways flat-style awning. In the background is Queensland locomotive 1503. |
| Wallangarra | 1996 | The view of the New South Wales platform at Wallangarra, viewed from the NSW end. |
| Wallangarra | 1996 | The view of the Queensland platform at Wallangarra, viewed from the NSW end. QR was still running trains to Wallangarra at this time. |
| Wallarobba | 1982 | The view looking back up the line in the direction of Sydney. |
| Wallarobba | 1982 | A closer view of the up end of the station, including the name board. |
| Wallarobba | 1982 | The mens toilets, at the up end of the station. |
| Wallarobba | 1982 | The view looking north along the station. |
| Wallendbeen | 2001 | The view of Wallendbeen station looking in the up direction (towards Sydney). |
| Wallendbeen | 2001 | The view looking south, showing the nearby silos. |
| Wallendbeen | 2002 | Looking across to the up platform. |
| Wallendbeen | 2002 | The view along the platform looking towards Sydney. |
| Wallendbeen | 2002 | A close-up of the station building on the up platform. |
| Wallendbeen | 2002 | The fireplace still remains within the waiting room. |
| Wallendbeen | 2002 | The waiting room also has the ticket window and noticeboard. |
| Wallendbeen | 2002 | The view looking along the up platform towards Albury. |
| Wallendbeen | 2002 | The station name board. |
| Wallerawang | 1996 | 5910 has just been given the go-ahead to depart the station on a tour to Clandulla. |
| Wallerawang | 2002 | The now abandoned Wallerawang West Signal Box. |
| Wallerawang | 2002 | The 50-lever frame is still present inside the Wallerawang West box, although everything else (including the connections) have been removed. |
| Wallerawang | 2002 | The junction at Wallerawang West. The Main West in on the left, while the line on the right is the branch line to Mudgee and eventually Gwabegar. |
| Wallerawang | 2002 | The goods shed between Wallerawang Station and the West Signal Box. |
| Wallerawang | 2004 | The view looking west towards the old Wallerawang West signal box and the junction of the line to Gwabegar. The siding is now used for per-way storage. The area to the right of the main line was once the site of extensive loco service facilities include ash and inspection pits, a water tank, coal stage and a 60' turntable. |
| Wallerawang | 2004 | The water tank and water column at the eastern end of the station. |
| Wallerawang | 2004 | The road-side view of the station building. |
| Wallerawang | 2004 | The view looking west along the former up platform. |
| Wallerawang | 2004 | The station signboard on the side of the station building. |
| Wallerawang | 2004 | The view looking along the platforms in the direction of Sydney. The former Wallerawang East Signal Box is visible on the down platform. |
| Wallerawang | 2004 | The view looking down over the location of the one-time down yard. |
| Wallsend | 2003 | The location of the one-time Wallsend Station near the end of the branch. Note the Terminus Hotel in the background. |
| Wallsend | 2003 | Replicas of the gates which once guarded the crossing of Nelson Street. The track continued on a short distance further to Wallsend Colliery. |
| Walmer | 2004 | Only a water-tank remains of the one-time station. Behind the silo is the goods loading platform. |
| Walsh Point | 2001 | The view looking up the Master Siding towards Kooragang Island. |
| Walsh Point | 2001 | The view looking down the master siding towards the dead end. The silo in the distance is the Australian Cement Works. |
| Walsh Point | 2001 | The view looking up the siding into the Australian Cement Siding. |
| Walsh Point | 2001 | The Eastern Nitrogen Sidings on the eastern side of Walsh POint. |
| Walsh Point | 2001 | The view looking towards the end of the line along Rotten Row, used to store derelict wagons. |
| Wambidgee | 2003 | Only the eroding remains of the loading bank mark the location of the one time station at Wambidgee in a view looking towards Gundagai. |
| Wangi Power Station | 2003 | Wangi Power Station. |
| Warabrook | 2003 | The view looking west towards Warabrook, where the coal roads dive under the main lines. Hanbury Junction signal box is visible in the middle distance. |
| Warialda | 1999 | The unusual sign-board, in front of the silos, indicates the location of Warialda Station. |
| Warialda | 2004 | The view looking towards Inverell. |
| Warialda | 2004 | Warialda station boasts a modern shelter, but is almost buried in the grass. |
| Warren | 2002 | The triangular turning siding at Warren, with a silo adjacent to the arm of the triangle furthest from the station. It is unclear if this silo is in use. |
| Warren | 2002 | The view from the platform looking back towards Nevertire. The line branching off the the far right is one leg of the turning triangle. The one-time goods shed was just beyond the crane. |
| Warren | 2002 | The view of the platform and yard, looking towards the end of the line. The line on the far left is a leg of the turning triangle. |
| Warren | 2002 | The overgrown concrete platform still remains. |
| Warren | 2002 | Remains of structures in the yard, including the base of the jib crane, a loading bank and water column. |
| Warren | 2002 | The sign on the door of the safeworking hut. |
| Warren | 2002 | The stop block at the end of the short branch line to Warren. |
| Warren | 2002 | This is the bridge where the Warren line crosses a creek about 5km from Warren, looking towards Nevertire. |
| Warrimoo | 2004 | The view looking along the down platform. |
| Warrimoo | 2004 | The view looking along the up platform, in the direciton of Katoomba. |
| Warwick Farm Junction | 1983 | The one-time Warwick Farm Junction Signal Box. This sat on the down side of the line, just before the down-side facing junction. |
| Warwick Farm Junction | 1985 | This unusual lever was released by a key held at Cabramatta Jct Box. This duplex lock lever was released by a key held at Cabramatta Jct Signal Box and the lever's purpose was to engage or shut down a switch to the overhead lines giving the trains power to travel the Racecourse Branch. |
| Warwick Farm Junction | 1985 | 1985 still saw mid week race trains to Warwick farm Racecourse. Here is a race train coming from the Racecourse Branch onto the up line to head to Sydney Central. |
| Warwick Farm Junction | 1983 | This tiny Box was only open on race days serving the branch to the racecourse. |
| Warwick Farm Racecourse | 1980 | The Warwick Farm Racecourse Signal Box sat opposite the up end of the the platform. The tracks from left to right are the dead-end Car Siding, the crossover from the Run Around Siding and the Platform Road. |
| Warwick Farm Racecourse | 1978 | The signals protecting the Hume Highway level crossing, in this view looking towards the racecourse.. In the foreground is the Down Home and in the background is the Up Starting signal. Both signal were controlled from the Racecourse Box. |
| Warwick Farm Racecourse | 1986 | A mid-week Warwick Farm single deck racetrain approaches the grassy platform in 1986. The Signal Box only used on race days and contained 20 levers. Lever 17 had the key for Frame B which controlled the points for the horse dock siding. |
| Warwick Farm Racecourse | 2001 | The double length platform at the end of the line, facing back towards the junction. |
| Warwick Farm Racecourse | 1986 | 1986 sees a double deck suburban on the Racecourse mid week special. |
| Warwick Farm Racecourse | 1984 | The Warwick Farm Racecourse line crossed the Hume Highway and it was the somewhat dangerous job of flagmen to try and stop the traffic. The signal behind the train pulled "off" was controlled from lever 3 in the Junction Box. |
| Warwick Farm Racecourse | 1984 | 1984 sees a single deck train for the mid week gamblers. The racecourse did not run too many races in the week through a year. |
| Warwick Farm Racecourse | 1984 | A mid week gambler special returns from Warwick Farm Racecourse along the branch to head to Sydney. |
| Warwick Farm Racecourse | 1984 | 1984 sees the single deck train at Warwick Farm Racecourse discharging passengers for an afternoon of betting. |
| Waterfall | 2001 | The signaller's control desk at Waterfall. |
| Waterfall Tunnel | 1914 | A copy of a photograph showing the tunnel being opened out. |
| Waterfall Tunnel | 2003 | The view looking south to the cutting which was the former tunnel. |
| Wattamondara | 2002 | The platform road has been lifted, but the short platform still sports a nameboard. |
| Wattamondara | 2002 | The view looking south, showing the loading bank and silos. |
| Wattamondara | 2002 | The view looking south. The short platform on the right served a small goods shed. |
| Wattamondara | 2004 | The view looking southwards. |
| Wattamondara | 2004 | A close-up of the goods platform, looking south. |
| Wauchope | 2002 | The view looking north from the Oxley Highway crossing. The stationis visible on the right in the distance. Just before it is the disused No 3 Timber Siding. On the far left is the goods siding, while in the centre are the transit (obscured) and loop sidings. In the distance are some wagons at the cement silo. |
| Wauchope | 2002 | Another view looking north towards the yard. |
| Waugoola | 2004 | The remains of a cattle loader at the down (west) end of the yard. |
| Waugoola | 2004 | The decaying remains of the platform, looking east towards Blayney. |
| Wave Hill | 2003 | The somewhat oddly-maintained platform at Wave Hill. |
| Wee Waa | 2004 | The view of the station building, looking in the direction of Narrabri. |
| Wee Waa | 2004 | The heavy duty crane in the yard. The line to Narrabri disappears in the left background. |
| Wee Waa | 1990 | A photograph of the station when it was still manned. |
| Wee Waa | 1975 | A view of the one-time goods shed, looking in the direction of Walgett. The shed is now gone, but the crane remains. |
| Wee Waa | 1975 | The jib crane at the down end of the goods shed platform. |
| Wee Waa | 1975 | The water tank that was located at the up end of the yard. The weighbridge cabin is visible on the far right. |
| Wee Waa | 1975 | The view looking up the line past the elevated water tank. |
| Weemelah | 2004 | The grain loading facilities, looking south. |
| Weemelah | 2004 | The goods loading bank is still present, although the gods siding has been lifted. The remaining tracks are the loop and main line. Note the bulk grain stored under the green tarpaulins in the right background. |
| Weemelah | 2004 | The view looking south showing all the remaining infrastructure: gantry crane, loading bank, grain stores, passenger platform and water tank. |
| Weemelah | 2004 | A stop block marks the current end of the line. |
| Weemelah | 2004 | The station of the track in the now-closed section beyond Weemelah. It has been 30 years since trains last ran here. |
| Weeraman | 2002 | The rotting goods loading bank (left) and passenger platform (right) in this view looking back towards Craboon. |
| Weeraman | 2002 | The short passenger platform is now dominated by a large tree, in the view looking towards Coolah. |
| Weeraman | 2004 | The station signboard now adorns a nearby property. |
| Weethalle | 2003 | A view of the goods bank opposite the station. |
| Weja | 2002 | The view looking towards Temora from the base of the silo. The running line is right of the photo. |
| Wellington | 2001 | The non-rail side of the station building. |
| Wellington | 2001 | The view along the platform shows the modern Countrylink signage. |
| Wellington | 2001 | The platform sign and footbridge. |
| Wellington | 2002 | The view of the yard looking up the line towards Sydney shows goods bank and silos as well as an unusual crane (the pyramidal structure in the distance). |
| Wellington | 2002 | The view of the platform looking towards Dubbo. Note the original and modern signage on the up end of the platform. |
| Wellington | 1982 | A down goods train headed by a 44-class enters the yard. On the right are the goods shed and loading back. |
| Wellington | 1982 | A view of the 6 lever A frame with yard diagram. |
| Wellington | 1982 | A goods service has stopped for the exchange of safeworking tokens. |
| Wellington | 1982 | A closer view of the yard diagram next to the A frame. |
| Wellington | 1982 | The view looking north from the footbridge. |
| Wellington | 1982 | The view looking south as an Up Wheat train passes through the yard. The former locomotive servicing facilities were located in the grassy area opposite the goods shed. |
| Wellington | 1982 | A view looking up the line towards the goods shed, loading bank and silos. |
| Wellington | 1982 | The view looking south as an up wheat train clears the station. |
| Wellington | 2003 | The road-side view of the station. |
| Wellington | 2003 | A more modern view of the yard. |
| Wentworth Falls | 2004 | The view looking east along platform 1. |
| Wentworthville | 2004 | The view looking towards Sydney from the footbridge. |
| Wentworthville | 2004 | The view looking west. |
| Wereboldera | 1999 | A closer view of the points levers at the north end of the siding. |
| Werrington | 2004 | The view looking west along platform 1. |
| Werrington | 2004 | The view looking across to platform 2, in the direction of Sydney. |
| Werris Creek | 1996 | The view of the station building from the footbridge to the north. The Main North is in the centre, the branch to Mungindi is behind the station buildings. |
| Werris Creek | 1996 | The station from the south. The train in the platform is on a tour. |
| Werris Creek | 2001 | The impressive two-storey station building. |
| Werris Creek | 1996 | The signal diagram at the station. |
| Werris Creek | 2004 | A view of the lever frame and diagram inside the signal box. |
| Werris Creek | 1988 | The metal signwork at the entrance to Werris Creek Loco. |
| West Ryde | 1979 | West Ryde Signal box on the south end of the down platform. Behind and below the box is the Victoria Road underbridge. |
| West Ryde | 2004 | The view looking north along the station. |
| West Ryde | 2004 | The view looking south along platform 1. |
| West Tamworth | 2002 | The short and well maintained staff station at West Tamworth. |
| West Tamworth | 2002 | Another close-up of the station. |
| West Tamworth | 2004 | Disused grain wagons are now stored on the branch line at West Tamworth. |
| West Tamworth | 2004 | The junction of the Main North and Barraba branch lines. |
| West Tamworth | 2004 | The inside the signal box at West Tamworth. |
| West Tamworth | 2004 | The oil terminal at West Tamworth. |
| West Tamworth | 2004 | The view along the platform. The station is now an office for track work. |
| West Tamworth | 2004 | The disused silo which now only sees obsolete grain wagons. |
| West Tamworth | 1963 | An aerial view of the station area from 1963. |
| West Tamworth | 2004 | 3810 performing tourist train duties. |
| West Tamworth | 2004 | Preserved loco 4918 heads a tourist train. |
| West Wyalong | 1981 | The name board and 2-arm semaphore signal. |
| West Wyalong | 1991 | 4809, 4823 and 4846 haul an up wheat train through West Wyalong. |
| Westby | 2000 | The relatively well-preserved station building. |
| Westdale | 2002 | The silo which is the only reason for the line still being opened at all. This is the view looking towards Tamworth. |
| Westdale | 2002 | The stopboard which marks the current end of the line. |
| Westmead | 2004 | The view looking towards Sydney along platforms 1 and 2. |
| Westmead | 2004 | The view looking towards Sydney along platforms 3 and 4. |
| Weston | 2001 | The signal box about 100m to the east of Weston Station. This controlled the branch to Pelaw Main and the sidings to nearby Hebburn No 1 Colliery. Just visible in the grass is the remains of the line which branched off to Pelaw Main and the Richmond Vale Railway system. |
| Weston | 2003 | The signal box has been destroyed by fire. |
| Weston | 2003 | The steps up to the now burnt out box. |
| Weston | 2003 | The disconnected rodding and debris from the fire. |
| Weston | 2001 | The interior of the signal box is mostly gutted, although the 34 arm lever frame is still present. |
| Weston | 2004 | Another view of the lever frame. |
| Weston | 2004 | The view looking up the line at the station. The truncated line is the former Up Main, with the Down Main on the right. |
| Weston | 2001 | The view from the footbridge off Weston Station platform, looking towards Maitland. |
| Weston | 2004 | Another view looking up the line. The puddle on the left marks the location of a recently-demolished shed. |
| Weston | 2001 | At the down end of the platform are a large elevated water tank and counterbalanced water column. A second water column is visible in the left distance. |
| Weston | 2003 | The view along Weston platform, looking towards Cessnock. |
| Weston | 2001 | The view underneath the lever frame reveals that all has been disconnected. |
| Weston | 2003 | The approach to Weston signal box, looking towards Maitland. |
| Whitburn Colliery | 2004 | This is the thick scrub bordering the area around Anvil Creek where the colliery line crossed. No trace remains of the rail line that once traversed this creek. |
| Whitburn Colliery | 2004 | All that remains at Whitburn Colliery itself. |
| Whitburn Colliery | 2004 | The view from the site of Whitburn Colliery across to the colliery office, now used as Greta Workers Club. |
| Whitburn Colliery | 2004 | More remains of the colliery looking through the scrub to where the colliery stood. No track remnants could be located. |
| Whitburn Colliery | 2004 | Remains from Whitburn Colliery on the small hill adjacent to Anvil Creek. |
| Whitburn Colliery | 2004 | The remains of the air chimney and the fan house at Whitburn Colliery. |
| Whitebridge | 2002 | The approach from the north to Whitebridge station. The station location was just beyond the Gangers Shed on the left hand side. |
| Whitebridge | 2002 | All that remains of Whitebridge is the station sign. |
| Whitton | 1996 | The abandoned platform at Whitton is dominated by the old water tank. |
| Wickham | 2004 | A night shot of the level crossing at the Newcastle end of the station. |
| Wickham | 2004 | Wickham Signal Box. |
| Wickham | 2004 | Another view of Wickham signal box. |
| Widgiewa | 2000 | The concrete-slab platform and signal hut are in relatively good condition. |
| Widgiewa | 2000 | A view looking south along the platform. No trace remains of the one-time sidings apart from the lever frames. |
| Widgiewa | 2000 | A view looking north towards the station. |
| Willbriggie | 1997 | 4862 and 4880 have arrived to pick up some wheat wagons from the siding. |
| Willbriggie | 2000 | The platform and safeworking hut at Wilbriggie. In the foreground is a disconnected lever frame. In the distance in the goods platform and some silos. |
| Willbriggie | 2000 | In recent times, rotting wooden sleepers have been replaced with steel versions. |
| Willigam | 1980 | The passenger platform (left) and loading bank (right) are still visible in this 1980 photograph of the area. This view is looking back towards Roslyn. |
| Willigam | 2001 | View looking at the two platforms back towards Roslyn. |
| Willigam | 2001 | The view of the concrete platform looking back towards Roslyn. |
| Willow Tree | 2000 | Willow Tree still sees regular passenger services. |
| Willow Tree | 2001 | A side-on view of the platform and station. |
| Willow Tree | 1990 | A view of the station with three modified 45 classes doing bank enging work. |
| Willow Tree | 1998 | The view looking towards Newcastle, the 80 class bankers await the arrival of the Northern Tablelands Xplorer. |
| Wimbledon | 1981 | An up wheat train passing through Wimbledon station in December 1981. The Loop and Goods Siding are at right, with the railway residence visible in background. |
| Wimbledon | 2004 | The goods loading bank, no longer served by track. The one-time station was directly opposite. |
| Windowie | 1999 | The platform and water tank, at Windowie. Just visible at the left end of the platform at the supports for the one-time station name. |
| Windsor | 2002 | The view along the curved platform at Windsor, looking back towards Sydney. |
| Windsor | 1984 | Windsor's Signal Box diagram in 1984. |
| Wingello | 2004 | The view looking down the line between the two platforms. |
| Wingello | 2004 | The view from the down end of the station as 8156 leads a freight train heading north. |
| Wingello | 2004 | The shelter on the down platform. |
| Wingello | 2004 | The booking office entrance with a sign showing the station is 677.6m above sea level. |
| Wingello | 2004 | The older-style nameboard on the down platform. |
| Wingello | 2004 | A pair of semaphore signals are still present at the up end of the station. |
| Wingello | 2004 | The waiting room still contains the remains of the old fireplace. |
| Wingello | 2004 | The view from the up end of the station. Note the semaphore is displaying its "stop" aspect, as a freight train has just passed through. |
| Wingello | 1980 | The diagram in Wingello box. |
| Wingello | 1980 | A 1980 picture showing the interior of Wingello Signal Box showing the block instruments. |
| Wingello | 1980 | Wingello station on a spring Sunday afternoon in 1980. |
| Wingen | 1979 | The automatic staff exchanger has been set up ready for the approaching south-bound train. |
| Wingen | 1967 | 5242 heads No 239 Goods on its way north. The station can be seen in the distance onthe right hand side of the line. |
| Wingen | 1967 | 5242 has paused as Wingen before continuing north with No 239 Goods. |
| Wingen | 1977 | The view looking south along the station with a DEB set visible in the distance. |
| Wingen | 1977 | DEB set with 909 leading has stopped briefly before heading north. |
| Wingen | 1977 | Wingen Signal box, on the down side of the line. |
| Wingham | 2004 | A Sydney-bound XPT approaches the station. |
| Wingham | 2004 | A southbound empty freight train passing through the station. |
| Wingham | 2004 | The view looking down along the platform. |
| Wingham | 2004 | The view looking up along the platform. The siding on the far left is the former goods/stock siding. |
| Wiragulla | 2004 | The short modern platform at Wirragulla. |
| Wiragulla | 2004 | Wirragulla platform, looking back towards Maitland. |
| Wirega | 2004 | The level Crossing at Monteagle Rd, 434.020 kms. The view is looking towards Grenfell. |
| Wirega | 2004 | The view of the silos, looking back towards Greenethorpe. |
| Wirega | 2004 | A close-up view of the "B" lever arm. |
| Wirega | 2004 | The view looking towards Greenethorpe at the up end of the loop siding. |
| Wollar Gap Tunnel | 1992 | Looking through Wollar Gap Tunnel from the east, with an up train approaching. |
| Wolli Creek | 1981 | The view looking towards the city and Wolli Creek junction, from the Down Illawarra Local line. |
| Wolli Creek | 1981 | The interior of Wolli Creek signal box, showing the levers and track diagram. |
| Wolli Creek | 1985 | Wolli Creek Junction Signal Box served the junction of the Illawarra and East Hills lines, and now the Airport Line. This contained pistol grip controls. |
| Wolli Creek | 1986 | The diagram in Wolli Creek Junction Signal Box showing the line to East Hills running behind the Box. |
| Wollongong | 1977 | A couple of passengers check out the interior of CPH32 in the down dock. |
| Wollongong | 1977 | A CPH railcar sits on the down dock on the left, while a southbound train of Budd cars allows passengers to disembark. |
| Wollongong | 2000 | The large signal control room at Wollongong. |
| Wombiana | 2002 | Westbound XPT travelling west between Blayney and Orange, having just passed through the location of Wombiana platform. |
| Wondabyne | 1968 | A north-bound goods train headed by a 46-class loco is passing along Mullet Creek before approaching Wondabyne. |
| Wongawilli Colliery | 1996 | Ex-FreightRail locomotives 101 and 102 approaching the colliery to pick up some loaded coal wagons. |
| Wongawilli Colliery | 1996 | Ex-Goldsworthy loco D49 (now withdrawn from service) begins the descent towards the main line with a loaded coal train. |
| Wongawilli Colliery Junction | 2004 | A view of the junction looking south. The line to the right curves and climbs up to the coal loader at Wongawilli. |
| Woodford | 1919 | A photo of a photo held at National Trust's (NSW) Woodford Academy. It shows Woodford Station and the signal box which was removed in the late 1950's. The photo has been estimated to have been taken circa 1919, dated from the people and the items in the photo. The original single line cutting dating back to 1867 and by passed by 1896 can be seen slightly above and to the right of the D on the Woodford sign on the platform. The original highway can also be seen behind this sign which now forms the lower carpark at Woodford Station. At least 2 station staff can also be seen in this photo. |
| Woodford | 2003 | An early morning sunrise shows the station still illuminated by strings of lights. |
| Woodford | 2004 | The view of platform 1 and the Up Main looking up from the old highway, now a commuter carpark. The small building is the Lamp Room, located at the Sydney end of platform. |
| Woodford | 2004 | The view looking along platform 2 towards Sydney. |
| Woodford | 1980 | 8506/7/8 head an up coal train near the Woodford Bends. |
| Woodhouselee | 2001 | The location of Woodhouselee station. The overgrown main line is still present. The station was located under the large tree. |
| Woodhouselee | 2001 | The B lever frame and bracket lock, at the down end of the loop. |
| Woodhouselee | 2001 | The remains of the platform shelter, now collapsed and overgrown. |
| Woodhouselee | 2001 | More remains at the platform location. |
| Woodlawn College | 2003 | A view of the location of the one-time Woodlawn College platform. |
| Woodlawn College | 2003 | One of the many wooden trestle bridges on the line, particularly between Woodlawn and Lismore, each imposing a severe speed restriction. This bridge, near the former platform at Woodlawn College, is about to be crossed by 4908 and 4918 pulling a tour train. |
| Woodstock | 2001 | The view of the well-maintained station, looking south towards Cowra. |
| Woodstock | 2002 | A tour train approaches Woodstock platform from Cowra. |
| Woodstock | 2000 | The view looking north towars the silo siding. The station is located behind the silo. |
| Woodville Junction | 2003 | Woodville Junction signal box, hidden under the Donald Street Bridge at Hamilton. The actual junction is about 300-400 metres to the right of the signal box. |
| Woodville Junction | 2003 | Woodville Junction signal box, hidden under the Donald Street Bridge at Hamilton. The actual junction is about 300-400 metres to the right of the signal box. |
| Woodville Junction | 1986 | Woodville Junction Box, located underneath Donald Street overpass. |
| Woodville Junction | 1986 | Woodville Junction Box, located underneath Donald Street overpass. |
| Woodville Junction | 1986 | The diagram inside Woodville Junction Box. |
| Woodville Junction | 1986 | The diagram inside Woodville Junction Box. |
| Woy Woy Tunnel | 2003 | The view looking through Woy Woy tunnel from the Sydney end. The tunnel is straight, however there is an average grade of 1 in 150 downhill to the Woy Woy end. |
| Wubbera | 2004 | The location of the one-time station. No trace remains. |
| Wubbera | 2004 | Just before the station the line crosses a small bridge. The tightness of the curve has necessitated the use of check rails to prevent derailments. |
| Wyalong | 1977 | Diesel railcar 603 has paused at Wyalong Central. |
| Wyalong | 1981 | The view looking along the platform towards Lake Cargelligo. |
| Wyalong | 1981 | Another view looking along the platform. |
| Wyalong | 1981 | The outside lever frame and signal diagram. |
| Wyalong | 1991 | 4809/4823/4846 have paused for safeworking duties. Note that the lever frame is still in position. |
| Wyalong | 1991 | 4809 at the head of an up train that has stopped for safeworking. The building on the right is the goods shed. |
| Wyalong | 1991 | The rear of the safeworking hut after the demolition of the station. The lever frame is still in use. |
| Wyalong | 2003 | The water tank and column still remain at the eastern end. |
| Wyalong | 2003 | All that is left of the station is a small platform with a safeworking hut. |
| Wyalong | 2004 | The small platform and staff hut at Wyalong. The original station was on the Sydney side of the silos at the left of the picture. |
| Wyalong | 2004 | The office area of the former Freight Centre. When the station was demolished, this became the Station Master's office, Booking Office and Accounts office for the Freight Centre. |
| Wyalong | 2004 | A closer view of the current facilities. |
| Wyalong | 2004 | The disused weighbridge in the old goods yard. |
| Wyalong | 2001 | A view of the grain loop, looking towards Sydney. |
| Wyalong Junction | 1997 | The Burcher branch junction, with the line to Burcher veering off to the right. |
| Wyanga | 1986 | The platform and signboard are still present at Wyanga. |
| Wyee | 2003 | The loader adjacent to the Cement Siding. |
| Wyee | 2003 | A view of the cement siding at the northern end of the station. |
| Wyee | 2003 | The view looking south along the station from the footbridge. |
| Wyee | 2003 | Another view of the cement siding. |
| Wyee | 2003 | Down side of Wyee Station looking towards Sydney. |
| Wyong | 2004 | The view looking south towards Sydney. |
| Wyong | 2004 | The view looking south along platform 1. |
| Wyong | 2004 | The view looking north towards Newcastle. |
| Wyong | 2004 | The view looking north from the road bridge just to the north of the station. Visible on the right is the loadng platform on the former stock siding. |
| Wyong | 2004 | The view looking north as a southbound service approaches the station. |
| Wyuna Downs | 2004 | The level-crossing warning sign, faded by temperatures reaching over 50C, near Wyuna Downs. |
| Wyuna Downs | 2004 | The level-crossing sign, warning of trains long after the last one went by. |
| Yagobie | 1973 | Fred Hood stands on the wooden-faced platform, still sporting its name board. |
| Yanco | 2000 | This lever frame once controlled the yard and junction at Yanco. It is no longer in use. At the far left are a Train Order signal and the platform. |
| Yanco | 2000 | The short platform and safeworking hut at Yanco. |
| Yanderra | 2001 | The site of the one-time station at Yanderra, looking in an up direction. It consisted of a pair of outside platforms located on the transition between the two curves. |
| Yanderra | 1980 | Yanderra station site in 1980 still shows the loading dock looking south. |
| Yarra | 1980 | The location of the one-time station of Yarra, looking in the down direction. |
| Yarraford | 2001 | The railway bridge over Beardy Waters at Yarraford (694.452km). This bridge was constructed in 1886. |
| Yass Junction | 2004 | The modern station name board, on the up platform. |
| Yass Junction | 2004 | The well-maintained gardens at the up end of the main platform. The signal box is visible at the end of the platform. |
| Yass Junction | 2004 | The view from the overhead footbridge looking south towards platform 1. |
| Yass Junction | 2004 | The view from the overhead footbridge looking south towards platform 2. |
| Yass Junction | 2004 | The road-side entrance to the station, which crosses the former branch line tracks. |
| Yass Junction | 2004 | The view looking south along the back of platform 2. |
| Yass Junction | 2004 | The interior of the ticket office on platform 2. This is currently leased by the ARHS, ACT division. |
| Yass Junction | 2004 | The view looking north along platform 2. |
| Yass Junction | 2004 | The view from the end of the truncated branch line looking back towards the station, visible in the distance. |
| Yass Junction | 2004 | The view of the actual junction, with the former branch track disappearing into the grass. |
| Yass Junction | 1998 | The impressive station and footbridge at Yass Junction. |
| Yass Junction | 1999 | A different view of Yass Junction, taken from the inside of a train. |
| Yass Junction | 2004 | The view looking towards the junction along the back of platform 2. |
| Yass Junction | 1998 | The elevated signal box at the up end of Yass Junction station. The line in the foreground is the one-time branch to Yass Town. |
| Yass Junction | 2004 | The stop-block along the tramway, where the track crosses a road. |
| Yass Junction | 1980 | Yass Junction block instruments for the up and down lines to Bowning. |
| Yass Junction | 1980 | Yass Junction Signal Box in happier times showing the signal from the Yass Tramway to the goods siding which was pulled by lever 12. |
| Yass Junction | 1980 | The diagram for Yass Junction, the line to Yass Town can be seen at the lower left. |
| Yass Junction | 1980 | The levers show how the line to Yass Town was called a Tramway (no's 9 & 12). |
| Yass Junction | 1980 | Old NSWGR English is shown on the Yass Junction sign in 1980 with the word "alight". |
| Yass Junction | 1980 | The Staff and Ticket box for the Yass Town branch at Yass Junction. |
| Yass Town | 2000 | The station name board from the nearby Yass Junction station has been moved down to the museum. |
| Yass Town | 2000 | The track for this branch ran for part of its distance next to the road. Unusually for this situation, the track has been preserved. |
| Yass Town | 2000 | Another view of the track, now running within the limits of Dutton Street. |
| Yass Town | 2004 | Restored steam locomotive 1307 sits in the yard at Yass. |
| Yass Town | 2004 | The view of the yard looking away from the end of the line. The loading bank and goods shed are on the left, with the station on the right. |
| Yass Town | 2004 | A close-up of loco 1307 sitting on the main line. |
| Yass Town | 2004 | Another view of loco 1307. |
| Yass Town | 2004 | A couple of wagons sit adjacent to the goods platform. |
| Yass Town | 2004 | The view of the station taken from the goods platform. |
| Yass Town | 2000 | Architects plans for the station building are on display inside the museum. |
| Yass Town | 2000 | The impressive girdered rail bridge over the Yass river. |
| Yass Town | 2000 | The road-side view of Yass Station (and Railway Museum). |
| Yass Town | 2000 | The beautifully restored station building with various artifacts out on display. |
| Yass Town | 2000 | Steam locomotive 1307 sits at the platform outside the museum. |
| Yass Town | 2000 | Preserved X200 class rail tractor X203 is sitting in the yard with a pair of S class wagons. |
| Yass Town | 2004 | The entrance to Yass yard, now a museum. |
| Yass Town | 1998 | The back of the station building at Yass,. |
| Yass Town | 1980 | Prior to formal closure and well before preservation, a white and bright Yass Town Station sits forlorn and empty in 1980. |
| Yass Town | 1980 | Looking along Dutton St. from the start of the Yass Town yard in 1980. Many a short train rumbled along here. |
| Yass Town | 1980 | Yass Town station and yard stands empty in 1980. |
| Yennora | 1985 | The Yennora B lever frame, located on the south leg of the triangle leading to the Wool Sidings. This leg was very rarely used. |
| Yeoval | 2003 | The original Grain Corp silos, before extension. |
| Yeoval | 2003 | Additions made to the silos to increase capacity from 2,450 tonnes to 6,700 tonnes. |
| Yeoval | 2003 | Yeoval concrete silos, now served by road traffic only. |
| Yeoval | 2004 | The jib crane in the yard has some unusual bracing. |
| Yeoval | 2004 | The view looking down the line through the yard. The platform on the left is the goods platform. The mound on the right is the remains of the main platform. |
| Yeoval | 2004 | The view looking back up the line, showing the remains of the passenger and goods platforms. |
| Yeoval | 2002 | The view looking north towards the yard. The former station is located in the right distance. |
| Yerong Creek | 1980 | A relative well worked crossing loop on the single line of the main south was Yerong Creek shown here with a signal box in need of attention in 1980. This is the view looking south towards Albury. |
| Yerong Creek | 2001 | The low passenger platform sports a Countrylink-style nameboard and a small tin shed. |
| Yerong Creek | 2001 | The loading bank is still extant. |
| Yerong Creek | 2001 | The grain silos are still used by Graincorp. |
| Yerong Creek | 2003 | The view looking along the silo siding. |
| Yerrinbool | 2001 | Yerrinbool station, looking in the direction of Melbourne. |
| Yerrinbool | 2004 | The view looking south from the down end of the station. The disconnected lever frame and semaphore signals are relics of an earlier era. The "4" sign indicates the stopping location for a 4-car railset. |
| Yerrinbool | 1990 | A view of the signal box on the up platform. |
| Yerrinbool | 1990 | The front of the small signal box located on the up platform. |
| Yerrinbool | 1990 | The former short Up Refuge siding at the southern end of the station. |
| Yerrinbool | 1980 | Yerrinbool track diagram in 1980. |
| Yerrinbool | 1980 | Yerrinbool train locator board where the lights glow showing train progress, 1980. |
| Yethera | 2001 | The view looking towards Bogan Gate, with the main line at the right. The remains of the loading bank is visible on the left, with the former station located on the far right. |
| Yiddah | 2004 | A view of the silos at Yiddah. |
| Young | 2000 | The impressive architecture of the station building at Young. |
| Young | 2000 | The view along the platform. |
| Young | 2000 | Another view of the non-platform side of the station. |
| Young | 2002 | 4401 and 4908, at the head of a tour train, stand at the platform at Young. |
| Young | 2002 | The view towards the grain silos, looking towards Blayney. |
| Young | 2004 | The view looking north towards the grain silos. |
| Young | 2004 | Another view looking north of the overgrown yard. |
| Young | 2004 | The view looking south through the yard towards the station. |
| Young | 2004 | The view looking south along the platform. |
| Yuluma | 1998 | Yuluma was most recently a silo location. This view shows the approach to the silo from the north. |
| Yuluma | 1998 | This view shows the approach to the silo from the north. |
| Yumbunga | 1981 | 4836 heads south with a load of empty open wagons through the one-time crossing loop at Yumbunga. |
| Zig Zag | 2003 | The short Platform 1 at Zig Zag, looking towards Sydney. |
| Zig Zag | 1968 | The view looking south-west towards the Zig-Zag. The Top Road viaduct is visible in the distance, behind the cuttings for the Middle Road. At the bottom is the main line. |
| Zig Zag | 1980 | All three roads of the Zig Zag can be seen here. The smoke is from a train emerging from the tunnel on the middle road. |
| Zig Zag No 1 Tunnel | 2004 | The down portal of Zig Zag No 1 Tunnel. |
| Zig Zag No 10 Tunnel | 2004 | The down portal of Zig Zag No 10 Tunnel. |
| Zig Zag No 2 Tunnel | 2004 | The down portal of Zig Zag No 2 Tunnel. |
| Zig Zag No 3 Tunnel | 2004 | The down portal of Zig Zag No 3 Tunnel. |
| Zig Zag No 4 Tunnel | 2004 | The down portal of Zig Zag No 4 Tunnel. |
| Zig Zag No 5 Tunnel | 2004 | The down portal of Zig Zag No 5 Tunnel. Visible in the distance are Nos 4 and 3Tunnels. |
| Zig Zag No 6 Tunnel | 2004 | The down portal of Zig Zag No 6 Tunnel. |
| Zig Zag No 7 Tunnel | 2004 | The down portal of Zig Zag No 7 Tunnel. |
| Zig Zag No 8 Tunnel | 2004 | The down portal of Zig Zag No 8 Tunnel. |
| Zig Zag No 9 Tunnel | 2004 | The down portal of Zig Zag No 9 Tunnel. |
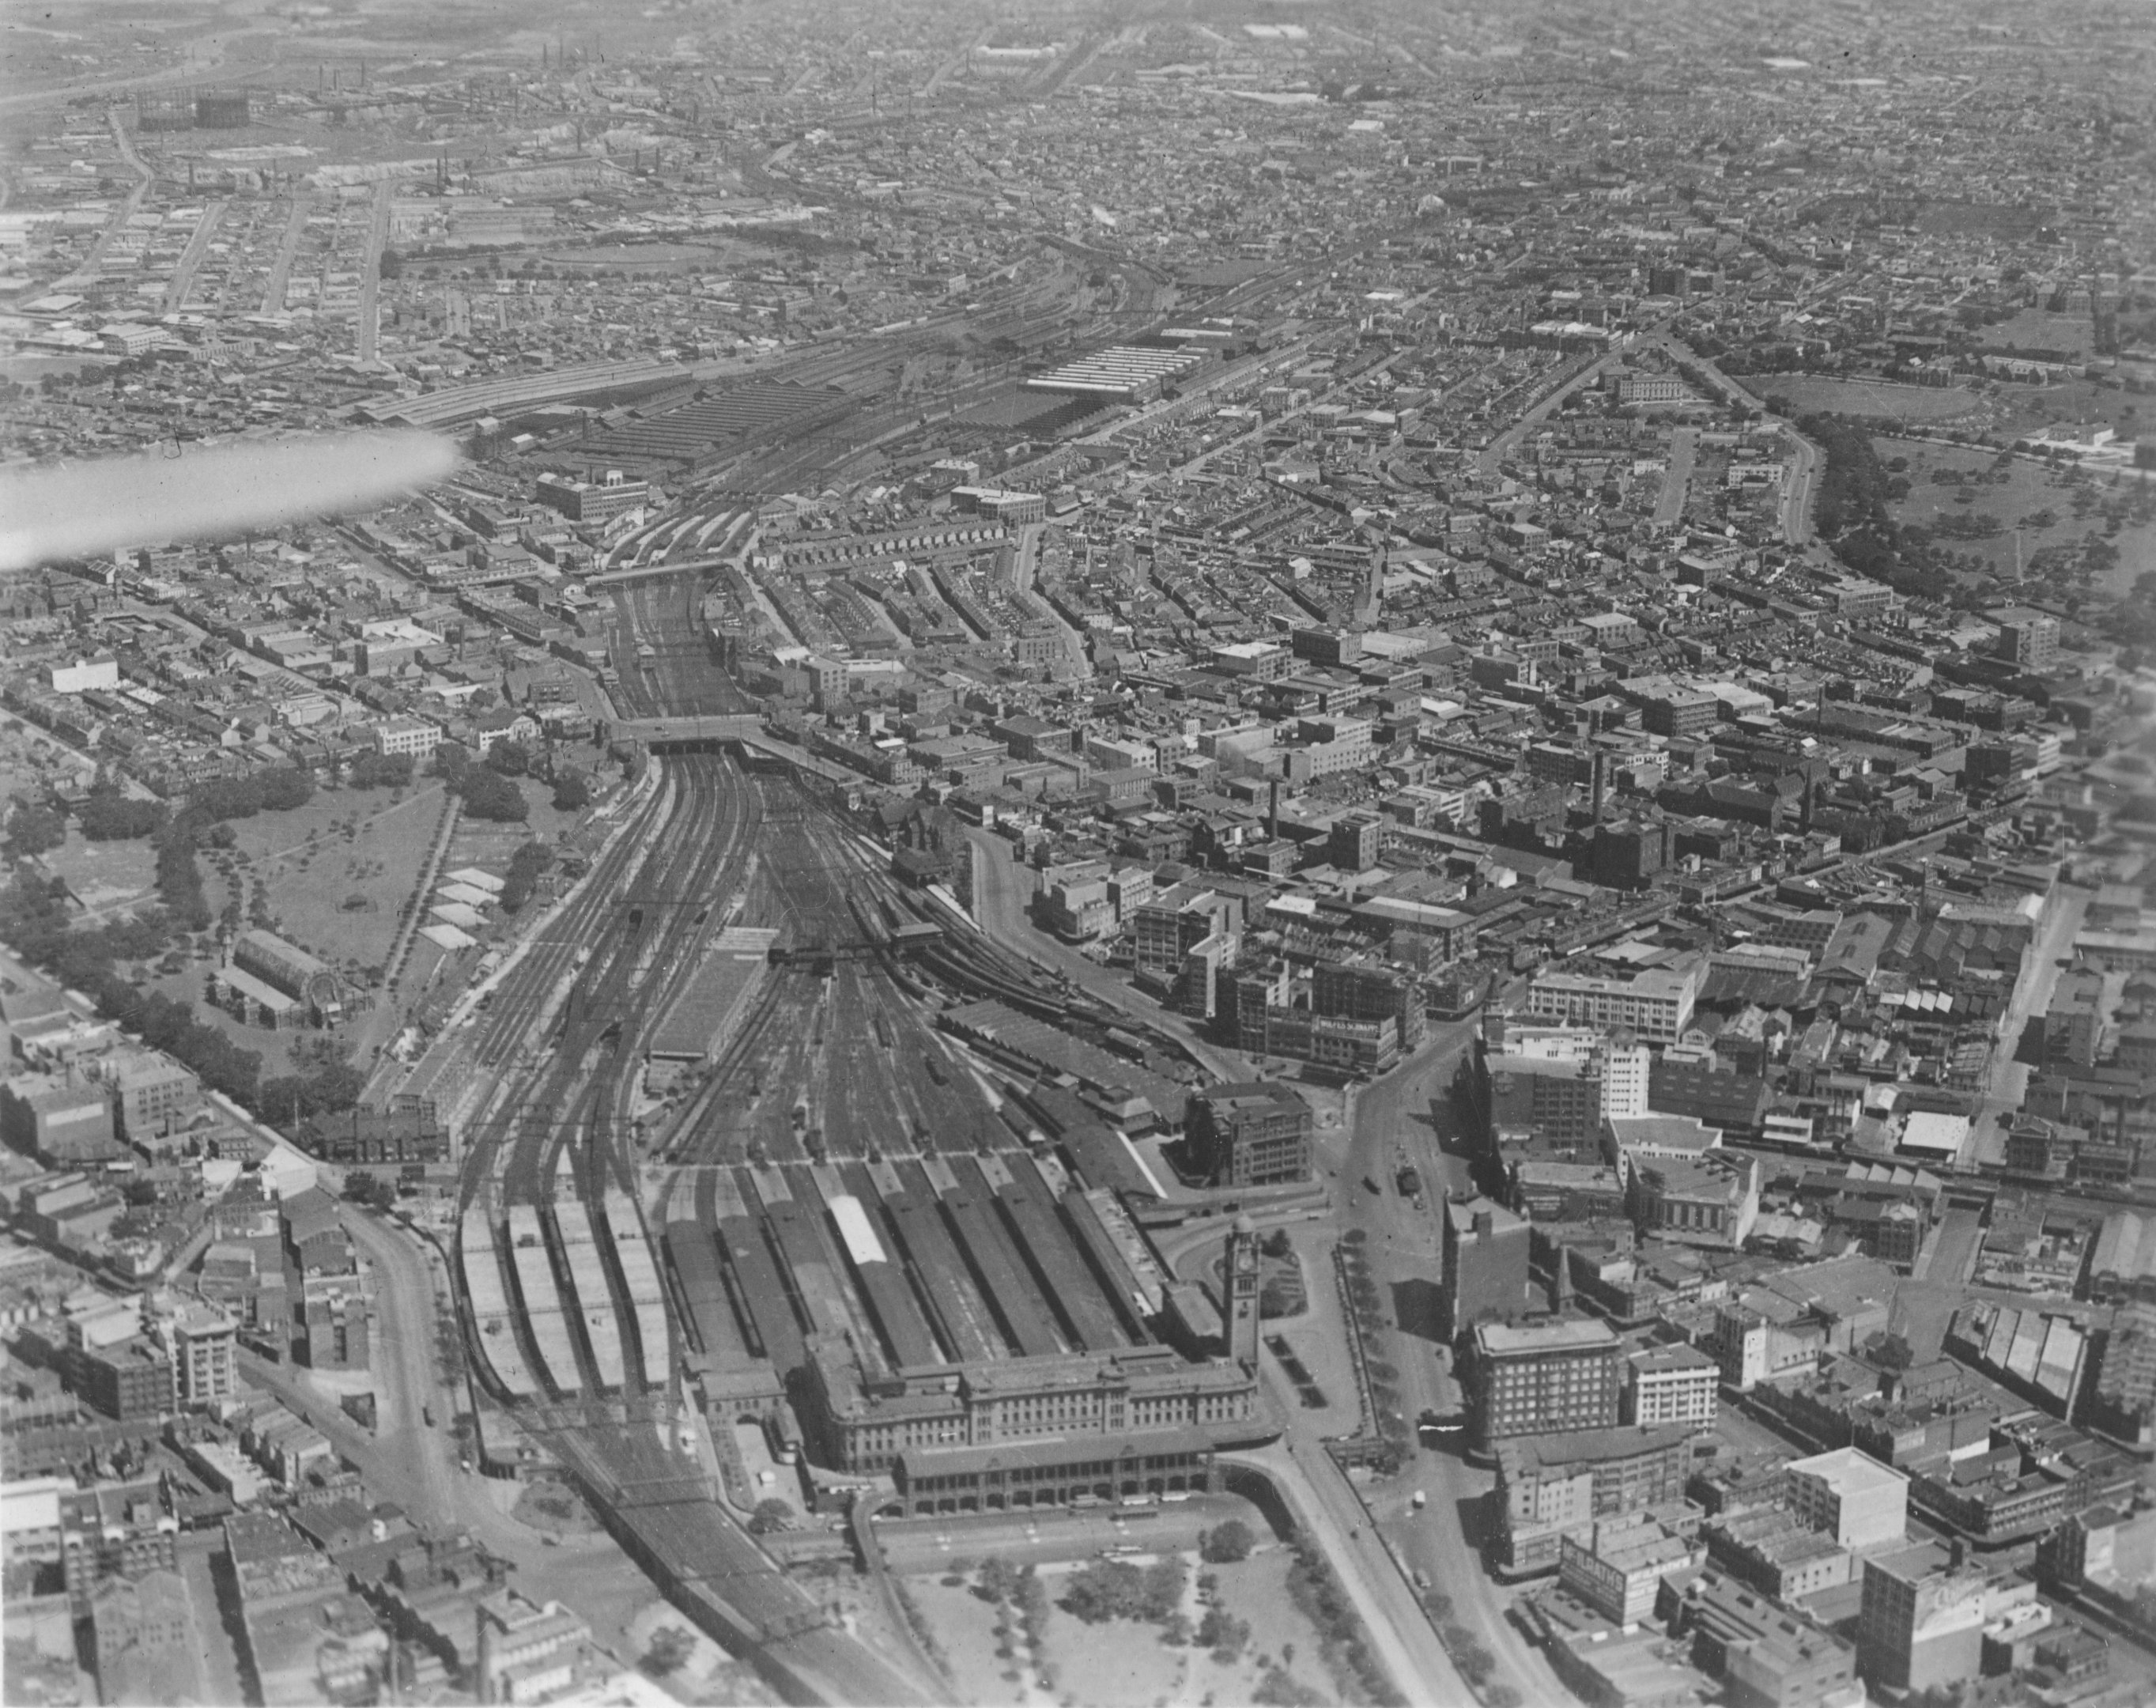