NSW Signal Box Photos
[Display as: Thumbnails
Order by: Year]
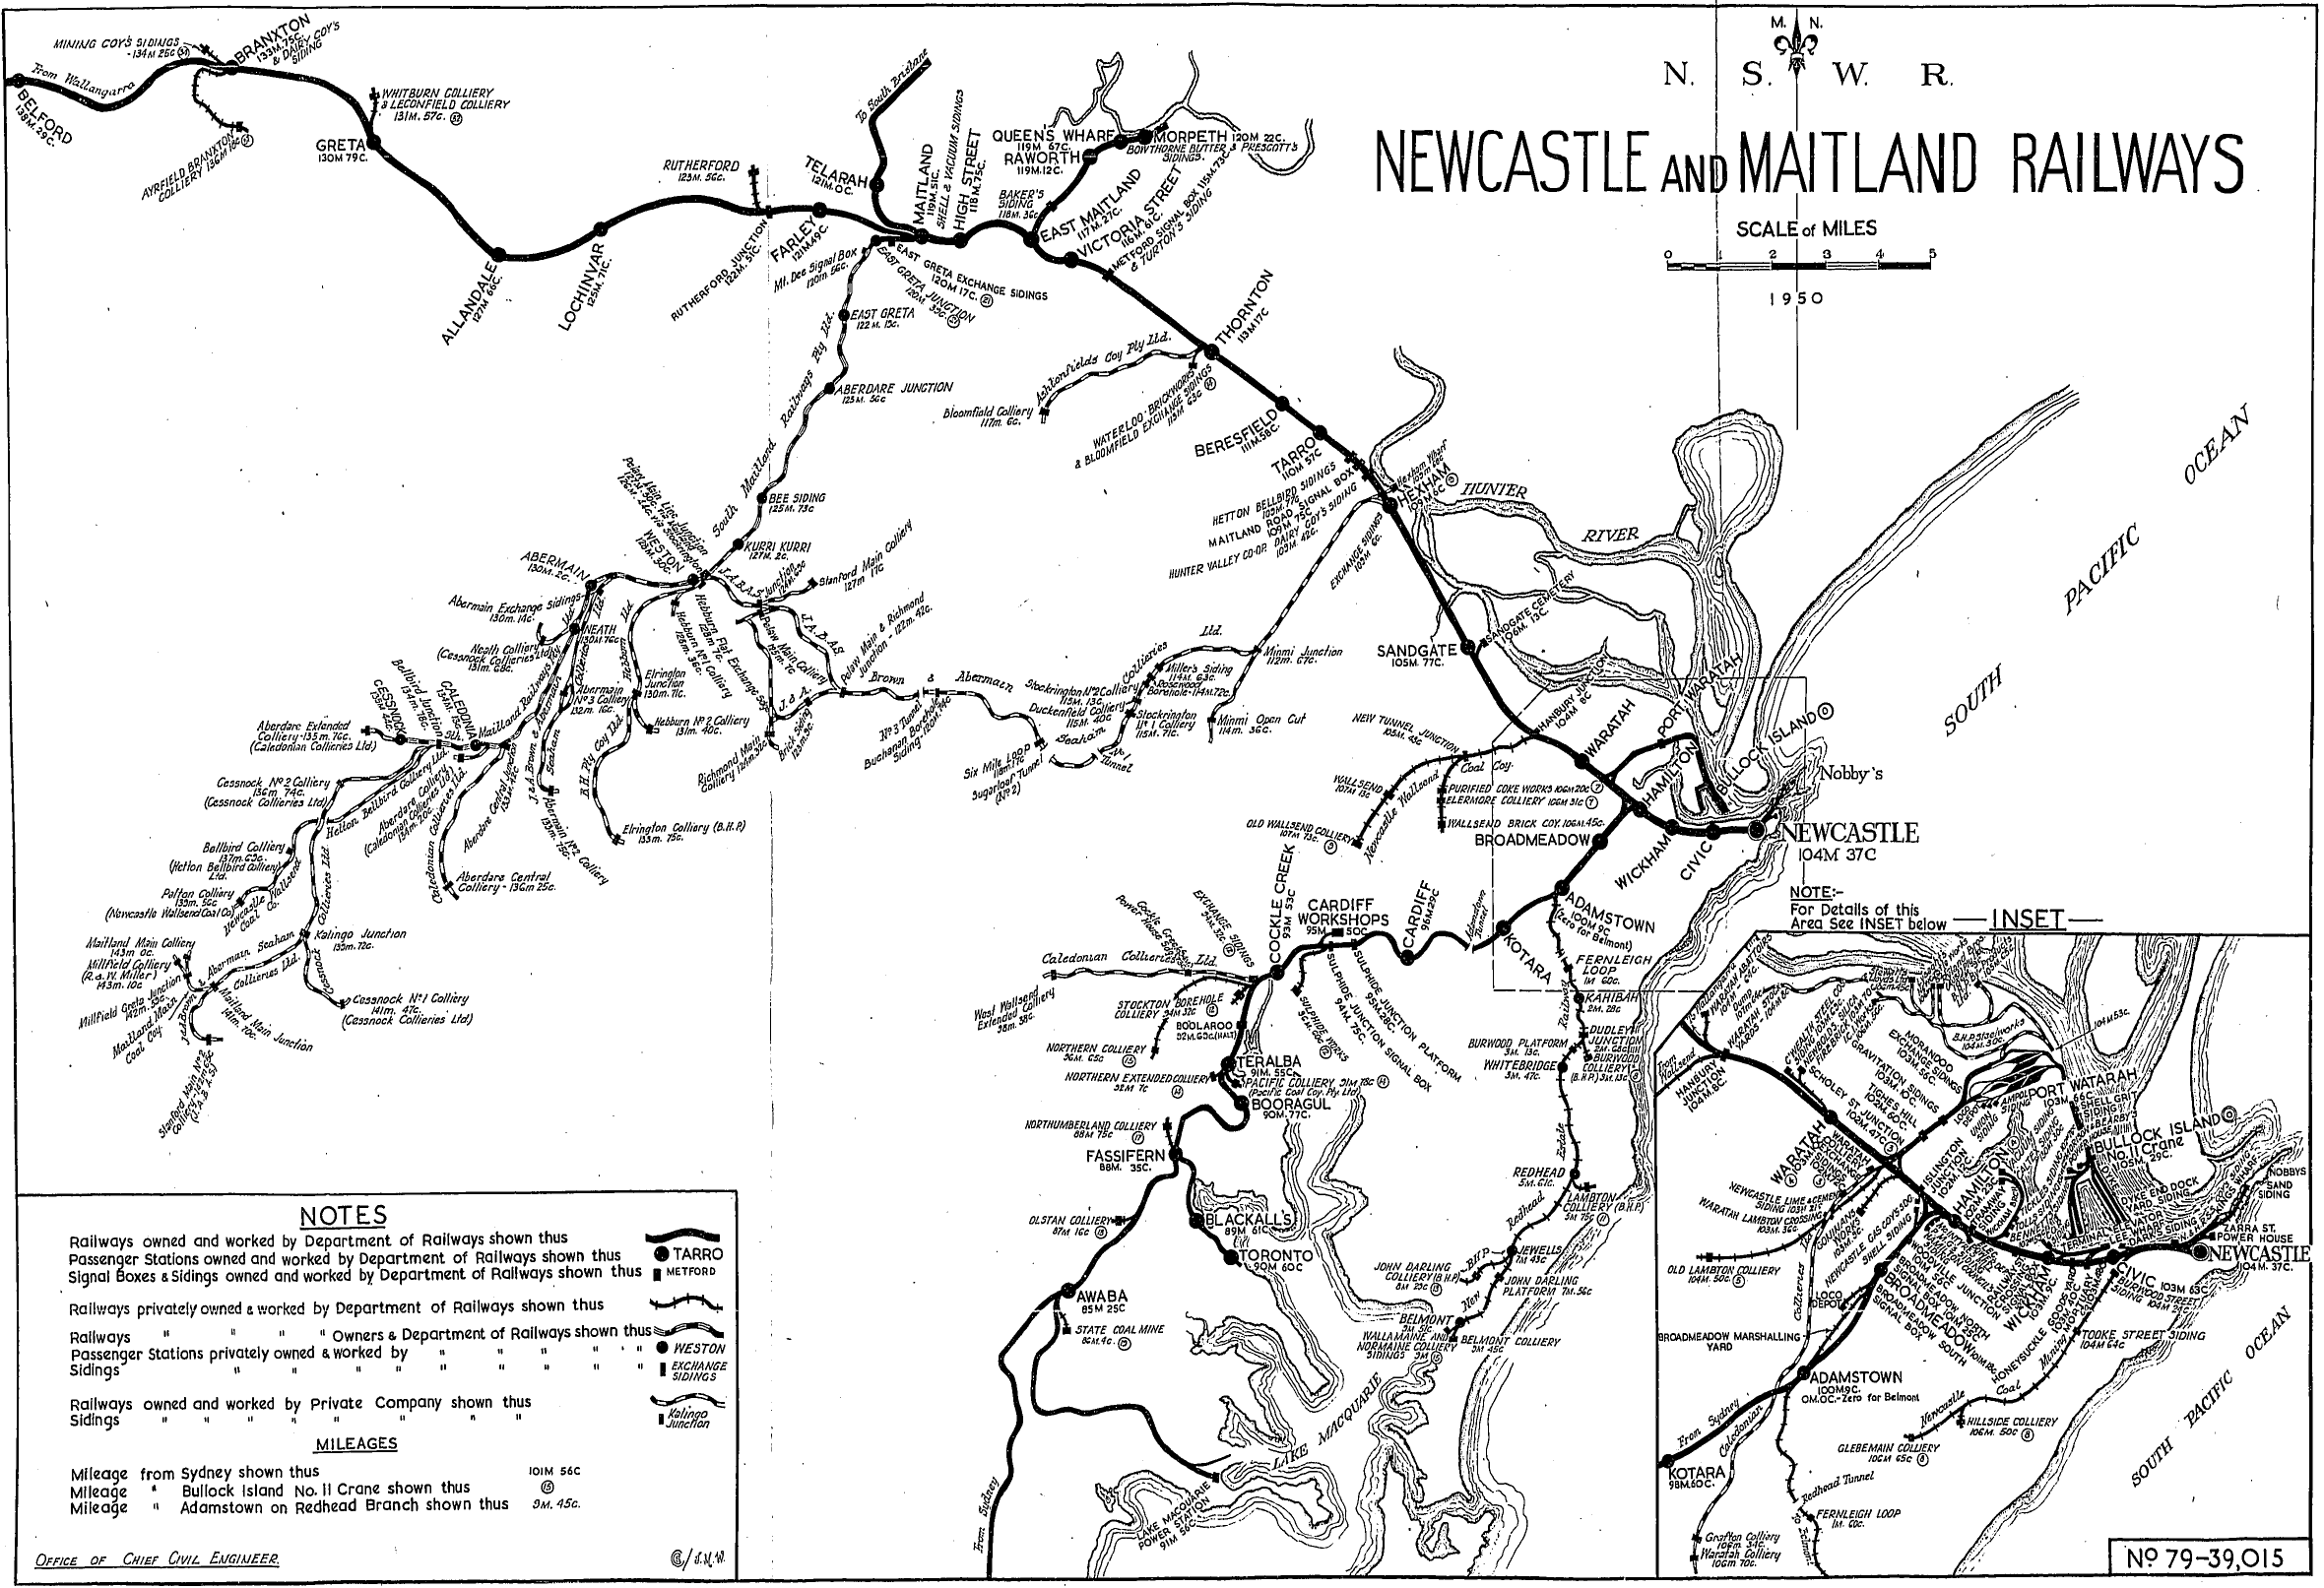
| Adamstown | 2003 | Adamstown signalbox, at the down end of the station. Now used by a model railway club. |
| Adamstown | 1984 | Adamstown Box served the junction to the Belmont line, seen here in pre-electrification days. |
| Albury | 1980 | Albury Station Signal Box. |
| Albury | 1972 | A pair of 44 class locos wait to be detached from a southbound goods train outside South Box. The VR X class loco on the adjacent track will take the train the rest of the way to Melbourne. |
| Albury | 1972 | A shot looking north of Albury Station Box. |
| Albury | 2004 | The view looking north towards Albury Station Signal Box. |
| Barmedman | 2009 | The small lever frame inside the staff hut. |
| Bathurst | 2001 | The signal box on the Sydney end of the up platform. |
| Bathurst | 2007 | The view looking along the up platform towards the signal box. |
| Ben Bullen | 1986 | A shot of Ben Bullen with the signal box and semaphore signals still present. |
| Berrima Junction | 2007 | The view looking west towards the Berrima Junction signal box. |
| Berrima Junction | 1980 | Berrima Junction diagram and block instruments. |
| Berry | 1985 | Berry frame and diagram in 1985. |
| Binalong | 2002 | The lever frame inside the signal box. |
| Binalong | 2002 | Another view of the disused lever frame. |
| Binalong | 2002 | The view of the signal box at the end of the station building. |
| Blacktown | 1991 | The interior of Blacktown Signal Box. |
| Branxton | 2009 | The interior of the signal box on the platform. At the left are the passing loops at Belford, while on the right is Branxton station. |
| Brickworks | 1981 | The Brickworks Signal Box 3 years before this section was closed. |
| Broadmeadow | 1986 | Broadmeadow North Box situated on the north end of the main platform. |
| Broadmeadow | 1986 | Broadmeadow North Frame taken from the top of the spiral stairway. |
| Broadmeadow | 1986 | If you look closely you can see 3 signal boxes, Broadmeadow South in the foreground, Broadmeadow North mid shot and Woodville Junction in the distance. |
| Broadmeadow | 1986 | Broadmeadow South Box |
| Broadmeadow | 1986 | Broadmeadow South frame from the stairs. |
| Bulli | 2004 | The Signal levers where found in the long grass beside the railway station and have been remounted and restored by the local museum that now occupies the old timber station. |
| Bulli | 1987 | The signal box controlling access to the Bulli Coal Siding. |
| Caledonia | 2001 | The signal box at the up end is boarded up, and completely stripped inside. |
| Canberra | 1985 | The nation's capital could not even boast a full signal box, just a Frame A. Here 42219 in 1985 stands ready to head a Sydney passenger train. |
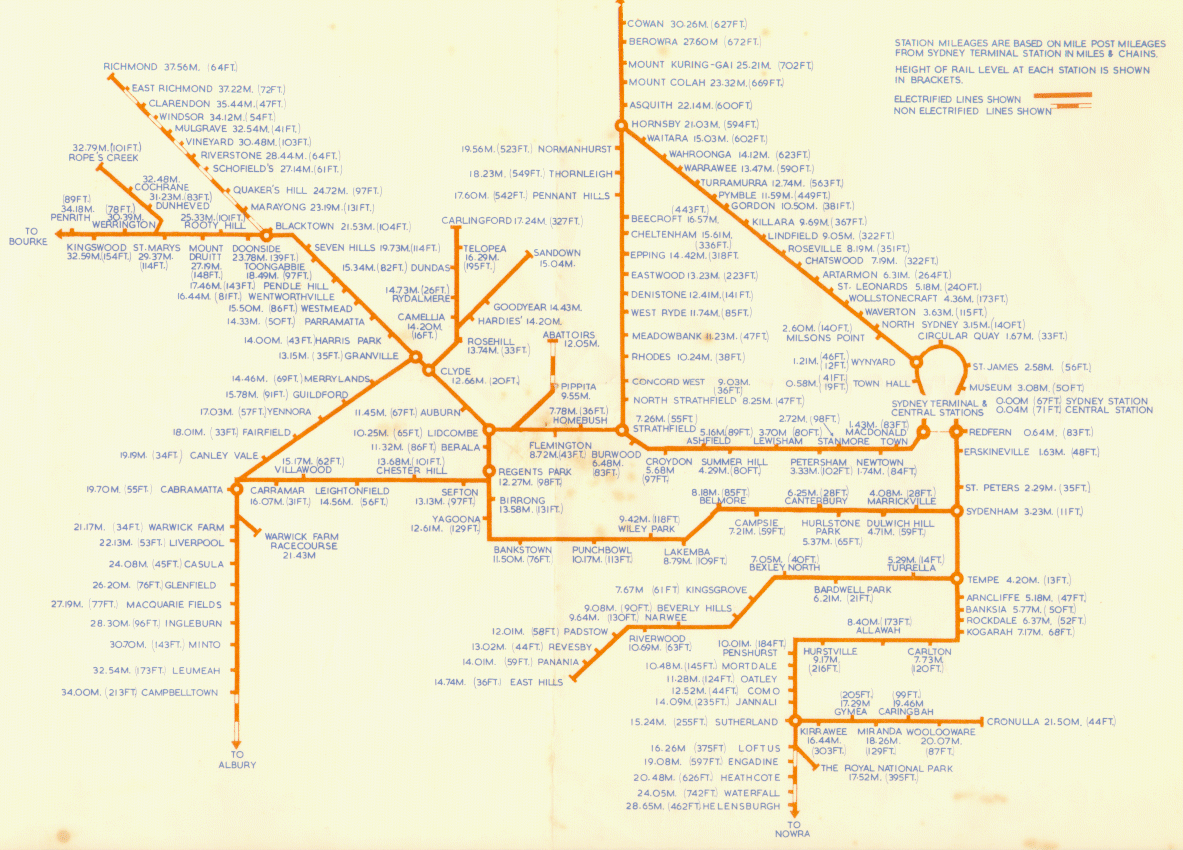
| Central | 1970 | A signalman posing in the Sydney West signal box. |
| Central | 1970 | The signal diagram for the Wells Street signal box. |
| Central | 1970 | A close-up view of the minature points levers in the Wells Street box. |
| Central | 1970 | The Wells Street signal box, looking in the direction towards Redfern. |
| Central | 1970 | The Wells Street signal box, looking towards Central. |
| Central | 1970 | Sydney West Box, looking towards Darling Harbour. |
| Central | 1978 | The monolithic pistol grip Sydney West Box interior taken a week before its closure in 1978. |
| Central | 1978 | One of the diagrams in Sydney West signal box. This one shows platforms 1 - 4, the main long distance and inter-state platforms. |
| Cessnock | 1975 | The signal box, before demolition has started. |
| Chatswood | 2004 | A close-up of the track diagram. |
| Chatswood | 2004 | A close-up of the level frame in the signal box on the main platform. |
| Coal Cliff | 1987 | The signal box on the up side of the line. |
| Concord West | 2000 | A view of the interior of the old signal box. |
| Coolalie | 1980 | All that remains of Coolalie in this 1980 photo was the abandoned signal box, which once stood on the down platform. The former Up Starting signal is on the left. |
| Coolamon | 2004 | The view looking towards Junee, showing the silos and signal box. |
| Cooma | 1989 | The signal diagrams inside the box at Cooma. |
| Cootamundra | 1980 | Cootamundra North Box frame. |
| Cootamundra | 1980 | The utilitarian Cootamundra North Box with the level crossing gates. |
| Cootamundra | 1980 | Cootamundra South Box with Rail Motor 27 headed north to Cootamundra Station from the Tumut line. |
| Cootamundra | 1980 | Cootamundra South Box and crossing gates. |
| Cootamundra West | 1986 | The signal box on the platform. |
| Cootamundra West | 2001 | The view looking east at the signal box, which is still in use. |
| Cootamundra West | 2005 | The interior of the signal box at Cootamundra West. |
| Cootamundra West | 2006 | The view looking south at the signal box. Note the gap under the platform for the now-removed rodding and cables. |
| Cootamundra West | 2006 | The entrance of the signal box, looking east. |
| Cootamundra West | unknown | The view looking east towards the signal box on the platform. |
| Cootamundra West | 1980 | The iron station sign and signal box still used 1980. |
| Curlewis | 2003 | The interior of the signal box. |
| Curlewis | 2003 | The staff instruments for the Breeza-Curlewis and Curlewis-Gunnedah sections. |
| Darling Harbour | 1984 | The view looking north-west over the Double Tier Goods Shed. This has now been replaced by the Novotel Hotel. The orange building in the centre is the Murray Street signal box. |
| Darling Harbour | 1979 | The lever frame for the Murray Street crossing. The gate wheels can be seen on each end of the frame |
| Darling Harbour | 1982 | Union Street Box controlled the entrance to Darling Island goods yard and the Pyrmont power station. |
| Darling Harbour | 1979 | Ultimo Signal Box contained 36-lever frame. The building was unfortunately destroyed by a fire on 11/3/1996. |
| Demondrille | 1980 | Always in the shadow of big brother, Demondrille South now stands decaying beside tracks overtaken with long grass in 1980. |
| Demondrille | 2002 | The view from the road bridge looking towards Cootamundra. The line to Cowra branches of the to right of the Demondrille North Signal Box. The station was a pair of island platforms on the main and branch lines just beyond the signal box. The overgrown line on the far right served a dock platform just beyond the box. |
| Demondrille | 2002 | The view of the North Signal Box, looking back towards Sydney. The lines in the foreground are the branch to Cowra and Blayney, with the Main South at the back. |
| Demondrille | 2004 | The interior of the North Box, showing the lever frame and safeworking instruments. |
| Demondrille | 2004 | The interior of the North Box, showing the lever frame and signalling telephones. |
| Demondrille | 2004 | A close-up view of the signalling instruments. |
| Demondrille | 2004 | A close-up view of the signalling telephones and log books. |
| Demondrille | 1980 | Demondrille North Box needs a coat of paint in this 1980 photo. |
| Demondrille | 1980 | The little-used Demondrille South Box in 1980. |
| Demondrille | 1980 | A view looking down to Albury where Demondrille North Box can be seen and also the two separated platforms, the one from the branch on the right. |
| Dubbo | 1982 | The interior of the signal box, with the lever frame and yard diagram. |
| Dunheved | unknown | The Main Signal Frame still stands on the Platform, as with the Men's urinal. |
| East Greta Junction | 2001 | The remaining trackwork at East Greta Junction. In the background, the line curves to the right where it meets the Main North line. The signal box is still in use. |
| East Hills | 1985 | East Hills Signal Box frame before the line was duplicated and extended to Glenfield and the box removed. |
| Emerald Hill | 2007 | A view of the interior of the signal box. |
| Enfield Yard | 1980 | Front view of the majestic Enfield North Box which was busy no matter what shift the signalman had. |
| Enfield Yard | 1984 | Enfield north box, with 4622 and another unidentified 46 loco. |
| Epping | 2003 | Epping Signal Box is nestled under the road overbridge at the southern end of the station. |
| Euabalong West | 2005 | The signal box is now vandalised and dilapidated. |
| Exeter | 1980 | A view of Exeter Signal Box, sitting on the up platform. |
| Fish River | 1980 | The remains of Fish River signal box. This used to sit on the platform which was demolished around it. |
| Flemington | 1982 | Flemington Car Sidings Box was a huge installation utilising pistol grips for the complex function of the car sidings. |
| Flemington | 1982 | Flemington Car Sidings signal box shows the array of pistol grips to control the complex sidings and main line. |
| Flemington Goods Junction | 1984 | The striker bells in Flemington Car Sidings Signal Box to notify of train coming. |
| Gilmore | 1999 | The island platform and signal box at Gilmore. |
| Glenbrook | 2005 | The lever frame in the old signal box. |
| Goobang Junction | 1990 | The former Goobang Junction West signal box. |
| Goulburn | 1979 | Goulburn North Signal Box was located adjacent to the Goldsmith Street level crossing. It was decommissioned in 1979, about a week after this photo was taken. |
| Goulburn | 1979 | Goulburn North frame in 1979 |
| Goulburn | 1979 | Goulburn Station Signal Box was located not far to the north of the station, on the up side of the line. It was decommissioned in 1979, about a week after this photo was taken. Behind the box is the large goods shed and platform. |
| Goulburn | 1979 | Interior of Goulburn Station box showing the lever frame. What was slightly unusual was the levers in the standard position stood straight up rather than the usual "lean". |
| Goulburn | 1979 | Goulburn Station Box diagram as it appeared 1 week before closing and decommissioning in 1979. |
| Goulburn | 1979 | Goulburn Loco Yard Box, which contained 20 levers and was able to be closed out when not required. |
| Gunnedah | 2007 | The interior of the station master's office, showing the staff machines for the next and previous sections. |
| Gunning | 1980 | Gunning Signal Box. |
| Hamilton | 2005 | The view looking west from the down end of the station. The track curving behind the signal box leads to the Mill Siding. The Endeavour set in the distance is just passing through Hamilton Junction. |
| Hamilton | 1987 | Majestic Hamilton Junction Box was situated just to the east of the fork on the Newcastle Branch, at the Beaumont Street crossing. This box controlled a number of industrial sidings in the area such as the McIntyre Mill. |
| Hamilton | 2005 | An elevated view looking west towards Hamilton Junction. |
| Harden | 2005 | The view looking north to Harden North Box. A wheat train has just left the Up Goods siding (left) heading towards Sydney. |
| Harden | 2007 | The view looking towards Sydney from the end of the platform. |
| Harden | 1980 | Harden North Signal Box as its southern sister stands majestically as a fine example of NSWGR architecture for the structures of safety. |
| Harden | 1980 | Sister to the North Box this impressive structure of Harden South Box needed some TLC in this 1980 shot. |
| Harefield | 1980 | While still on the timetable in 1980, Harefield had just had its new control panel put in and the station was being looked after. |
| Henty | 1980 | Henty Signal Box in need of repair and a paint job sits near the station sign which says "Change here for the Rand line". |
| Henty | 1980 | Henty Frame D sat on the up side of the line with its own small box. The lower quadrant signal on the very short pole to the left was for the branch and controlled from frame D. 42220, freshly painted, arrives from Sydney with a freight. |
| Hexham | 1986 | Hexham Box controlled the junction to the Richmond Vale railway. |
| Hexham | unknown | A closer view of the signal box, taken about a month before it was closed. |
| Hunter Valley Coal Loader | 2006 | The view looking up the line towards the Hunter Valley Coal Loader. In the foreground is the old Newdell Signal Box, that controlled the former sidings for the Liddell, Newdell and Durham Collieries. The lights in the foreground are loading lights for Liddell loading bin. |
| Hunter Valley Coal Loader | 2006 | A closer view of the old Newdell Signal Box, showing its dilapidated state and asbestos warning signs. |
| Illawarra Junction | 1960 | A view of the former elevated Illawarra Junction signal box. |
| Islington Junction | 2005 | A view of the utilitarian box controlling the junction. |
| Islington Junction | 2003 | Islington Signal Box. |
| Ivanhoe | 2005 | The sgnal box at the western end of the station. |
| Ivanhoe | 2005 | A view of the well-preserved station and signal box buildings. |
| Jerrawa | 2005 | The signal box stands where the island platform once resided. |
| Johns River | 1981 | The signal box on the platform. |
| Johns River | 1981 | The lever frame inside the signal box. |
| Joppa Junction | 1979 | The Joppa Junction Signal Box, taken a week before its closure. The line to Bombala curves away behind the box. |
| Kapooka | 1980 | The austere design of Kapooka Signal Box was compensated by it's pleasant surroundings. Kapooka box was in the country and was a well used crossing loop. |
| Kapooka | 1980 | Kapooka Signal Box sat off the main road and was rather an isolated box but was an important crossing point. This 1980 photo shows an automatic staff exchanger ready for an up train to Wagga. The staff was placed in the top ring for collection by the locomotive while the bottom "rams horn" took the staff from the Uranquinty section, all at speed. |
| Katoomba | 2005 | A view of the interior of the signal box. |
| Katoomba | 2005 | A view of the signal box looking west. |
| Katoomba | 2005 | A view of Katoomba Signal Box taken from Great Western Highway looking south at the station. The old goods shed can be seen behind on the left of photo. |
| Kerewong | 1982 | The signal box at Kerewong. |
| Kerewong | 1982 | The lever frame inside the signal box. |
| Kerewong | 1982 | A close up of the not-so-usual Guards Lever which locked a group of levers. |
| Lawson | 2004 | The lever frame and signal diagram in the old Lawson signal box. |
| Lawson | 2004 | A close-up of the signal diagram. |
| Lithgow | 2003 | A view of the Yard Box, looking west towards the station. |
| Loftus Junction | 1985 | The little-used Loftus Junction box served the junction with the The Royal National Park line. |
| Lysaghts | 1980 | Allan's Creek signal box was located between Lysaghts and Cringila on the Port Kembla branch. It controlled the lines to Lysaghts and AIS sidings. |
| Lysaghts | 1985 | 1985 sees life at Allan's creek situated between Lysaghts and Cringila this signal box controlled the siding to Commonwealth Steel. A very busy location. |
| Maitland | 2004 | The very-unusual elevated signal box at Maitland. |
| Maitland | 2006 | A view of the inside of Maitland signal box. |
| Maitland | 2006 | A view of the inside of Maitland signal box. |
| Maitland | 2006 | A view of the inside of Maitland signal box. |
| Maitland | 2006 | A night picture of Maitland Signal Box taken just before it was closed. It is now controlled from the ARTC building at Broadmeadow. |
| Maitland | 2006 | The front entrance of the Maitland Signal box. |
| Marulan | 2005 | The remains of the lever frame inside the former Marulan Signal Box. |
| Medway Junction | 1987 | Between Tallong and Marulan lies Medway Junction Signal Box which served the Medway Quarry Siding. 4422 heads a train on the Down Main. |
| Medway Junction | 1980 | Medway Junction Box. |
| Melinga | 1981 | Although the station closed to passengers in 1975 the signal box on the platform was still working in 1981. The view of the station is taken from the Sydney side looking north. |
| Menangle | 1985 | The Menangle Signal Box lever frame. |
| Merrylands | 1967 | The one time signal box at Merrylands. This was situated at the southern end of the up platform, directly adjacent to the Merrylands Road level crossing. |
| Merrylands | 1967 | The lever frame inside the signal box. |
| Mindaribba | 1977 | A view of the down side platform, with signal box at the Sydney end. Electric staff safeworking was still in use at the time of this photo. |
| Mittagong | 2001 | The Mittagong Signal Box is nestled under the footbridge at the northern end of the down platform. |
| Mittagong | 1980 | Mittagong Signal Box. |
| Mittagong Junction | 1980 | Mittaging Junction box was at the south end of the Picton-Mittagong loop line and was seldom used. |
| Molong | unknown | The signal diagram inside the signal box. |
| Molong | unknown | The lever frame inside the signal box. |
| Moree | 2007 | A close up view of the 12 lever frame in the Staff Hut. |
| Morisset | 2005 | The lever frame inside the signal box on the platform. |
| Moss Vale | 2001 | The elevated Signal Box with three 80 class locos, as seen from the up platform. |
| Mount Victoria | 2002 | The view looking across to the two-storey station building and signal box. |
| Mount Victoria | 2002 | A closer view of the signal box. |
| Mulgrave | 1977 | The signal box on the platform at Mulgrave station. |
| Murrurundi | 1983 | Murrurundi frame and diagram in 1983. |
| Muswellbrook | 2000 | The signal box at Muswellbrook. |
| Muswellbrook | 1986 | Muswellbrook Signal Box around 1986. The shunters humpy is visible on the left of the shot. |
| Muswellbrook | 1984 | A view of the inside of the signal box showing the control panel. |
| Narrabri | 2007 | The interior of the signal box, showing the yard diagram, lever frame, and the staff instrument, complete with anti-tamper clamp. |
| Neath | 1987 | Neath station was opened in 1908 and the 16 lever signal box is shown still with signals in the yard. The line in the left background led to the Neath Colliery. |
| Neath | 2001 | The view of Neath's down platform, showing the small toilet/storage block and the signal box, which controlled the Neath Colliery branch. This branch left the main line on the middle background, and crossed the road just behind the platform. |
| Newbridge | 2001 | The boarded up signal box is a relic of a time when Newbridge was a more important location. This is looking in the direction of Blayney. |
| Newcastle | 2003 | Newcastle Signal Box, located to the north of the station. |
| Newcastle | 2007 | The track diagram and minature lever panel inside the signal box. |
| Newcastle | 1985 | Market St level crossing controlled by Newcastle box, showing the gates open. When they closed they had a habit of bouncing. |
| Newcastle | 1985 | The Newcastle controlled Market St. gates shown down in this 1985 picture. This happened many times a day and traffic problems were frequent. |
| Newdell Junction | 1987 | The all-brick Newdell Junction Signal box which served Liddell and Newdell Colliery sidings as well as the State Coal Mine siding. |
| Newdell Junction | 1987 | The all-brick Newdell Junction Signal box which served Liddell and Newdell Colliery sidings as well as the State Coal Mine siding. |
| Newnes Junction | 2005 | The signal box still sees use when there is coal traffic from the Clarence Colliery. This is the view looking towards Sydney. |
| Newnes Junction | 2005 | The interior of the signal box showing the lever frame and signal diagram. |
| Newnes Junction | 2005 | Another view of the interior of the box. |
| North Strathfield | 1982 | A 44 class loco hauls the Newcastle Express (N21) past the 76-lever Strathfield North Signal Box. |
| Nyngan | 2006 | The interior of the signal box, showing the staff boxes, lever frame and yard diagram. The Nyngan-Cobar staff is missing, indicating that a train is in that section. |
| Orange | 2004 | The view looking towards Sydney of the Orange Signal Box, situated between the Loop Siding and Main Line. |
| Orange East Fork | 2007 | The view looking across to the East Fork signal box. |
| Otford | 2004 | The signal box from Otford has been re-assembled at Albion Park as part of the Illawarra Light Railway Museum. |
| Ourimbah | 2005 | The now-closed signal box on platform 2. |
| Pangela | 1976 | The staff is about to be exchanged with an up train at Pangela Signal Box in January 1976. |
| Parkes | 1978 | A view of Parkes looking to the west and the box in 1978. The signal box boasted 55 levers and 24 Kellogg Keys. |
| Parkes | 2004 | The signal box and level crossing at the down end of the yard. |
| Parramatta | 1980 | Parramatta Signal Box, a 56-lever box with Kellogg Keys. |
| Parramatta Road Crossing | 2004 | A close-up of the signal box which controls the level crossing. |
| Parramatta Road Crossing | 1984 | Parramatta Road Signal Box controls the level crossing with the busy main road. The line often featured shortened trains due to lack of available power on the line. The two car set is about to cross the road and terminate at Clyde station. Note also the spare booms arms - the booms at this crossing have a short lifespan due to inattentive car drivers! |
| Parramatta Road Crossing | 1984 | The interior of Parramatta Road Crossing Box, taken in 1984. |
| Penrith | 2005 | A view of the all-brick Penrith Signal Box taken looking west. |
| Penrith | 1988 | 3801 and 4472 Flying Scotsman at Penrith during the 1988 bi-centennial. Taken from the western end looking east toward Sydney with the signal box at the back. |
| Petersham | 1988 | The frame itself reveals an unusual design for the mini levers with the release being a plunger on top of the lever. |
| Petersham | 1988 | The frame itself reveals an unusual design for the mini levers with the release being a plunger on top of the lever. |
| Picton | 1982 | Picton Signal box, with 48 levers and 1 mini lever. |
| Picton | 2001 | A more recent shot of the signal box at Picton. |
| Port Kembla | 1987 | The brick Port Kembla signal box. |
| Port Kembla | 1987 | The diagram inside Port Kembla signal box. The diagram shows the balloon loop and nearby siding entrances. The box used a rotary switch panel. |
| Port Kembla North | 1987 | Port Kembla North signal box was a busy location using levers. In front of the box is an Lysaght locomotive shunting the sidings. |
| Port Kembla North | 1987 | Port Kembla Sidings North Box. |
| Queanbeyan | 2006 | The view looking down the line beyond the station. The small cabin encloses the F Frame. The signals control the former main line to Bombala (left) and the branch line to Canberra (right). On the far right is the remains of the stock loading platform. |
| Queanbeyan | 2006 | A side-on view of the F Frame signal box, with the gangers shed behind. |
| Queanbeyan | 1989 | A closer view of the F frame signal box. |
| Regents Park | 1981 | The very rarely used Regents Park Junction Box. |
| Riverstone | 2005 | A copy of a photo of the exterior of the Signal Box at Riverstone taken in 1989. The original is in a frame in the Station Master's office at Riverstone. |
| Riverstone | 2005 | The signal box at Riverstone. Riverstone and all of the Richmond line is controlled by the signal box at Blacktown. This signal box at Riverstone is now operated part time as required by the station staff. |
| Riverstone | 2005 | A copy of a photo showing the old levers inside the box. The original of this photo is hanging in the SM's office at Riverstone. |
| Robertson | 2002 | The signal box on the platform. |
| Robertson | 2007 | Inside the Roberston control room showing the control panel. The loop and points at Roberston are normally controlled from Wollongong but this panel can be used to take control if necessary. |
| Rooty Hill | 2005 | A view of the western end of Rooty Hill Station. Curved end of building was once a signal box but is now used as the SM's office and staff facilities. |
| Rosehill | 1992 | Another view of the signal box. |
| Rosehill | 1981 | The Rosehill block instruments. |
| Rosehill | 1992 | The platform-mounted Rosehill signal box (now demolished), looking towards Camellia. |
| Rosehill | 1992 | The view of the signal box, looking towards Clyde. |
| Rosehill | 1981 | The interior of Rosehill Box. |
| Rosehill | 1982 | 4904 4915 head up from the Sandown branch with a load of oil tankers past Rosehill (Racecourse) station. Rosehill Signal Box was "switched out" most of the time and usually only used on race days. |
| Rydal | 2002 | The signal box on the down platform. |
| Rydal | 2004 | The mostly-gutted signal box still contains a 12-lever frame. |
| Rylstone | 2005 | A view looking down the platform at the signal box and station building. |
| Sandown | 1992 | Sandown signal box, looking towards the end of the line, one part of which curves away to the left behind the signal box towards the Parramatta River. The other siding runs into the Shell Refinery. The Boral Plasterboard factory is in the background on the right. |
| Sandown | 1992 | Sandown signal box, before it was demolished. |
| Scarborough | 1980 | Scarborough Signal Box. |
| Scarborough | 1982 | The view looking aouth, at the southern end of the station. On the left is the signal box and former dock siding. Behind the locomotive can be seen the yard and South Clifton Colliery sidings. |
| Sefton Park South Junction | 2004 | The diagram and points levers inside Sefton Park Junction signal box. |
| Singleton | 2004 | |
| Springwood | 2005 | The signal box board in Springwood signal box. |
| St Heliers | 1986 | St Heliers Signal Box on was situated between Grasstree and Muswellbrook. This 52 lever box served the junction to the Muswellbrook No.2 Colliery Branch. The utilitarian design of the box was destroyed by a runaway train on August 28th, 1987. |
| St Heliers | 1986 | The interior of the St Heliers Signal Box. |
| St Marys | 2005 | The view looking east of St Marys signal box, at the western end of the station. |
| Stockinbingal | 2003 | The 25 lever frame inside the signal box. |
| Sulphide Junction | 1981 | A goods train headed by 4474 and 4851 is about to exchange staffs outside the Sulphide Junction signal box. The train appears to be running "wrong road" on the Down Main. |
| Sydenham | 1984 | Interior of Sydenham Box showing the 70 mini lever frame although at the time of the photo only the first 59 were in use, all the rest were "spare" or missing and the plates as well. |
| Tamworth | 2005 | The lever frame inside the signal box. |
| Tamworth | 2008 | The dis-used signal box has been modified to publically display the lever frame , and has other small railway items on display within. |
| Tarago | 2006 | The Countrylink nameboard and signal box at the Canberra end of the platform. |
| Taree | 1987 | Taree North Box |
| Taree | 1987 | Taree South Box. |
| Telegraph Point | 1982 | The lever frame inside the signal box. |
| Temora | 2004 | The lever frame in the signal box. |
| Temora | 2004 | Another view inside the signal box. |
| Temora | 2004 | A close-up of the safeworking instruments behind the lever frame. |
| Temora | 2004 | The emergency fog equipment in the signal box. |
| Temora | 2004 | The exterior of the signal box. |
| The Rock | 1980 | The Rock Signal Box was a classic example of a NSWGR Signal Box down to the ubiquitous finials. |
| The Royal National Park | 2001 | The signal box at the terminus station, now repainted in a rather unusual colour scheme. |
| The Royal National Park | 2005 | A closer view of the old signal box just on the western end of the station. |
| Thirlmere | 2003 | The view looking across towards the station and signal box. |
| Thirroul | 1986 | Thirroul Signal Box had a tremendous view of the ranges and a decent size yard to look after. |
| Thirroul | 1986 | Thirroul Signal Box had a tremendous view of the ranges and a decent size yard to look after. |
| Thornleigh | 1978 | View of the 16 lever frame at Thornleigh Signal box. |
| Towrang | 2005 | A close-up of the signal box. |
| Towrang | 2005 | The view looking down the line. The one-time station was located where the dirt bank lies. |
| Towrang | 2005 | The now disused Towrang Signal Box. The levers, windows and even name plate have been removed less than a month since it was taken out of use. The box was taken out of use when the Upper Quadrant signalling was replaced with LED Colour Lights (28/29 May 2005). The siding, ground frame and crossover still remain. The view is looking towards Sydney. |
| Towrang | 1980 | The original Towrang Signal Box on the truncated platform in 1980. |
| Urana | 1980 | The diagram in the signal box. |
| Valley Heights | 2005 | A photo of a photocopied photo which shows the old Valley Heights Signal Box. The writing and call numbers and description on side of photocopy are unreadable but it appears to have come from either State Records or ARHS. Handwriting below photocopy reads, "Before it burnt down". This photocopy was until recently on the wall of the waiting room at Valley Heights station. Along with another shot of the box there are 2 others which are very bad photocopies showing the elevated coal road and Valley Heights depot dated in handwriting 1959. These were taken down when the station waiting room was painted. |
| Valley Heights | 2005 | A view looking down through the overhead wires at what is left of the once 3 storey signal box beside the Down refuge loop and sidings at Valley Heights. |
| Valley Heights | 2005 | The one-time 3 storey signal box beside the Down refuge loop and sidings at Valley Heights. |
| Wagga Wagga | 1980 | The Signal Box in 1980. |
| Walcha Road | 2005 | The frame inside the staff hut. Only three of the levers are still in use. |
| Wallendbeen | 2005 | The view looking down to the up platform. The centre building is the former signal box. |
| Wallerawang | 2002 | The now abandoned Wallerawang West Signal Box. |
| Wallerawang | 2002 | The 50-lever frame is still present inside the Wallerawang West box, although everything else (including the connections) have been removed. |
| Wallerawang | 2004 | The view looking west towards the old Wallerawang West signal box and the junction of the line to Gwabegar. The siding is now used for per-way storage. The area to the right of the main line was once the site of extensive loco service facilities include ash and inspection pits, a water tank, coal stage and a 60' turntable. |
| Wallerawang | 2004 | The view looking along the platforms in the direction of Sydney. The former Wallerawang East Signal Box is visible on the down platform. |
| Wallerawang | 2005 | A closer view of the elevated Wallerawang East Signal Box. |
| Wallerawang | 2005 | The current view of the West Box, with a somewhat ironic sign. |
| Warabrook | 2006 | An outside view of Hanbury Junction Signal Box. |
| Warabrook | 2006 | A view of a track indicator panel in the Hanbury Junction signal box. |
| Warabrook | 2006 | A view of the signaller's desk in the Hanbury Junction signal box. |
| Warabrook | 2006 | A closer view of the signal diagram in Hanbury Junction signal box. |
| Warabrook | 2006 | A closer view of the signal diagram in Hanbury Junction signal box. |
| Warabrook | 2006 | A closer view of the signal diagram in Hanbury Junction signal box. |
| Warabrook | 2006 | A closer view of the signal diagram in Hanbury Junction signal box. |
| Warabrook | 2007 | A night view of the Hanbury Junction signal box. |
| Warwick Farm Junction | 1983 | The one-time Warwick Farm Junction Signal Box. This sat on the down side of the line, just before the down-side facing junction. |
| Warwick Farm Junction | 1985 | 1985 still saw mid week race trains to Warwick farm Racecourse. Here is a race train coming from the Racecourse Branch onto the up line to head to Sydney Central. |
| Warwick Farm Racecourse | 1980 | The Warwick Farm Racecourse Signal Box sat opposite the up end of the the platform. The tracks from left to right are the dead-end Car Siding, the crossover from the Run Around Siding and the Platform Road. |
| Warwick Farm Racecourse | 1986 | A mid-week Warwick Farm single deck racetrain approaches the grassy platform in 1986. The Signal Box only used on race days and contained 20 levers. Lever 17 had the key for Frame B which controlled the points for the horse dock siding. |
| Werris Creek | 2005 | The electric staff machine inside the signal box. |
| Werris Creek | 2005 | The staff for the short section south to Werris Creek South Box. |
| Werris Creek | 2005 | A closer view of the lever frame inside the signal box. |
| West Ryde | 1979 | West Ryde Signal box on the south end of the down platform. Behind and below the box is the Victoria Road underbridge. |
| West Tamworth | 2004 | The inside the signal box at West Tamworth. |
| Weston | 2001 | The signal box about 100m to the east of Weston Station. This controlled the branch to Pelaw Main and the sidings to nearby Hebburn No 1 Colliery. Just visible in the grass is the remains of the line which branched off to Pelaw Main and the Richmond Vale Railway system. |
| Weston | 2003 | The signal box has been destroyed by fire. |
| Weston | 2003 | The steps up to the now burnt out box. |
| Weston | 2003 | The disconnected rodding and debris from the fire. |
| Weston | 2001 | The interior of the signal box is mostly gutted, although the 34 arm lever frame is still present. |
| Weston | 2004 | Another view of the lever frame. |
| Weston | 2001 | The view underneath the lever frame reveals that all has been disconnected. |
| Weston | 2003 | The approach to Weston signal box, looking towards Maitland. |
| Wickham | 2004 | Wickham Signal Box. |
| Wickham | 2004 | Another view of Wickham signal box. |
| Wingen | 1979 | The automatic staff exchanger has been set up ready for the approaching south-bound train. |
| Wingen | 1977 | Wingen Signal box, on the down side of the line. |
| Wolli Creek | 1981 | The interior of Wolli Creek signal box, showing the levers and track diagram. |
| Wolli Creek | 1985 | Wolli Creek Junction Signal Box served the junction of the Illawarra and East Hills lines, and now the Airport Line. This contained pistol grip controls. |
| Wollongong | 2000 | The large signal control room at Wollongong. |
| Woodville Junction | 2003 | Woodville Junction signal box, hidden under the Donald Street Bridge at Hamilton. The actual junction is about 300-400 metres to the right of the signal box. |
| Woodville Junction | 2003 | Woodville Junction signal box, hidden under the Donald Street Bridge at Hamilton. The actual junction is about 300-400 metres to the right of the signal box. |
| Woodville Junction | 2006 | Woodville Junction Signal Box sits beneath Donald Street bridge and is completely invisible from the roadway above. The junction is visible in the background: straight ahead the line curves to the right to Hamilton and Newcastle, with a turnout to the left towards Islington Junction and further on to Maitland. |
| Woodville Junction | 2006 | Woodville Junction Signal Box sits beneath Donald Street bridge and is completely invisible from the roadway above. The junction is visible in the background: straight ahead the line curves to the right to Hamilton and Newcastle, with a turnout to the left towards Islington Junction and further on to Maitland. |
| Woodville Junction | 1986 | Woodville Junction Box, located underneath Donald Street overpass. |
| Woodville Junction | 1986 | Woodville Junction Box, located underneath Donald Street overpass. |
| Yass Junction | 1998 | The elevated signal box at the up end of Yass Junction station. The line in the foreground is the one-time branch to Yass Town. |
| Yass Junction | 1980 | Yass Junction Signal Box in happier times showing the signal from the Yass Tramway to the goods siding which was pulled by lever 12. |
| Yerrinbool | 1990 | A view of the signal box on the up platform. |
| Zig Zag | 2005 | The Zig Zag signal box now used on the tourist railway, viewed from the main line. |